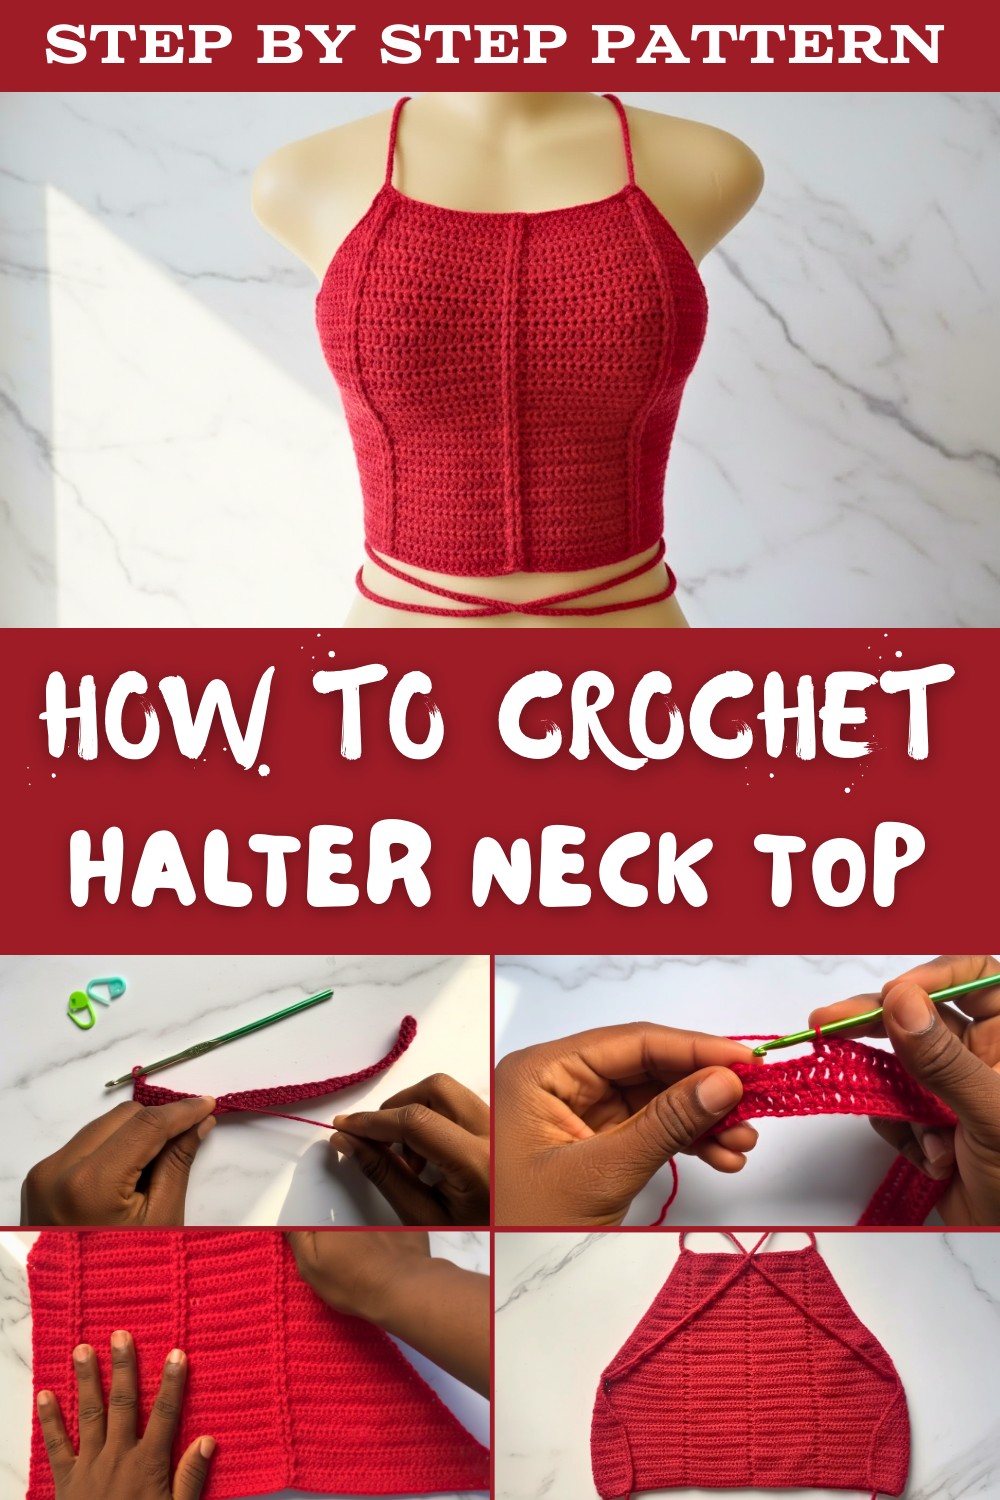
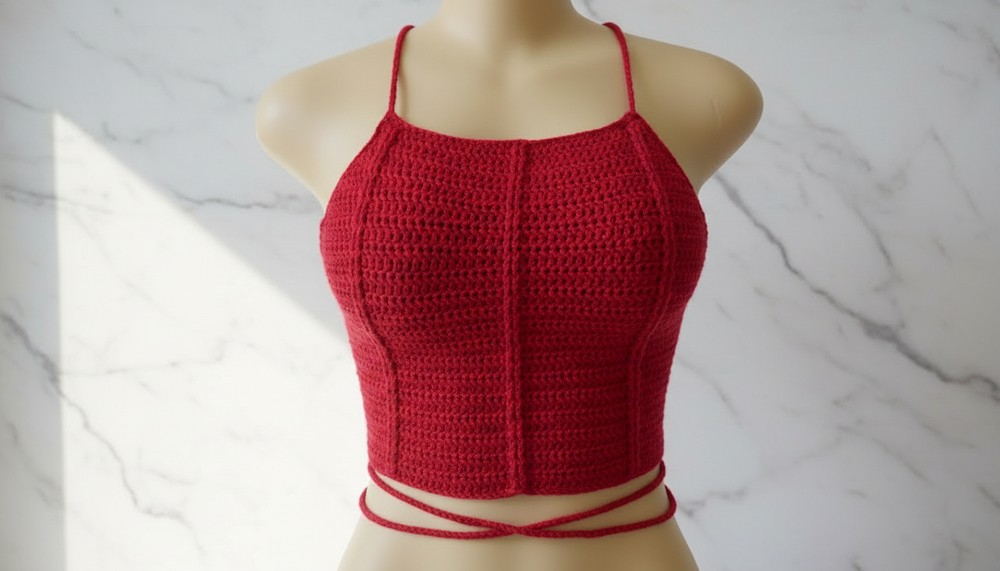
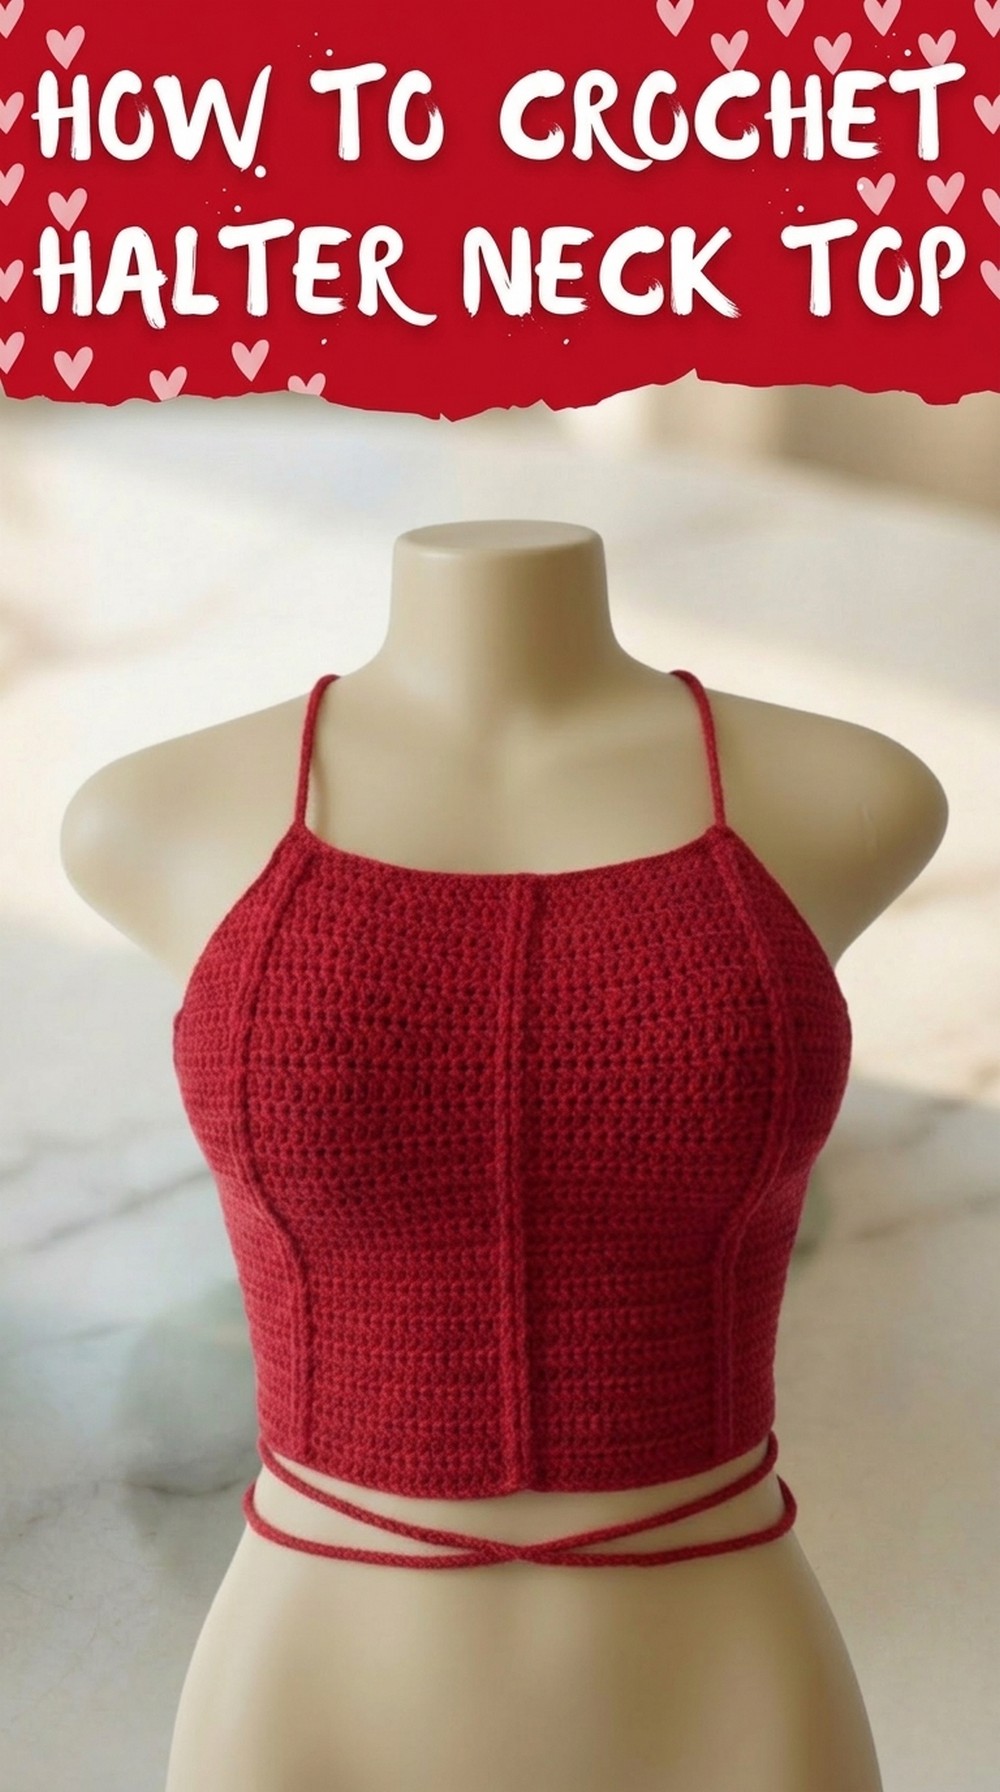
Quick Free Crochet Halter Neck Top Pattern for Fashion Lovers
Create your own stylish summer essential with this free crochet halter neck top pattern that is for beginners and customizable for any occasion.
Summer fashion is all about lightweight, breezy outfits that keep you cool and stylish, and there's nothing more perfect than crocheting your own halter neck top. Whether you're heading to a beach day, a backyard picnic, or a casual coffee run, a free crochet halter neck top pattern lets you create a versatile and trendy piece that's perfect for warm weather.
Free Crochet Halter Top Pattern That's Perfect for Summer
Featuring open, breathable stitches and soft yarn, this top is great for layering over swimsuits or pairing with high-waisted shorts for a chic yet effortless look. Crocheting your own halter top gives you the freedom to customize the fit, color, and design. It's beginner-friendly and a quick project, making it ideal for crocheters of all skill levels. With endless styling options, this pattern is a practical addition to your wardrobe and the ultimate summer staple.
Step-by-Step Crochet Halter Neck Top Pattern
This detailed pattern guides you through creating a stylish corset-style top that features front post double crochet stitch accents and a lace-up back. The top is made to fit around the collarbone and can be customized to various sizes.
Finished Measurements
- Width: Adjusted to measure around the collarbone (approximately 8 inches in this example).
- Length: Adjustable to desired fit with this example reaching approximately 11 inches.
Gauge
- Double Crochet (dc): Approximately 10 stitches = 4 inches, using a 4.0 mm hook.
Materials
- Yarn:
- Weight: Light Weight / DK Yarn (Category 3)
- Suggested: 100% acrylic yarn
- Hook:
- 4.0 mm crochet hook
- Additional Tools:
- Tape Measure (for accurate sizing).
- Stitch Marker(s): To mark the center point and track stitches.
- Scissors.
- Yarn Needle: For weaving in ends.
Skill Level
Intermediate - Familiarity with double crochet stitches, front post double crochets, working in rows, and basic decreases required.
Key Abbreviations (US Terminology)
- ch: Chain
- st(s): Stitch(es)
- dc: Double Crochet
- fpdc: Front Post Double Crochet
- sc: Single Crochet
- sl st: Slip Stitch
- yo: Yarn Over
Special Techniques
- Front Post Double Crochet (fpdc): Creates a raised stitch for texture (instructions included).
- Half Treble Decrease: Used to shape the sides of the top for a snug fit when transitioning from increases to straight rows.
Pattern Instructions
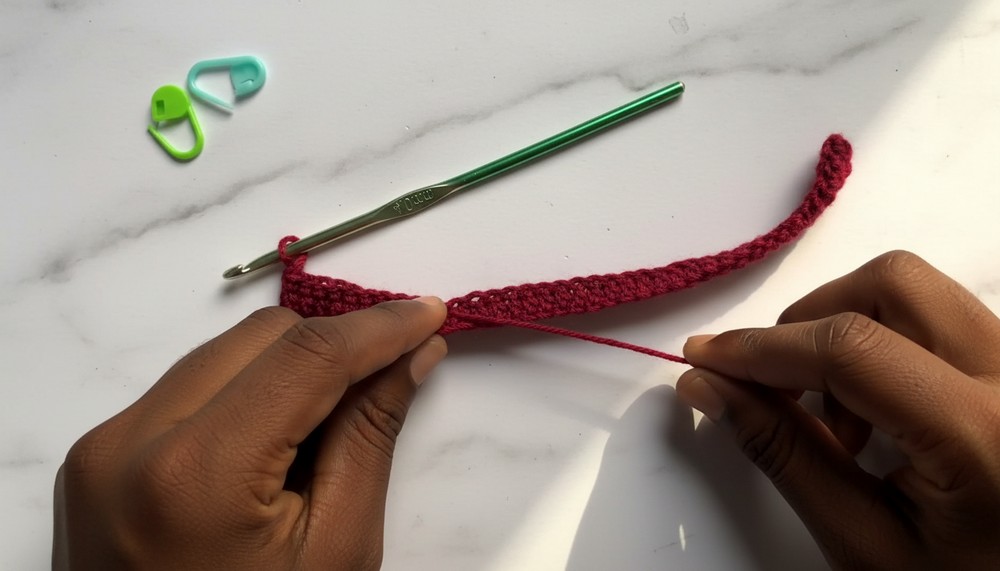
Step 1: Bottom Band & Foundation Chain
- Use the tape measure to measure around the collarbone. The same length will be matched by the chain.
- Example Measurement: 8 inches, chain 37 (ensuring it stretches to 8 inches precisely). Ensure the chain count is an odd number.
Instructions for Foundation Chain:
- Make a slip knot and chain 37.
- Ch 2 more, which will count as a dc.
- Row 1: Begin by working your first dc in the 3rd chain from the hook. This creates 38 total stitches as the ch-2 counts as your first dc. Continue working dc across the row.
Step 2: Double Crochet Rows with Increases
Detach and prepare for increases combined with front post double crochets.
Row 2:
- Ch 2 (counts as first dc), work another dc in the same st (increase).
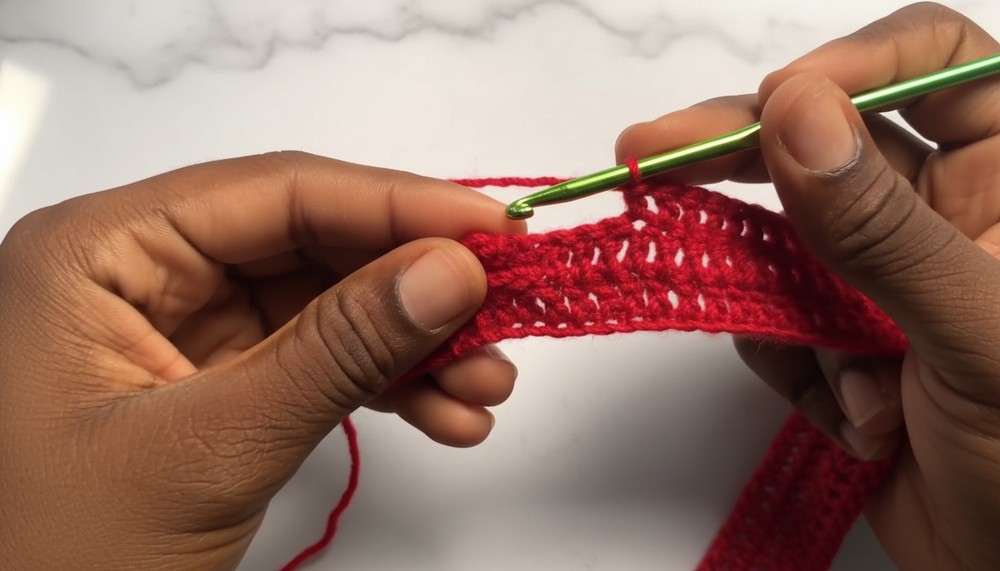
- Work 2 front post double crochets (fpdc):
- Fpdc: Yo, insert hook from front around the next dc post, yo and draw up a loop, yo, pull through 2 loops twice.
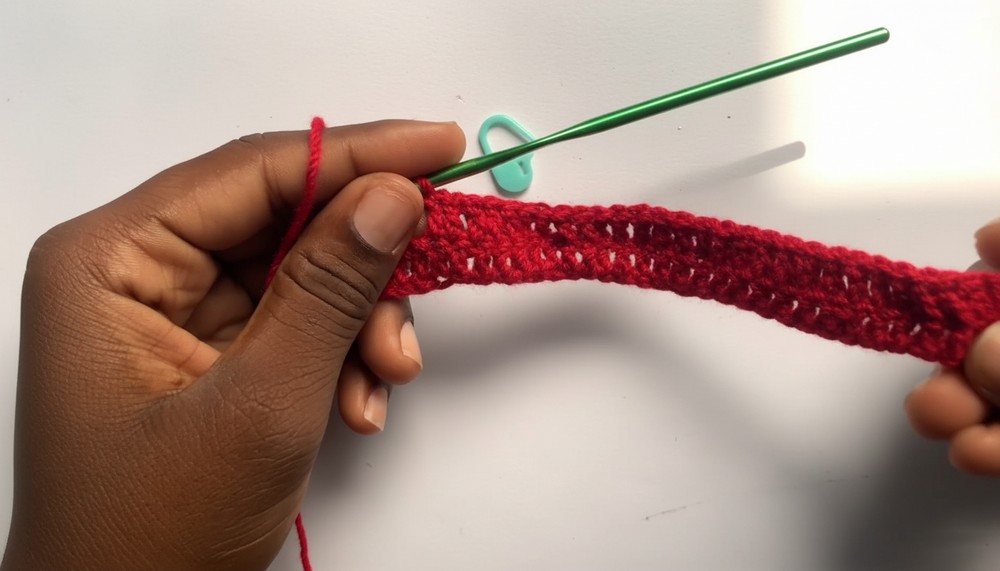
- Repeat the fpdc once more into the next stitch's post.
- Continue working regular dc across to the center, using stitch markers to track count if helpful.
- Middle Section: Continue adding 2 fpdc after the last regular dc before the central stitch, continue with dc into the center stitch.
- Finish row and work increase: 2 fpdc before the last dc, then increase by creating 2 dc into the final stitch.
- End Row: Work a slip stitch to join if working in continuous rounds, or turn to start the next row.
Row 3:
- Ch 2, turn. Work another dc into the same st.
- Continue working fpdc into previously worked front post stitches.
- Continue with dc across, according to stitch sizes, maintaining stitch counts.
Continue working increases in each row, following steps in Rows 2 and 3 as needed, turning the work after every row.
Step 3: Transition to Straight Rows
After reaching desired width or fitting up to underarm height, switch to working rows without increases.
Row:
- Ch 2, turn; skip first st, work regular dc across until final st, and do not increase - simply dc into last stitch.
Continue this process, ensuring pieces remain flat by avoiding added increases.
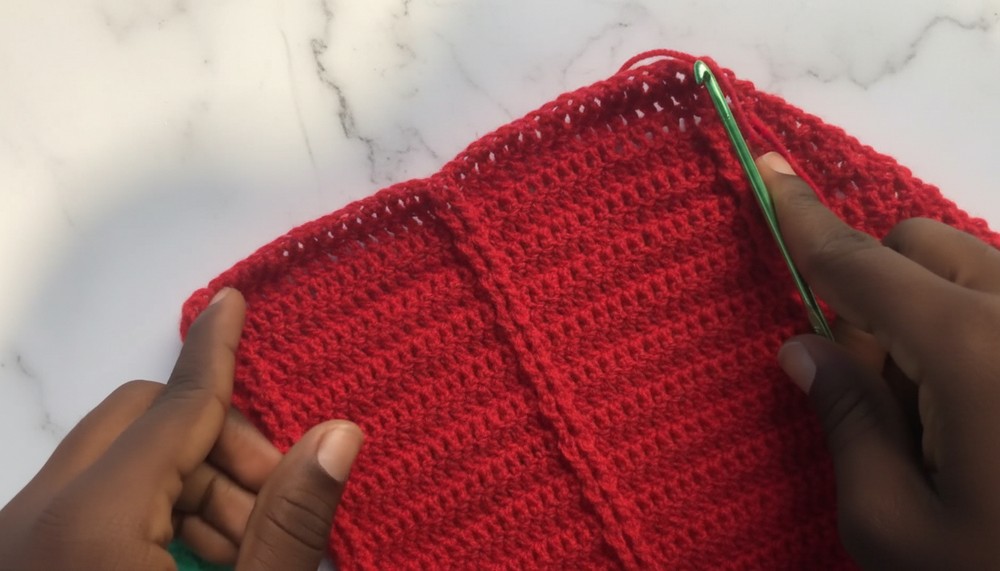
Step 4: Hem and Side Work
- After reaching desired height of main top section, complete with edge decoration:
- Boundary Hem: Ch 1, place single crochets uniformly across created edges.
Continue around hem, ensuring chains remain evenly distributed for clean finish.
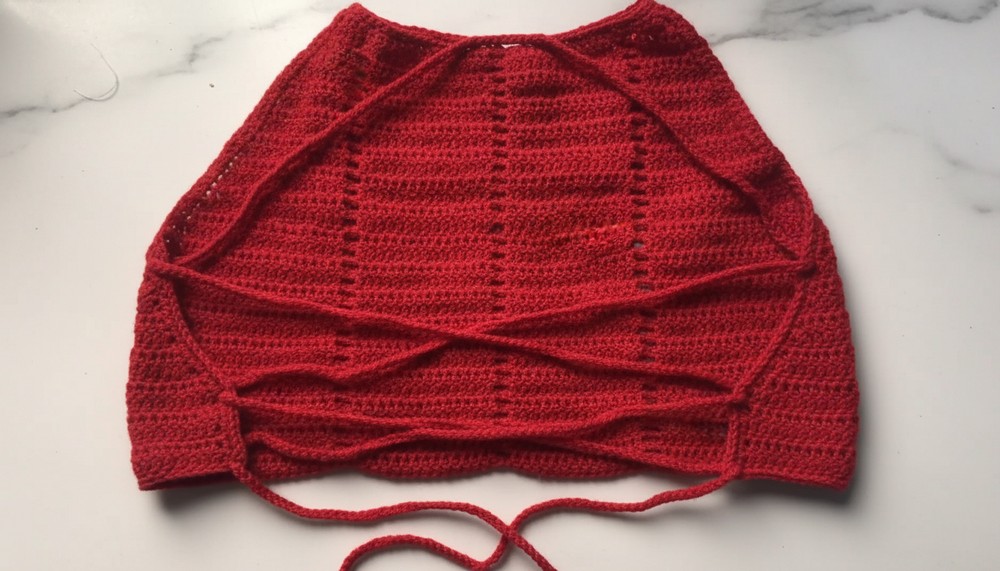
Step 5: Attachment and Lace Design
- Add laces starting at either end.
- Cord: Ch stitch of about 75-100 chains, enough to fit as lining through added regions.
Conclusion
Congratulations on completing your corset-style top. This design adds a customizable, stylish piece to your wardrobe, with easy adjustments offering unlimited size changes and fitting accordingly.
Tips
- Adjustable Fit: Secure accurate fit by ensuring the chain length remains proportional around the collarbone.
- Front PostDouble Crochets: Handle raised effect by consistently ensuring stitches remain distributed evenly.
https://youtu.be/9ibGJP17oqQ