Cat Ear Crochet Beanie Pattern with Step-By-Step Instructions
Create a cozy and stylish crochet cat ear beanie with this free pattern, perfect for staying warm, adding fun to your outfit, or gifting this winter season.
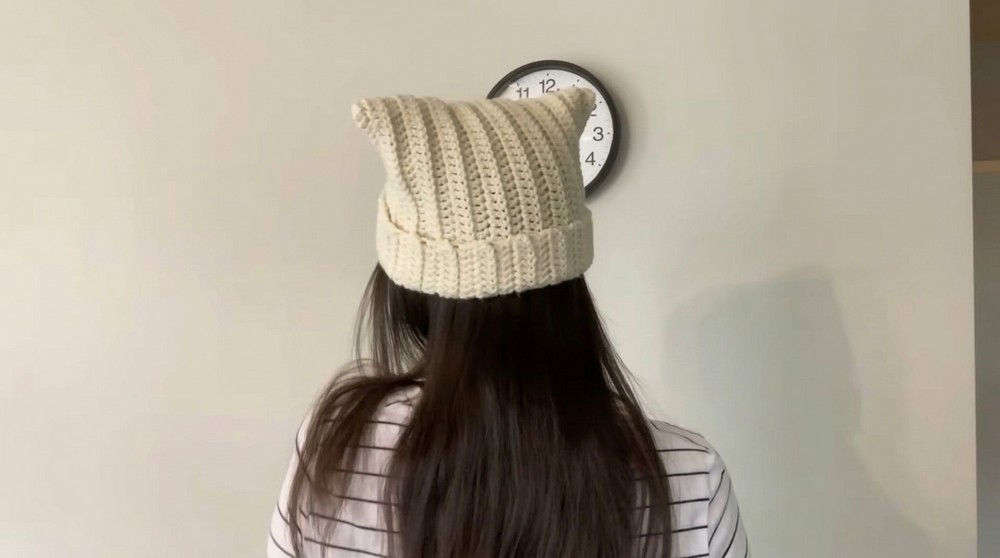
A fun and cozy accessory that combines cute style with everyday practicality. This unique crochet beanie features adorable cat ears, making it a playful and charming choice for anyone who loves creative fashion. With its soft texture and snug fit, the hat feels comfortable to wear and keeps your head warm during chilly days. Its ribbed design adds a touch of elegance while the pointed cat ears give it a whimsical, eye-catching look.
Easy Crochet Cat Ear Beanie Pattern for Beginners - Free

Perfect for casual outings, themed parties, or gifting, this beanie is suitable for all occasions and can be made in a variety of colors to match your style. The pattern is simple to follow and offers room for customization, giving you the joy of making something truly special. Whether you're crocheting for fun or creating a thoughtful gift, this piece is effortlessly versatile and full of personality.

Materials Needed
- Yarn: Medium-weight yarn (aran or worsted) - approximately 150-200 yards
- Hook Size: US H/8 (5.0mm) crochet hook
- Yarn Needle: For weaving in ends
- Stitch Markers or Bobby Pins: To mark important stitches
- Scissors
Gauge (Important for Sizing)
- 4" x 4" (10cm x 10cm) = 14 double crochets (dc) x 10 rows of double crochet.
- Adjust hook size if your gauge doesn't match.
Finished Size
- Circumference: Approximately 22" (adjustable).
- Length: 8" before folding the brim.
(Note: Suitable for teens and adults.)

Pattern Notes
- This pattern uses US crochet terms.
- Work in rows, and sew the sides together with a slip stitch to create the beanie shape.
- Chain stitches at the beginning of each row count as the first double crochet stitch.
- Keep your tension consistent-avoid pulling the yarn too tight.
Stitches & Special Techniques Used
- Slip Knot: To start your work.
- Chain Stitch (ch): Yarn over and pull through the loop on your hook.
- Double Crochet (dc): Yarn over, insert hook into designated space, yarn over, pull through, yarn over, pull through the first two loops, yarn over, pull through the remaining two loops.
- Back Loop Only (blo): Insert your hook into the back loop of the stitch instead of both loops.
- Slip Stitch (sl st): Insert your hook, yarn over, pull through both loops.
Pattern Instructions
Step 1: Create the Foundation Chain
- Start with a slip knot.
- Create a chain (ch) until it measures 20 inches in length. For reference, it took approximately 70 chains in the video, but this may vary depending on your tension.
- Ensure that your chains are loose to make it easy to work into them later. Tight chains will make it challenging to insert your hook.

Step 2: Row 1: Double Crochets in Foundation Chain
- Chain 2 extra (these chains will serve as the edge to create clean ends).
- Turn your chain. Insert your hook into the third chain bump from the hook to begin your first double crochet (dc).
- Work double crochets (dc) evenly across the entire foundation chain. You should now have one fully completed row of double crochets.
- Mark the first stitch with a stitch marker or bobby pin for clarity.

Step 3: Row 2: Continue Double Crochets
- At the end of Row 1, chain 2 to create a clean edge.
- Turn your work. Begin double crocheting into each stitch across the row as done previously.
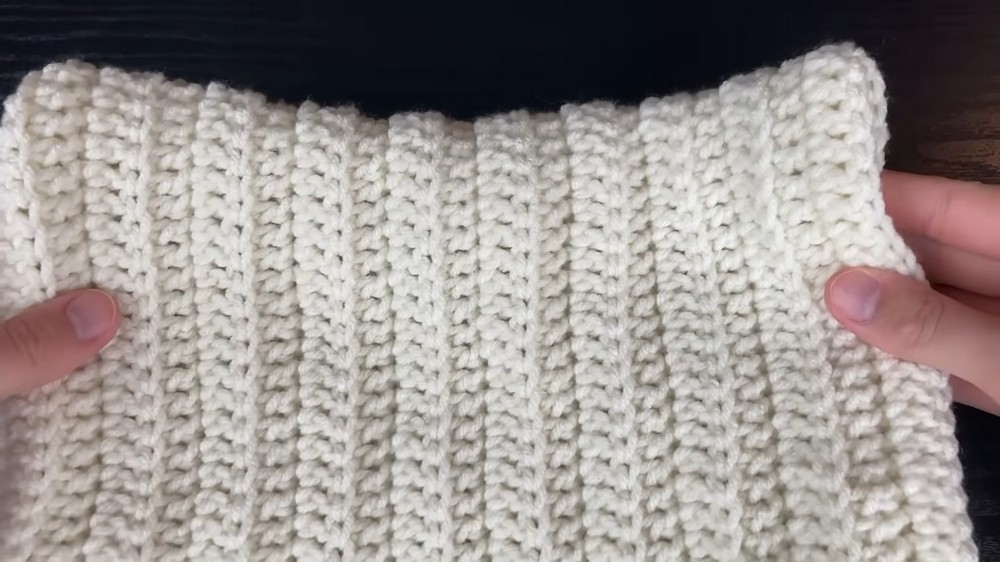
Step 4: Row 3 and Beyond: Double Crochet (Back Loop Only)
- After completing Row 2, chain 2 and turn your work.
- Work into the back loop only of each previous stitch instead of both loops. This creates a ribbed texture for the hat.
- Tip: Look at the top of each stitch-you will see two loops. Insert the hook in the loop farthest from you (i.e., the back loop).
- Continue rows in double crochet back loop only until the length of your project is half the desired head circumference. For an average adult size, this should be approximately 11 inches.

Step 5: Join the Two Sides
- Once your work reaches your desired length, fold the piece in half with the right sides facing outward.
- Use slip stitches (sl st) through the back loops only of both edges to join the two sides along the seam.
- Be sure to keep your tension loose during the slip stitch to avoid uneven or puckered seams.

Step 6: Finishing the Ears
- Flatten the top of the beanie and align the edges.
- Using a slip stitch method, join the open top of your hat. Work through both sides and only the back loops to close it. Once completed, your flattened seam should form natural "ears" on either side.
- Secure the yarn tail by weaving it in using a yarn needle.
Step 7: Weaving in Ends
- Insert the yarn tail into the yarn needle.
- Work the tail in and out of the stitches several times to secure it, then trim any excess.
- Repeat this step for any remaining yarn tails to achieve a polished finish.
Customization Ideas
- Add Color: Use different yarn colors for stripes or patterns between rows to customize the look.
- Make a Pom-Pom: Add a removable pom-pom to the top of the beanie for a whimsical touch.
- Adjust Size: For a larger or smaller hat, make your foundation chain longer or shorter to fit the desired circumference. Always test fit before completing.
- Embellishments: Sew on cute appliques, buttons, or embroidery for added style.
Final Look & Tips
When complete, your cat ear beanie will have a unique ribbed texture and adorable pointed edges resembling cat ears. Make sure the ears are evenly shaped when flattening the top to avoid lopsided results.
- Care Instructions: Wash gently in cool water by hand, and lay flat to dry to maintain its shape.
- Helpful Tip: Beginners should count their stitches after completing each row to avoid missing any along the way. This ensures a neat and even final shape.

Conclusion and Important Remarks
This Cat Ear Crochet Beanie is the perfect project for anyone seeking a simple yet delightful crochet pattern. It's stylish, functional, and makes a great gift for loved ones! Whether you're new to crochet or experienced, this pattern offers a fun challenge with rewarding results.