
Colorful Crochet Shirt Free Pattern Featuring Easy Granny Squares
Master the art of crocheting a stunning shirt with straightforward guidance, featuring bold textures, clear instructions, and endless options to suit your style.
There's a special charm in wearing something that feels unique and personal, and a crochet shirt is the perfect example of this. With a free crochet shirt pattern, you can make a lightweight and stylish top that is as comfortable as it is beautiful. These shirts feature elegant designs, from delicate lace-like patterns to bold textures, making them perfect for casual outings, beach trips, or even special occasions when paired with the right outfit.

What makes crochet shirts so appealing is their versatility and individuality. You can pick colors that reflect your style, adjust the size for the perfect fit, and follow step-by-step patterns that are easy to understand. Beyond their stunning appearance, these shirts are comfortable, breathable, and can be styled in multiple ways-whether as a standalone top or layered over other clothing.

The effort you put into creating one makes it not just a wardrobe staple but also something you'll feel truly proud of. At its core, this project combines beauty, creativity, and practicality for something you'll love to wear and show off.
Crochet Granny Square Shirt Free Pattern
Skill Level
Beginner to Intermediate: Suitable for beginners with basic crochet knowledge, involving stitches like single crochet (SC), double crochet (DC), and treble crochet (TR).
Materials Required
- Yarn:
- Three colors of DK weight or light worsted yarn:
- Color 1 (Wine): Main color for the base and background.
- Color 2 (White): For detailing and accents.
- Color 3 (Pink): For additional design elements.
- Three colors of DK weight or light worsted yarn:
- Hook:
- 4.5 mm crochet hook.
- Additional Supplies:
- A zipper (length depends on your shirt size).
- Stitch markers (optional, for keeping track of key points).
- Scissors.
- Tapestry needle for sewing and weaving in ends.
- Measuring tape (for accurate sizing).
- Sewing thread and needle (for attaching the zipper).
Abbreviations (US Terminology)
| Abbreviation | Description |
|---|---|
| CH | Chain |
| SC | Single Crochet |
| HDC | Half Double Crochet |
| DC | Double Crochet |
| TR | Treble Crochet |
| ST | Stitch |
| SL ST | Slip Stitch |
| YO | Yarn Over |
| INC | Increase (work 2 stitches in the same stitch) |
| DEC | Decrease (combine two stitches into one) |
Special Techniques
- Granny Square Pattern:
- Work from the center to the edges with increases to create a square shape.
- Joining Squares:
- Use sewn or crocheted seams to join squares cleanly.
- Zipper Attachment:
- A simple zipper is positioned at the front for closure, sewn using a thread and needle.
Finished Sizes
- The size of your squares determines the overall shirt dimensions. For standard sizes:
- Small: 8 rows per square.
- Medium: 9 rows per square.
- Large: 10+ rows per square (depending on your measurements).
Use a measuring tape to check your bust, waist, and armhole measurements and adjust the size of the granny squares accordingly.
Step-by-Step Instructions
Step 1: Granny Squares
The shirt begins with granny squares that are pieced together.
Foundation (Row 1)
- With Color 1 (Wine), create a loose magic circle or chain-4 loop, secured with a slip knot.
- CH 4 (3 CH counts as the first DC + 1 CH for spacing).
- Into the magic circle, work: [2 DC, CH 1]. Repeat 2 DC + CH 1 seven more times into the circle. (You should have 8 clusters of 2 DC with CH-1 spaces between each cluster).
- Tighten the magic loop and join with a SL ST to the top of the first CH-3. Cut and fasten off.
Row 2 (White)
- Join Color 2 (White) into any CH-1 space with a SL ST.
- CH 3 (counts as first DC), then work 2 DC into the same space. CH 1.
- Skip the next 2 DC and work 3 DC into the next CH-1 space, followed by CH 1.
- Repeat [3 DC, CH 1] in each CH-1 space around. (You should have 8 groups of 3 DC clusters separated by CH-1 spaces.)
- Join to the first CH-3 with a SL ST and fasten off.

Row 3 (Pink)
- Join Color 3 (Pink) into any CH-1 space.
- CH 3, 1 DC, CH 2, and 2 DC in the same space. This forms the first corner.
- In the next CH-1 space, work 2 DC, CH 2, 2 DC.
- Repeat around, ensuring each corner contains 2 DC, CH 2, 2 DC, separated by CH-1 spaces.
- Join with a SL ST and fasten off.

Rows 4-8 (or more depending on size)
- Continue increasing around the square by working corners as 2 DC, CH 2, 2 DC.
- Fill each side with 3 DC groups separated by CH-1 spaces.
- For larger sizes, increase the number of rows as needed.
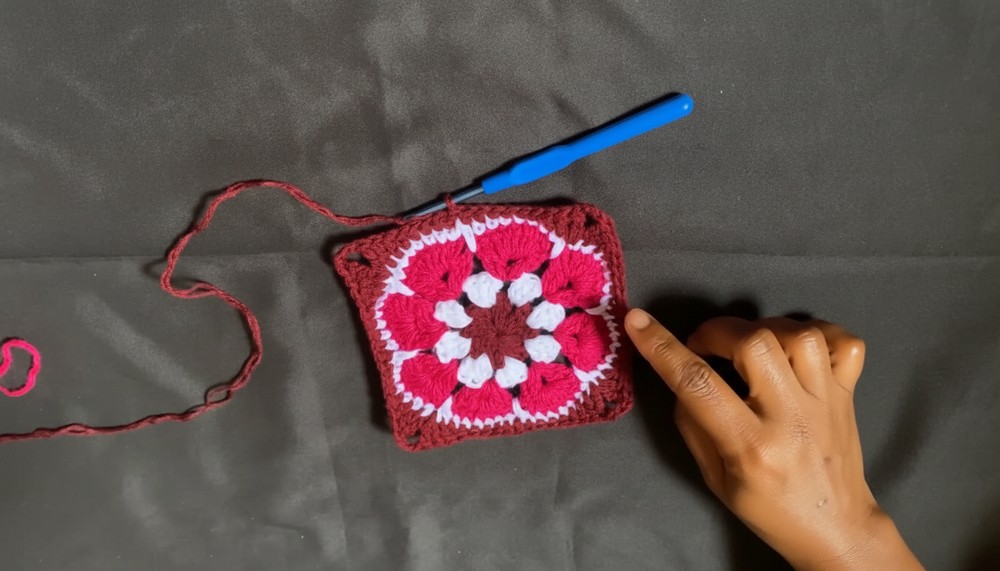
Repeat this granny square pattern to create the required number of squares:
- Front: 6 squares.
- Back: 6 squares.
- Sleeves: 4 squares (2 squares per sleeve).
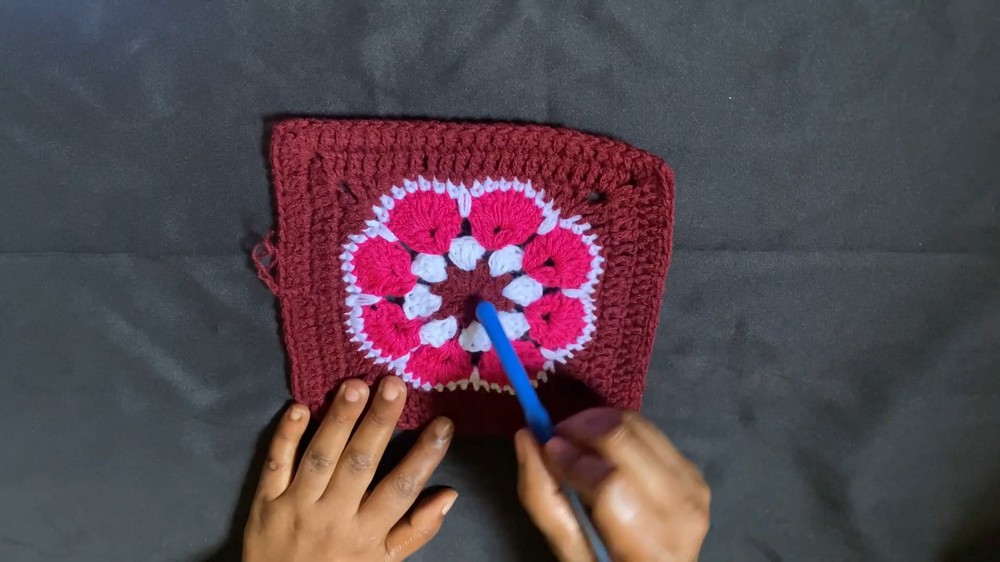

Step 2: Joining the Squares
- Arrange the squares:
- Lay them side by side to form the front and back panels (3 squares wide x 2 squares tall).
- For sleeves, arrange 2 squares in a row.
- Join Squares Together:
- Use your preferred method for joining:
- Sewn Join: Use a tapestry needle and matching yarn for neat seams.
- Slip Stitch Join: Work under both loops of the corresponding stitches in both pieces.
- Use your preferred method for joining:

Step 3: Constructing the Shirt
- Side Seams: Attach the front and back panels by sewing or slip stitching up the sides, leaving space at the top for the armholes.
- Shoulder Seams: Seam one square length at the top of each shoulder between the front and back panels.
- Attach Sleeves: Sew the sleeves along the armhole openings, ensuring the stitches line up cleanly.

Step 4: Adding the Zipper
- Mark the centerline of the front panel using a stitch marker.
- Sew or crochet a row of single crochet along both sides of the center where the zipper will be attached.
- Place the zipper and secure it with sewing pins or fabric glue.
- Hand-sew the zipper using a needle and thread along the SC row for neater edges.

Step 5: Finishing Touches
- Bottom Edging: Work a row of SC or DC along the bottom hem for a polished look.
- Neckline: SC evenly around the neckline for clean edges.
- Sleeve Edges: SC or DC around the sleeve openings.
Final Words
Congratulations on completing your Granny Square Shirt with a Zipper Front Closure! This colorful and beginner-friendly piece is a testament to your creativity and crafting skills. Whether worn casually or as a statement piece, your handmade shirt is sure to turn heads.

Tips for Success
- Blocking: After joining the squares, block the shirt to ensure shapes and seams lay flat.
- Zipper Placement: Use sewing pins to keep the zipper aligned while stitching.
- Customization: Experiment with different color combinations for a unique vibe.