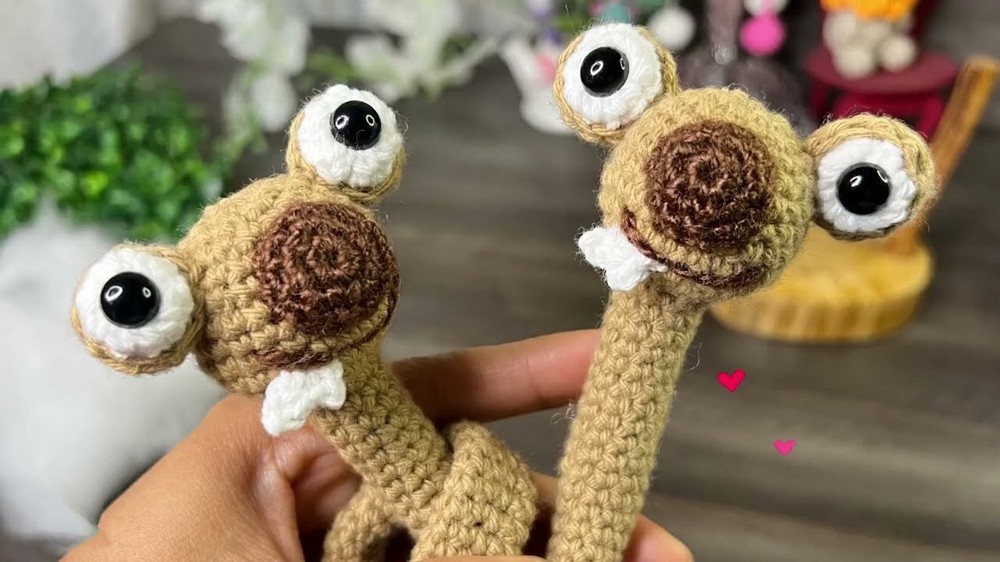
Playful Crochet Small Sid Long Neck Pattern for Handmade Toys
Follow how the Free Crochet Small Sid Long Neck Pattern brightens your skills with adorable charm, perfect for handmade gifts or keepsakes.
Some yarn and a crochet hook are all it takes to bring a charming character to life-Sid, the adorable long-necked sloth. Perfect for crochet enthusiasts seeking a manageable yet rewarding project, this pattern offers a unique way to practice key techniques like shaping, stitching in rounds, and adding personality with small details.
Unique Crochet Small Sid Long Neck Pattern for Kids' Gifts

Sid's whimsical pattern features expressive safety eyes, tiny teeth, and a playful long neck, making him ideal as a decor piece, a thoughtful handmade gift, or a cuddly desk companion. The thoughtful Small Sid Long Neck pattern ensures stability while leaving room for customization, whether you want to add colorful accents, textured yarns, or embellishments. While fun and creative, the pattern also delivers practical benefits, helping stitchers strengthen their skills, sharpen their precision, and grow comfortable with working on compact parts.

Whether shared as a gift or kept as a personal token of your talent, Sid is a lovable project that combines simplicity with endearing charm. Plus, his small size makes him portable and easy to complete, perfect for squeezing creativity into a busy schedule. Fall into this delightful pattern, and let Sid brighten any space with his quirky and heartwarming presence.
Special Features
- Extra long, flexible neck (~24 cm).
- Very expressive eyes, nose and teeth made with separate pieces and embroidery.
- Cute, "rolled" body position typical of a relaxed sloth.
- Uses small amounts of yarn - great scrap project.
Difficulty Level
- Intermediate
Confident beginners can try it if they already know how to: - Crochet in the round
- Increase, decrease, and work in front loops
- Sew/embroider parts on amigurumi
Materials
- Yarn (approx. 2 mm thickness, cotton or acrylic):
- Dark brown
- Medium brown
- White (for eyes and teeth)
- Crochet hooks:
- 2.5 mm for most of the body
- 1.75-2.0 mm for small details
- 1.5 mm for teeth (as tutor suggests)
- Safety eyes 8 mm
- Polyester fiberfill (siliconized stuffing)
- Tapestry needle
- Scissors
- Lighter (optional - to carefully melt and secure yarn ends on eyes)
Work in a spiral unless the pattern says to close rounds with a slip stitch.
Abbreviations (US terms)
- MR - Magic ring
- ch - chain
- sc - single crochet
- hdc - half double crochet (media vareta)
- sl st - slip stitch
- inc - increase (2 sc in same stitch)
- dec - decrease (2 sts closed together, using front loops only as tutor indicates)
- FLO - front loop only
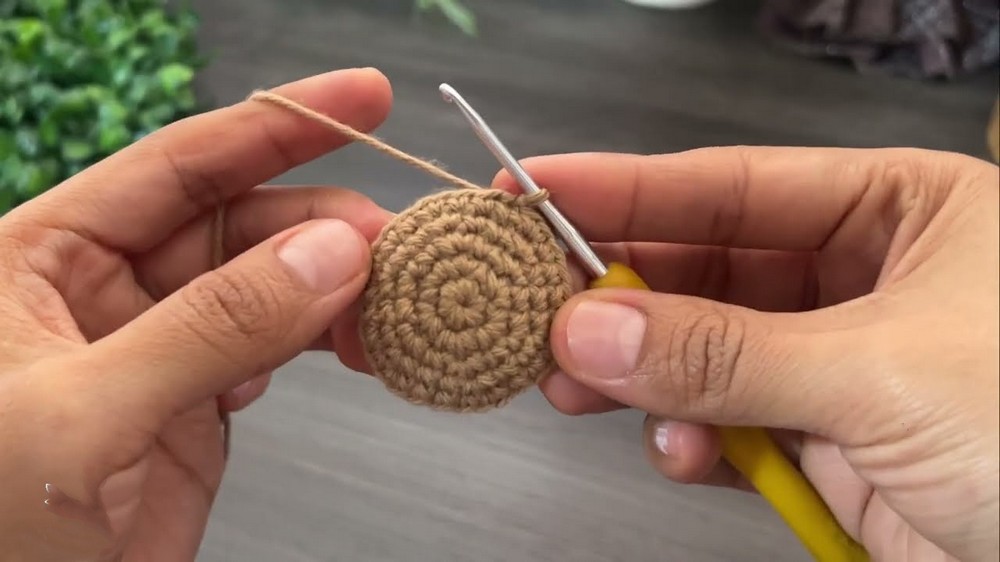
1. Arms (Bracitos de Sid)
Use brown yarn and 2.5 mm hook.
Round 1
- MR, ch 1, work 6 sc into the ring. (6)
- sl st to first sc to close the round.
Round 2 - Increases
- ch 1, 6 inc around (2 sc in each st). (12)
- Join with sl st.
Round 3 - Crossed Inner Round (texture)
Work through inside/front loops as shown in the video.
- ch 1
- Insert hook from the inside, taking the current stitch and the next stitch together (crossed), yo and pull through, then make 1 sc.
- Repeat this: "take this st + next st (from inside), sc" around.
- At the end you still must have 12 sc.
- Join with sl st.
The tutor reminds you: if you count all, there must be 12 sc.
Round 4 - Full Decreases
- ch 1
- Work 6 dec using FLO only (front loop of current st + front loop of next st, then sc together). (6)
- Join with sl st.
Rounds 5-7
- ch 1, 1 sc in each st around. (6)
- Join with sl st at the end of each round.
Make 2 arms. Leave a long tail for sewing.
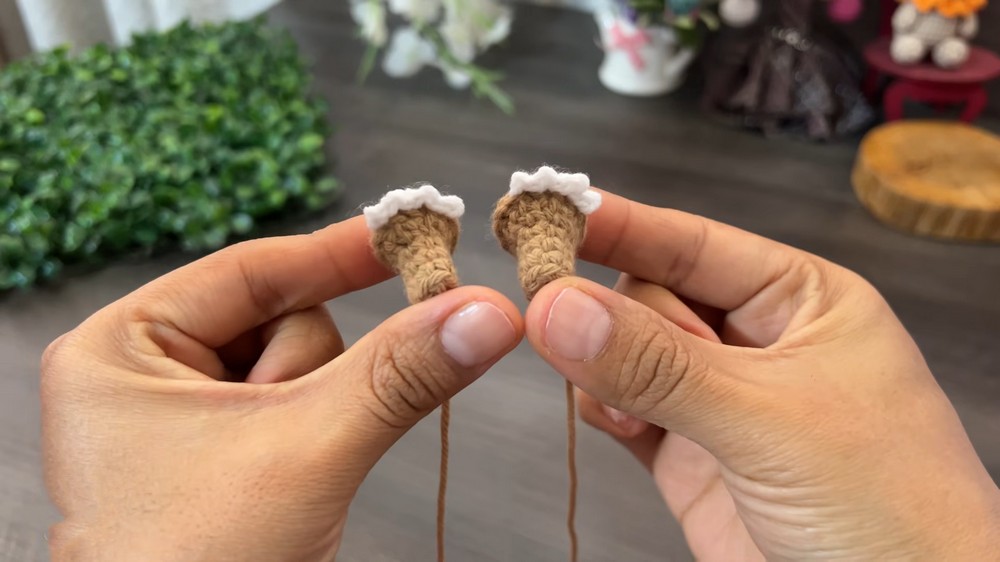
2. Legs/Feet (Patitas)
Tutor gives a summarized explanation; here's the reconstructed pattern according to her instructions.
Use brown yarn and 2.5 mm hook.
Round 1
- MR, 7 sc. (7)
Round 2
- 7 inc. (14)
Round 3 - Inner Crossed Round
- Work similar to the arm's round 3: through the inner/front part, crossing stitches, keeping 14 sts.
Rounds 4-7
- 1 sc in each st around. (14)
This creates a larger, rounder foot. The back (where a small tail area appears) is left to sew to the body.
Toes (Uñitas)
Using the front edge stitches of the foot:
Work each toe over one stitch on the front.
- Toe 1
- Insert hook in a front stitch, pull loop to front.
- ch 1, sl st in same st.
- Toe 2
- Go to next st: sl st, ch 1, sl st in same st.
- Toe 3
- Next st: sl st, ch 1, sc in same st.
- Toe 4
- Next st: sl st, ch 1, sl st in same st.
Cut yarn, bring tails to inside, secure.
Make 2 legs.
The tutor shows: arms smaller, feet larger, with 3-4 small "claws".
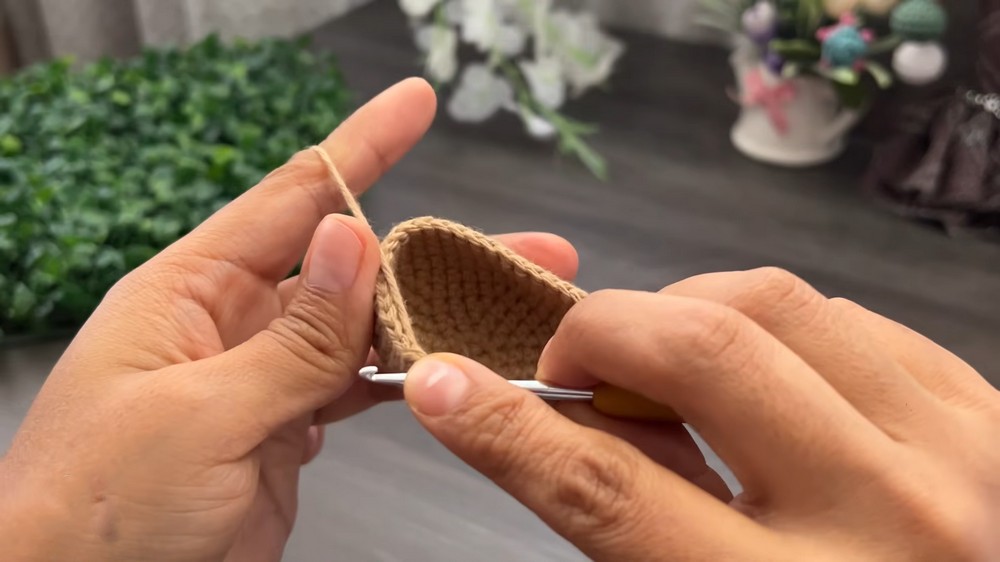
3. Body + Long Neck (Cuerpo y Cuello Largo)
Use brown yarn and 2.5 mm hook.
This part in the audio is slightly confusing because "cabeza" and "cuerpo" are used; but structurally, what she makes here is the body base with the beginning of neck (first part), and then the upper head piece (second part). I'll separate them clearly.
3.1. Lower Body & Neck Base (first shape with many rounds)
This is the long tube that becomes the neck and torso.
Round 1
- MR, ch 1, work 6 sc. (6)
- Close with sl st each round in this section.
Round 2
- ch 1, 6 inc. (12)
- sl st to join.
Round 3
- 2 sc, inc around. (18)
In the video, she initially says "2 sc + 1 inc" but then corrects for sequence; we'll keep the standard increase.
Round 4
- 1 sc, inc around. (18) or, as she states later:
Actually she clarifies the sequence as: - Round 3: 1 sc, inc → 18 sts
- Round 4: 2 sc, inc → 24 sts
- Round 5: 3 sc, inc → 30 sts
- Round 6: 4 sc, inc → 36 sts
So follow this corrected version:
- R3: (1 sc, 1 inc) repeat → 18
- R4: (2 sc, 1 inc) repeat → 24
- R5: (3 sc, 1 inc) repeat → 30
- R6: (4 sc, 1 inc) repeat → 36
All rounds: ch 1 at start, sl st to join.
Rounds 7-10
- ch 1, 36 sc around. (36 each round)
- Join with sl st.
Round 11 - Start Decreasing
- ch 1, (4 sc, 1 dec in FLO) repeat. (30)
Round 12
- ch 1, (3 sc, 1 dec) repeat. (24)
She comments: "ya se va formando el cuerpito".
Round 13
- ch 1, (2 sc, 1 dec) repeat. (18)
Round 14
- ch 1, (1 sc, 1 dec) repeat. (12)
At this point the opening is still big.
Round 15
- ch 1, (2 sc, 1 dec) repeat. (9)
Now you have 9 sc - this becomes the base of the neck.
Stuff the body/tube as you go or after this round, leaving the neck area unstuffed at first if you prefer a more flexible neck.
Rounds 16-79 - Long Neck
- Work 9 sc in each round, no increases or decreases. (9)
Continue until the neck measures about 24 cm.
Fasten off, leaving a tail if needed for later sewing to the head, or just close neatly if the head will be placed over and sewn around.
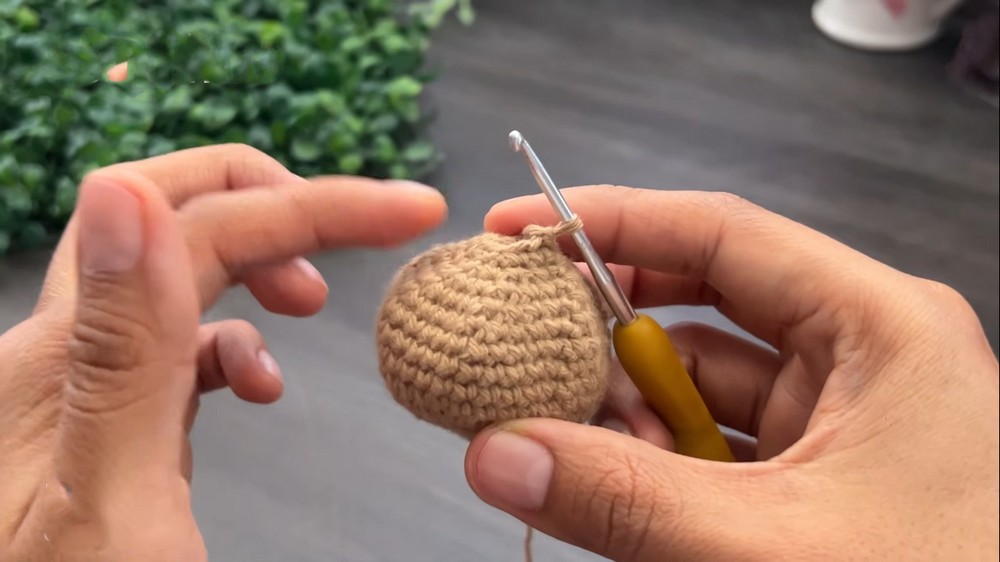
4. Head (Upper Head / "Cabecita")
Use brown yarn and 2.5 mm hook.
This is a separate piece that will be sewn to the top of the neck.
Round 1
- MR, ch 1, 6 sc in ring. (6)
- Close with sl st each round.
Round 2
- ch 1, 6 inc. (12)
Round 3
- (1 sc, 1 inc) around. (18)
Round 4
- (2 sc, 1 inc) around. (24)
Rounds 5-7
- 24 sc each round. (24)
Round 8 - Shaping
- ch 1, (2 sc, 1 dec) around. (18)
Round 9
- 18 sc. (18)
Round 10
- (2 sc, 1 dec) around. (approx. 14-12 sts, tutor indicates we end up with about 10 then close)
Then:
Next Round
- (1 sc, 1 dec) around until you reach about 10 sts.
Stuff the head firmly.
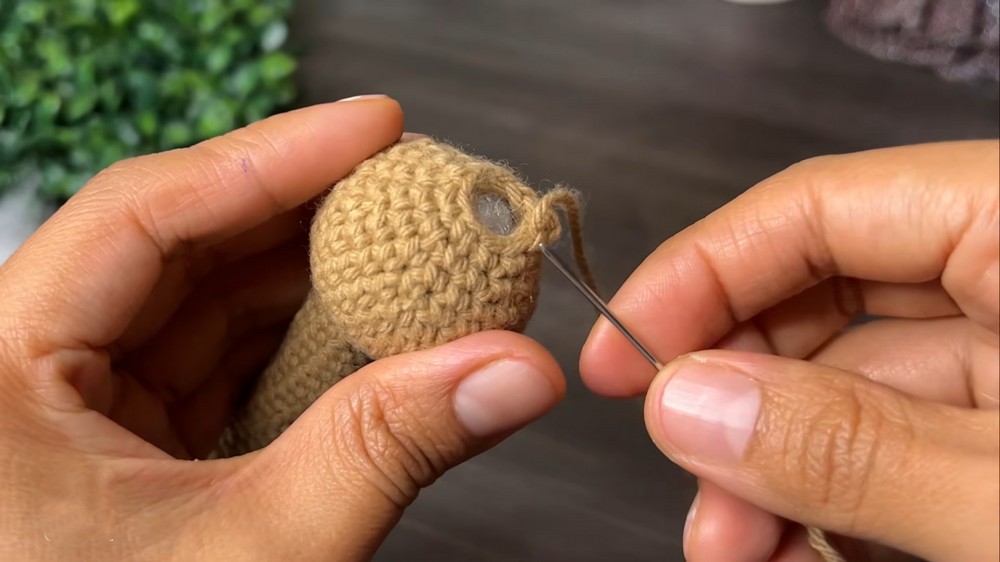
Closing the Head
Working in FLO, insert needle through each front loop around to cinch closed, pull tight, secure.
Leave a tail for sewing to the neck.
5. Eyes (Brown Back + White Front with Safety Eyes)
5.1. Brown Eye Base (Back Part)
Use dark brown yarn and 2.5 mm hook.
Round 1
- MR, ch 1, work 9 hdc into ring (media vareta = hdc). (9)
- Pull tail to close ring.
- Join with sl st to first hdc.
Round 2
- ch 1, 9 sc (1 sc in each st). (9)
- Join with sl st.
Do not cut the brown yarn. Leave it attached; this will be used later to join both halves.
5.2. White Eye Front
Use white yarn and a slightly smaller hook (e.g., 1.75-2.0 mm).
Round 1
- MR, ch 1, 9 hdc. (9)
- Pull tight.
Before closing this round:
- Insert 8 mm safety eye through the center of this white circle.
- Put the safety washer on the back.
Then:
- Join with sl st to first hdc.
- ch 1, 9 sc around. (9)
- Join with sl st.
- Fasten off white, leaving a small tail that can be hidden later. Carefully melt/seal if desired (as tutor does).
5.3. Joining Brown and White Parts
Take the brown back part (still with yarn attached) and the white front:
- Place white front over brown back, wrong sides touching.
- Insert hook through one stitch on brown and the corresponding stitch on white.
- ch 1, then work 9 sc around, going through both layers, joining them.
Fasten off, leaving a tail for sewing to the head.
Make 2 eyes.
6. Nose (Naricita)
Use dark brown yarn and 2.5 mm hook.
Round 1
- MR, 6 sc. (6)
Round 2
- 6 inc. (12)
Round 3
- 12 sc. (12)
Fasten off with a long tail for sewing. This creates a small, slightly raised nose.

7. Positioning & Embroidering the Face
Before sewing, the tutor rolls the body to show how Sid will be posed:
- Fold the long neck/body so the head rests over the body forming a relaxed sloth "C" shape.
- Identify the back seam line (where rounds were closed) and keep it at the back.
7.1. Sew Nose
- Place the nose on the front of the head: leave about 3-4 rows down from the top center.
- Sew around carefully:
- Take 1 stitch from the head, then 1 stitch from the nose, repeating all around.
7.2. Sew Eyes
- From the nose, count about 2-3 sts up and to each side (she says "dejamos uno, dos, tres").
- Place each eye symmetrically.
- Sew around with the remaining brown tail, making sure the white edges are neatly covered; she even wraps a bit of brown around extra white stitches to hide them.
Do not pull too tight so you don't pucker the stitches.
7.3. Embroider Mouth
Use brown yarn.
- From the bottom center of the nose, go one stitch down.
- Bring the yarn out there, then shape a gentle smile:
- Make a horizontal curve to one side, reinsert, then come up again in the center to make the central vertical part if desired.
- Keep it soft so it doesn't look too tight.
8. Teeth (Dientecitos)
Use white yarn and a 1.5 mm hook.
- Insert the yarn under the smile line, directly under the nose (between nose and mouth).
- In that stitch, sc to anchor.
First tooth (bigger)
- ch 3
- Starting from 2nd ch from hook:
- sc in 2nd ch, sc in 3rd ch. (2 sc up the chain)
- Insert hook back into the same base stitch on the head, sc again to anchor.
This forms a long, dangling rectangle tooth.
Second tooth (smaller)
- In the next stitch to the side, anchor with sc.
- ch 2
- sc in 2nd ch.
- Insert hook back into that same base stitch on the head, sc to anchor.
Finish:
- In the next head stitch, sl st, ch 1, cut yarn and hide tail.
Now he has two cute, uneven front teeth.
9. Assembly of Arms and Legs
With the body rolled into the sloth pose:
- Place arms on the sides of the upper body/neck area, leaving 1-2 rounds from the edge as tutor mentions. Sew securely.
- Place legs lower, leaving about 2-3 rounds between arms and legs positions. The feet should point forward, showing the claws.
Sew pieces with matching yarn, small neat stitches, and secure tails inside.
Tutor's Suggestions & Practical Notes
- She insists on counting stitches (especially where 12 or 18 sts should remain) to keep symmetry.
- For decreases, she always uses front loops only (FLO) to avoid visible holes.
- For the eyes, she suggests:
- Attach the safety eye and washer before closing the white circle.
- Use a lighter carefully on acrylic tails to flatten and secure (optional; be cautious).
- Do not pull the sewing too tight when attaching eyes and nose; otherwise the fabric wrinkles.
- Roll the body correctly before embroidering face so you know what the "front" is.
Uses
- Cute decor doll for a bedroom or workspace.
- Soft gift for sloth lovers, kids (with safety eyes properly secured), or as a baby shower decoration.
- Great as a desk buddy or stress toy due to the flexible long neck.
- Lovely project to showcase in craft fairs or on social media.
Tip
If the neck feels too floppy for your taste, insert a pipe cleaner, floral wire, or a thin plastic rod inside the neck before finishing stuffing, then surround it with fiberfill. This keeps the neck poseable but more stable.
Conclusion
This Small Sid Long Neck amigurumi pattern combines a simple tube body with carefully shaped head, expressive eyes, nose, and teeth to create a very charming character. The pattern uses basic stitches (sc, inc, dec, hdc, sl st), but the details and assembly give it an intermediate level of complexity.
Final Remarks
- Adjust hook size if your fabric is too loose (stuffing must not show).
- Practice the FLO decreases and small parts (eyes/teeth) on scrap yarn if you're new to tiny details.
- Share your finished Sid with other crocheters - it's exactly the kind of project that inspires and brings smiles.