
Free Crochet Wave Stitch Bag Pattern for Picnic Essentials
Enjoy making a Free Crochet Wave Stitch Bag Pattern, a lovely bag for carrying your phone wallet and other small essentials.
Featuring a soft wavy design and a versatile structure, this bag is a amazing project for anyone who loves creating beautiful and functional items. The unique wave stitch adds a charming texture to the bag, making it look elegant and stylish. Its surface resembles gentle ocean waves, giving it a calming and artistic flair that stands out wherever you take it.
This Crochet Wave Stitch Bag Free Pattern Will Be Your New Favorite

This crochet wave stitch bag isn't just about looks-it's built to be strong and practical. The thick, firm texture ensures it can easily carry everyday essentials like books, phones, makeup, or even small groceries, while keeping its neat and trendy appearance. Whether you're heading to school, the market, or just enjoying a casual outing, this stylish creation is sure to be a dependable companion.
One exciting feature is its flexibility for customization. You can experiment with colors to make it truly your own. Choose one solid shade for a sleek and simple look or blend two or more hues to make the wave pattern pop. Additionally, the size can be adjusted to suit your needs. Make a small handbag for light use or a large tote for carrying heavier items.
With simple and beginner friendly steps, this project is perfect for those new to crochet or anyone seeking a relaxing crochet experience. The repetitive wave design is soothing to work on, and all you need are basic tools like yarn and a crochet hook to get started.
This unique bag combines beauty, strength, and practicality, making it ideal for personal use or as a thoughtful, handmade gift.
Crochet Wave Stitch Bag Pattern
Materials Needed
- Yarn:
- Nylon yarn, size D27.
- You can substitute with other durable yarns like cotton or polyester for a strong finish.
- Hook:
- Crochet hook size #2 or an appropriate size for your yarn.
- Optional Items (for comfort):
- Finger guards or thimbles (useful when working with nylon yarn, which can be rough on fingers).
- Tools and Extras:
- Stitch markers.
- Sewing needle.
- Buttons for closure.
- Scissors.
Pattern Notes
- This sling bag is crocheted from the base upward using wave like stitch sequences.
- The motif consists of slip stitches, half double crochet, and double crochet in specific sections to create a flowing wave design.
- Two small pockets are added for additional storage.
- The bag closure uses buttons and a loop for security.
- Project consists of three main steps:
- Crocheting the main body.
- Adding side closures.
- Stitching pockets and adding straps/button.
Step 1: Crochet the Main Body
Foundation Row:
- Create a Slip Knot:
Begin with a slip knot on your hook. - Chain 55:
Crochet 55 chains for the foundation row. Add 1 extra chain for turning.

Row 1:
- Back Loops Technique:
Turn your work and crochet into the back loop of each chain for cleaner edges. - Wave Pattern:
Follow the pattern below:- Work 5 slip stitches in the first 5 chain spaces.
- Work 5 half double crochet stitches in the next 5 chain spaces.
- Work 5 double crochet stitches in the next 5 chain spaces.
- Repeat this sequence (5 slip stitches, 5 half double crochet, and 5 double crochet) until the end of the row.
- Turning Chain:
At the end of the row, chain 1 and turn your work.
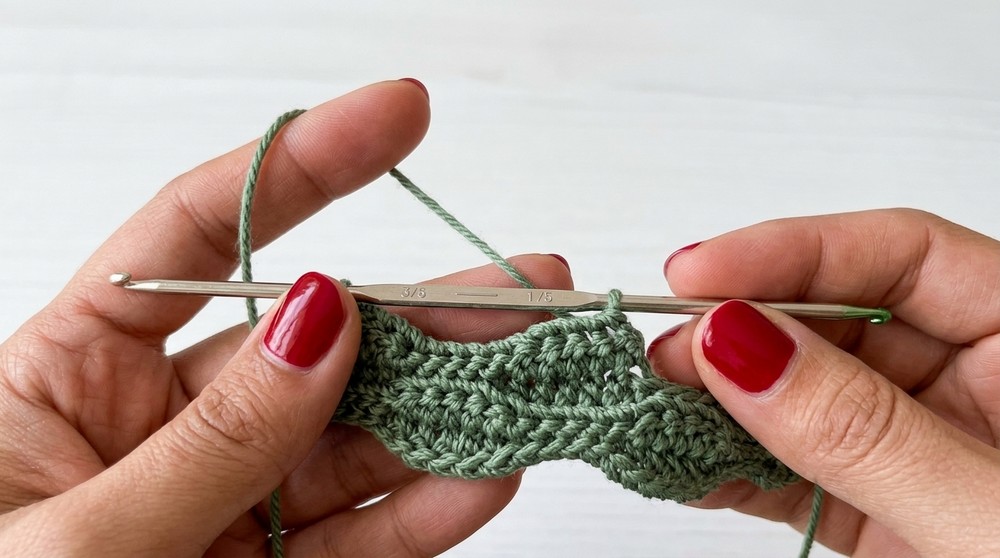
Row 2:
- Follow the Pattern:
For row 2, repeat the sequence from row 1:- Begin with 5 slip stitches, followed by 5 half double crochet, and then 5 double crochet.
- Mirror the Design:
Always work over the existing sequence in prior rows:- If the previous stitch is slip stitch, continue with the same.
- Repeat Process:
Continue until you have 50 rows or 25 complete wave motifs.

Step 2: Adding Side Closures
Foundation:
- Double Yarn:
For side closures, fold the yarn into two strands to make it compact and sturdy. - Chain 22:
Create 22 chains for the side panel. Add 1 extra chain for turning.
Row 1 for Side Panels:
- Half Double Crochet:
Work 1 half double crochet into each chain (total 21 stitches). - Turning Chain:
At the end of the row, chain 1 and turn. - Repeat Rows:
For sufficient width, work back and forth, maintaining the half double crochets for a few rows. Add height based on the depth you prefer.
End Row Adjustments:
Once the desired size is achieved, fasten off, leaving enough yarn to seam the sides onto the bag body.

Attach Side Panels:
Align each panel to the bag's edges. Secure them with stitch markers, ensuring alignment.
- Seam the side panels to the bag body using a sewing needle and the leftover yarn.
- Work carefully so the panels don't shift during stitching.
Step 3: Crocheting Inner Pockets
Small Inner Pocket:
- Foundation:
Create a slip knot and chain 50. Add 1 extra chain for turning. - First Row:
Work half double crochet stitches into each chain. - Turning Chain:
At the end of the row, chain 1 and turn. - Repeat Rows:
Continue back and forth in half double crochet for 10-15 rows until the desired pocket height is achieved.
Attach Pockets:
- Position the Pocket:
Place the pocket on the inner side of the bag, ensuring it aligns correctly. - Stitching:
Sew the pocket onto the bag body using a yarn needle, starting from the corner. - Optional:
For extra functionality, divide the pocket into partitions by stitching vertical lines down the middle.
Step 4: Adding Button Closure
Button Placement:
- Position the Button:
Attach the button in the center of one side of the bag flap using a sewing needle. - Create a Loop:
On the opposite side of the flap, crochet a small loop using chains to fit around the button snugly.- Customize the chain loop size based on the button's dimensions.
- Attach the loop securely after testing its fit.

Step 5: Attaching the Strap
Strap Details:
Straps make the bag functional as a sling bag.
- Crochet the Strap:
- Follow the strap pattern shared in the channel's other video (or alternatively, crochet long chains reinforced with single crochets).
- Attach Ends:
- Use a yarn needle to sew each end of the strap to the left and right upper edge of the bag.
- Ensure the strap length matches your preferred sling size.
Finishing
- Weaving Ends:
Use a yarn needle to weave in all loose ends securely to keep the bag tidy. - Final Inspection:
Ensure all stitches are tight, secure, and properly aligned. Test the bag structure and closures for stability.

Tips to Maintain the Pattern
- Choose Durable Yarn:
Nylon yarn is strong and long lasting, but you may opt for other sturdy materials as desired. - Avoid Loose Stitches:
Loose stitches may compromise the bag's sturdiness. Practice keeping tension consistent. - Customize Size:
Add or reduce wave motifs to adjust the bag's dimensions, depending on your needs. - Test Your Closure:
Always ensure your button and loop mechanism securely fastens the flap for reliable use.

Final Words
Creating this Mini Sling Bag is both fun and rewarding. The wave motif adds elegance, while the inner pockets make it functional. The button closure ensures security, and the adjustable strap makes it convenient to wear. With proper care and attention, your sling bag will last for a long time and showcase your crochet skills. Whether for personal use or as a thoughtful gift, this project is a delightful addition to anyone's collection. Enjoy crocheting your beautiful sling bag.