
Free Crochet Granny Square Cardigan Pattern That Bring Fresh Energy
Fill cool days with cozy style through this free crochet granny square cardigan pattern and make a beautiful piece for daily wear.
Granny square cardigans are among the most beautiful and creative handmade clothing projects. Made from colorful and artistic crochet squares, they allow you to make a stylish, cozy, and timeless piece to add to your wardrobe. A granny square cardigan isn't just clothing-it's a work of art that shows off your love for crochet, patterns, and vibrant colors. The stunning design begins with granny squares, which are carefully crocheted in a variety of sizes, patterns, and colors. The featured in the pattern uses daisy granny squares as the foundation, giving the cardigan a cheerful and eye catching appearance.
Crochet Granny Square Cardigan Free Pattern For Relaxed Stylish Looks

Whether you prefer a cropped look, waist length style, or long jacket, the pattern provides easy ways to make adjustments. This makes the cardigan perfect for all sizes and ages, and provides room for creativity in every project. The cardigan also includes elegant ribbed edges at the neckline, cuffs, and bottom. They give the cardigan a polished and professionally finished look, while also ensuring it fits comfortably.
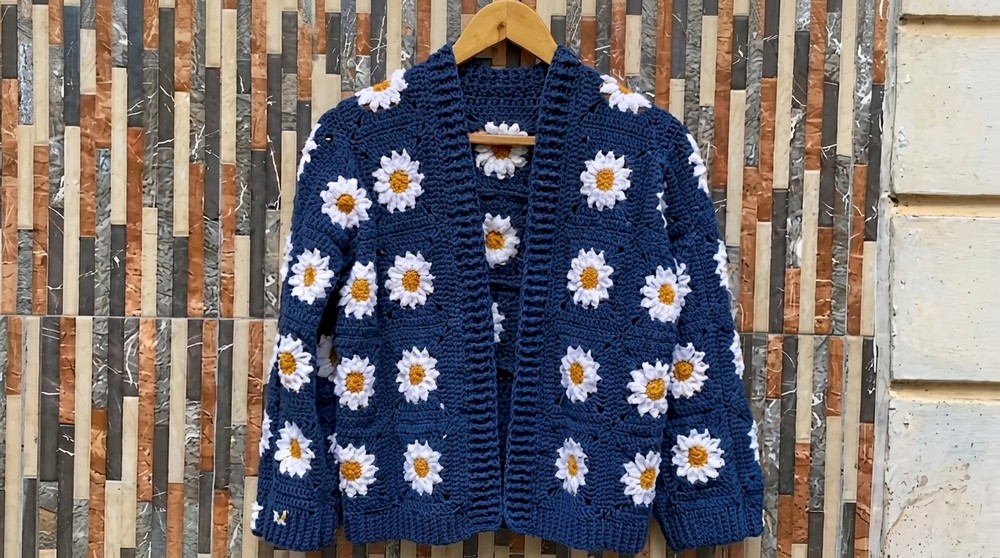
The sleeves are lightweight and designed to fit snugly at the wrist, with fantastic detailing like front and back post double crochet techniques, adding ribbed texture. This cardigan doesn't just look stylish-it is practical. Made from soft yarn, it's perfect for staying warm in cooler weather, and the breathable design allows for year round wear. You can dress it up with buttons or keep it open for a casual vibe. Either way, it becomes a favorite piece that's both functional and fashionable. Whether crocheted with bold colors or soft pastels, this sweater is a celebration of warmth, artistry, and care.
Crochet Granny Square Cardigan Pattern
Materials Needed
To make a Crochet Granny Square Cardigan, you need the following materials:
- Yarn:
- Select yarn in three or more colors for vibrant granny squares.
- The suggested yarn in this pattern is Lazy Cotton Gold or any Lightweight Cotton Yarn you prefer.
- Check the pattern gauge to ensure consistency.
- Crochet Hooks:
- 3.5 mm hook for making squares and ribbing.
- 3.0 mm hook for joining the squares (ensures neat and tight seams).
- Other Tools:
- Darning needle for weaving in ends.
- Scissors.
- Stitch markers to secure specific points during assembly.
- Measuring tape to measure square dimensions and finished size.
Gauge
- 4" × 4" Granny Square: Match this gauge to make squares uniform.
- Adjust the size by changing hook size or yarn weight if needed.
Finished Size
This pattern is for a Medium Size Cardigan:
- Bust Width: Approximately 42 inches.
- Length: 18 inches (excluding ribbing or adjusted to preference).
- Sleeves: 28 inches from neckline to wrist.
For smaller or larger sizes, instructions for customization are provided throughout the pattern.

Pattern Overview
Our cardigan will consist of four main sections:
- Back Panel: The largest rectangular piece made of joined granny squares.
- Front Panels: Two rectangular panels placed on either side of the cardigan with an open neckline.
- Shoulders: Two squares connect the back panel to the front panels across each shoulder.
- Sleeves: Rectangular panels attached to the shoulders to create the arms.
The cardigan also includes ribbings at the neckline, cuffs, and hem for a finished and fitted look.
Step by Step Instructions
Step 1: Crochet the Granny Squares
- Make a total of 64 granny squares using a 3.5 mm hook:
- Back Panel: 20 squares (5 squares wide × 4 squares tall).
- Front Panels: 20 squares (10 per panel, arranged in a 2.5 × 4 layout).
- Shoulder Panels: 2 squares (1 per shoulder).
- Sleeves: 12 squares (6 per sleeve, arranged 3 × 2 with length adjustments).
- Each square must measure 4 inches by 4 inches when completed.
If you don't already know how to make a granny square:
- Start with a magic circle or chain 4 and join to form a ring.
- Round 1: Chain 3 (counts as a double crochet). In the ring, work 2 double crochet, chain 2. Repeat (3 DC, CH 2) three more times to form four corners. Slip stitch to the top of the chain 3 to close the round.
- Round 2: Chain 3 (counts as a DC), 2 DC into the same space, chain 1. Work (3 DC, CH 2, 3 DC, CH 1) into each corner space for three additional sides. Slip stitch to close.
- Repeat rounds until desired size is achieved (about 3 to 4 rounds total for a 4 inch square).
- Weave in ends and block each square to ensure a uniform size.

Customize colors to your liking-you can alternate colors for each round, use solid colors, or create more intricate designs such as daisy or sunflower motifs.
Step 2: Join the Squares
- Use a single crochet join with a 3.0 mm hook for clean and neat seams. A 3.0 mm hook allows tighter joins for a polished finish:
- Place two squares together, right sides facing out.
- Insert your hook through the back loops of both squares, pull yarn through, and complete a single crochet stitch.
- Work along one edge. Repeat for remaining squares.
- Join all rows first, then connect the rows to each other.


Layout and Assembly
- Back Panel: Align and join 5 squares per row for 4 rows (5 × 4 grid).
- Front Panels: For each panel, align and join 2 rows of 2.5 squares wide for 4 squares tall.
- Shoulder Panels: Join 1 square between the top of each front panel and its matching edge on the back panel.
- Sleeves: Arrange 3 squares wide by 2 squares tall for each arm and join into a rectangular panel.
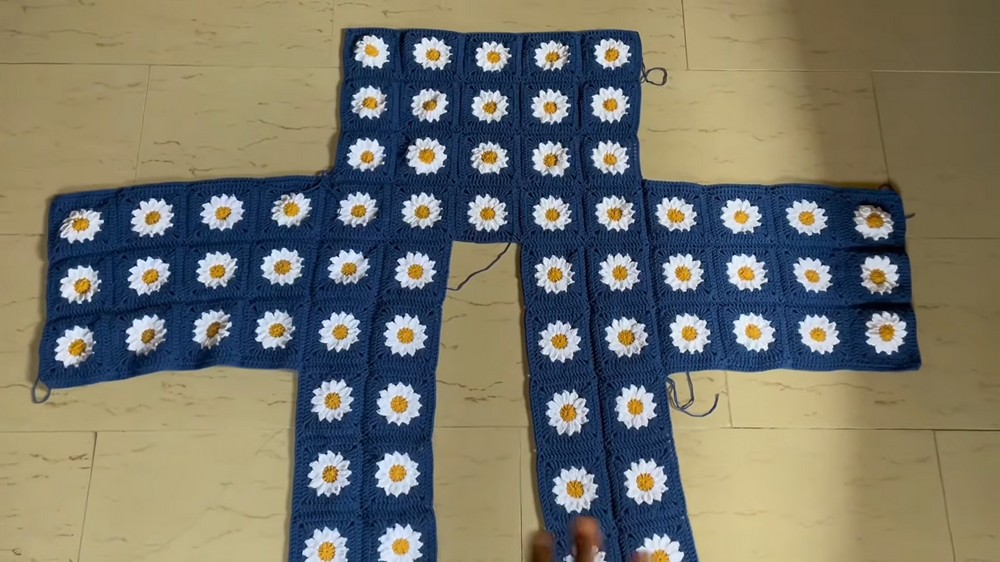
Step 3: Assemble the Jacket
Step 3.1: Sleeves
- Attach sleeves by aligning the long edge of the rectangular sleeve panel with the armhole (connecting back panel, front panel, and shoulder square edges).
Step 3.2: Side Seams
- Fold the cardigan, matching the front and back panels at the sides.
- Seam from underarm to hem and along the sleeves.

Step 4: Adding Ribbings
Bottom Ribbing
- Row 1: Attach yarn to the corner of the hem. Work one DC in each stitch along the bottom edge, including spaces between joins. Add an extra DC at corner squares.
- Row 2: Repeat DC evenly.
- Rows 3-6: Work Front Post Double Crochet (FPDC) followed by Back Post Double Crochet (BPDC) to create the ribbed effect.
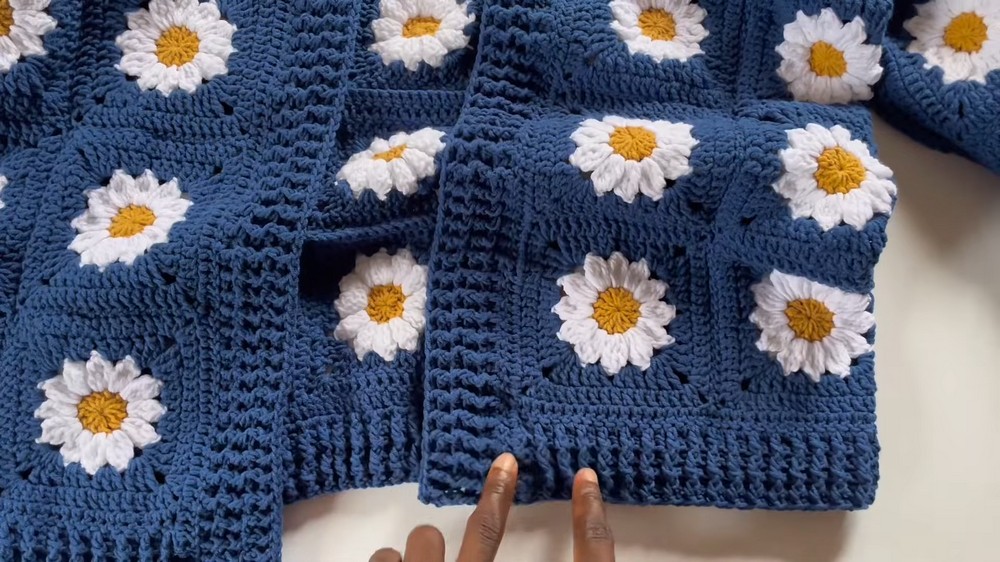
Cuff Ribbings
- Attach yarn to the sleeve edge at the wrist.
- Round 1: Decrease by working 2 DC together every 3-4 stitches to "scrunch" the cuff for a snug fit.
- Rounds 2-5: Alternate FPDC and BPDC for the ribbed texture.
Neckline Ribbing
- Attach yarn to one side of the neckline near the hem.
- Work one DC in each stitch along the neckline edge, decreasing at shoulder joins by working 4 DC together (1 in each piece of the join).
- Repeat rounds for FPDC/BPDC ribbing for 4-6 rows based on your preferred neckline finish.

Customization Tips
- Sizing Adjustments:
- Add or remove squares for longer/shorter body length or wider/narrower panels.
- Add extra rows of DC on sleeves or body for additional customization if squares don't perfectly align with your measurements.
- Color Choices:
- Go bold with contrasting colors, or use complementary shades for a subtle, cohesive look.
- Try alternating light and dark squares in a checkerboard pattern.
- Finishing Touches:
- Add buttons to the opening for a functional design.
- Attach pockets to the front panels for extra style and utility.
Conclusion
This Crochet Granny Square Cardigan is a delightful mix of vintage charm and modern style. It serves as both a cozy garment and a creative outlet for experimenting with colors and designs. Whether you're using bold contrasts, pastel shades, or muted tones, the final product will be an eye catching, one of a kind cardigan you'll love to wear or gift.
Take your time through every step, follow the stitch details, and enjoy the process of crocheting something beautiful. With this guide, you can make your Granny Square Cardigan unique to your taste and size. Have fun crocheting and creating memories through this timeless project.