
Cute Free Crochet Granny Square Cushion Cover Pattern
Bring a touch of charm to your home with this crochet granny square cushion cover that fills your space with comfort and the joy of handmade beauty.
It's amazing how a simple ball of yarn can turn into something so cozy and beautiful. With just your hands and a crochet hook, you can make a cushion cover that feels warm and inviting while adding charm to your space. This Crochet Granny Square Cushion Cover project uses one large square with lovely stitches that come together effortlessly, making it easy even for beginners to try.
Simple Free Crochet Granny Square Cushion Cover Pattern

The colors can be bold and bright, or soft and calm-it's all about what you like. As you work, you'll see a stunning diamond shape appear at the center, surrounded by neat patterns that look stylish but are surprisingly easy to create. It's a wonderful way to bring a little personality into your home while having fun with crocheting.
Not only does this cushion cover look beautiful, but it's also practical. It can protect your pillows while transforming them into something unique and cheerful. Whether you want to match the look of your living room, cozy up your bedroom, or even make a thoughtful gift for someone special, this is a project worth trying.
One of the best things about making this cushion cover is how relaxing and rewarding it feels. As your yarn turns into something you can actually use every day, you'll feel proud of the creativity you've poured into it. Simple steps, colorful results, and endless possibilities-this is your chance to brighten your space with something truly handmade and special.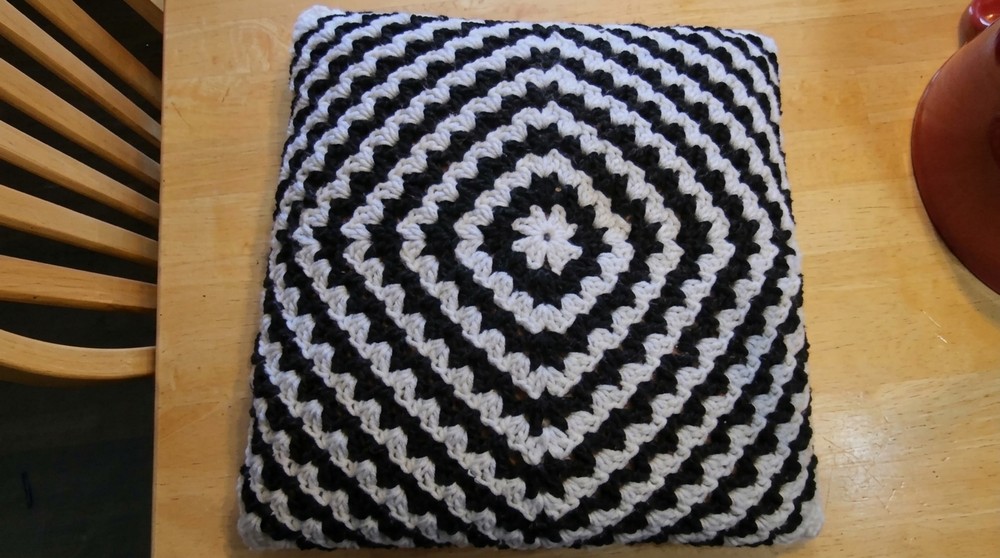
Crochet Granny Square Cushion Cover Pattern
Materials Required
- Crochet Hook: 5 mm crochet hook.
- Yarn: Acrylic yarn in contrasting colors (dark and light).
- Scissors: For cutting yarn ends.
- Darning Needle: To sew seams together.
- Standard Cushion Insert: Used as the base for the pillow cover.
Techniques Used
- Slip Knot: Used to start the project.
- Chain Stitch (ch): Basic foundation stitch.
- Double Crochet (dc): Primary stitch used throughout the pattern.
- Cluster Stitch: Groups of three double crochets.
- V Stitch: Double crochet, chain two, and double crochet in the same space.
- Slip Stitch: For joining rounds.
- Whip Stitch: Used for sewing pillow sides together.
Pattern Instructions
Step 1: Starting the Granny Square
- Create a slip knot and chain 5 stitches.
- Insert your hook into the first chain to form a circle, and slip stitch to secure.
Step 2: First Round
- Chain 3; this will count as your first double crochet.
- Work 2 double crochets into the center of the circle.
- You now have your first cluster (a group of 3 double crochets).
- Chain 2 to form the first corner.
- Repeat the process: 3 double crochets, chain 2.
- You should have 4 clusters total with chain 2 spaces between each cluster, forming 4 corners.
- To finish the round, chain 2 and slip stitch into the top of the first chain.
Step 3: Subsequent Rounds
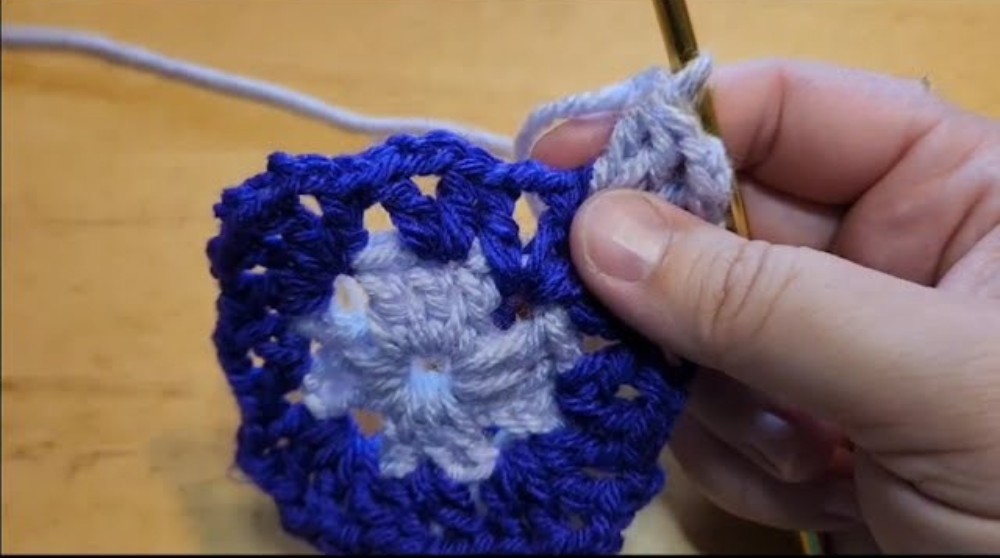
- Change yarn color by creating a slip knot with the new color.
- To start in a corner, insert your hook into any corner space and attach the yarn.
- For every corner, crochet:
- 1 V stitch: (dc, ch 2, dc).
- Chain 2, then crochet another V stitch in the same corner space.
- For clusters of three double crochets between corners:
- Find the middle double crochet of the cluster from the previous round, and work a single V stitch (dc, ch 2, dc) into that middle stitch.
- Repeat for all middle clusters around the square.
- Continue this pattern for the desired number of rounds.

Step 4: Alternating Light and Dark Colors
- Alternate between contrasting colors with every round (light and dark).
- Each odd round will be clusters of double crochets in spaces, while even rounds will include V stitches in corners and middle stitches.
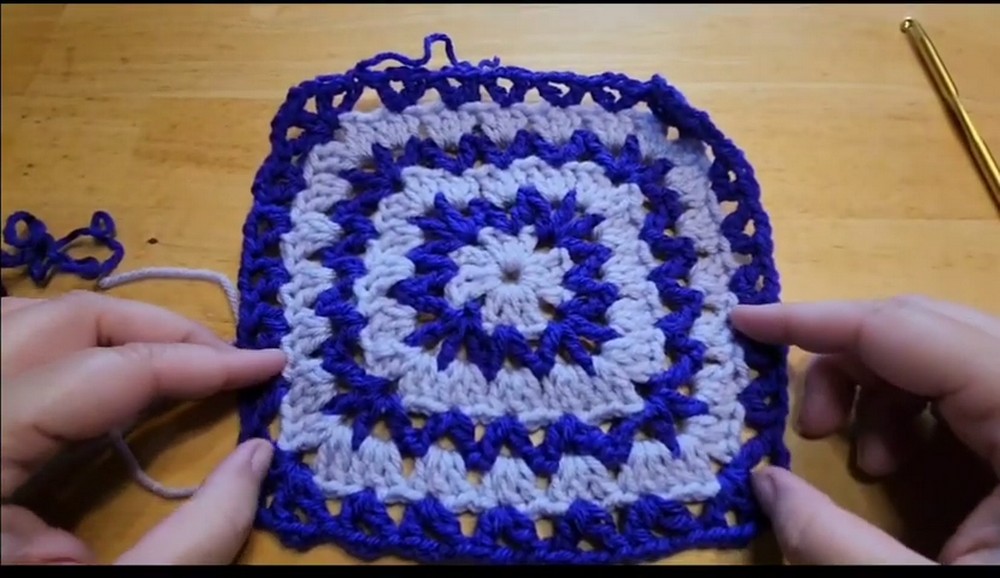
- Repeat the pattern until you've completed 21 rounds or until your square is the size of your pillow insert.
Finishing the Granny Square
- Once the final round is complete, secure the last chain with a slip stitch into the top corner of the starting chain.
- Trim yarn ends, leaving a little extra length, and pull the yarn through to fasten off securely.
- Weave in loose ends: Use your crochet hook or darning needle to tuck in the yarn ends behind stitches for a neat finish.

Assembling the Pillow Cover
Folding and Seaming
- Lay your completed granny square with the wrong side up.
- Fold two corners of the square into the center. Repeat with the other two corners, forming a diamond shape.
- Ensure the corners align neatly.

Sewing Edges
- Option 1: Crochet Seam
- Use a matching yarn and single crochet along the edges to join them.
- Option 2: Whip Stitch (as shown in the video):
- Use a darning needle and yarn to sew edges together with a whip stitch.
- To do this, sew through one loop from each layer on each side of the seam for a secure finish.

Inserting the Pillow
- Turn the square right side out to reveal the neat diamond pattern. Smooth out the corners.
- Insert your pillow through the remaining open seam, ensuring it fits snugly.
Final Seam
- Stretch the pillow cover slightly to ensure both edges of the open seam align.
- Sew the final seam using your chosen method (crochet seam or whip stitch).
- If you prefer a removable cover, you can add buttons to this seam instead of permanent stitching.

Final Words
Congratulations on completing your pillow cover. This single giant granny square design eliminates the need for assembling multiple smaller squares, saving time and effort. It combines style, simplicity, and functionality, producing an elegant diamond-shaped cover that enhances any space.
Tips to Maintain the Pattern
- Granny Square Basics: If you're a beginner, start with smaller squares to practice the techniques before moving to larger designs.
- Color Changes: When switching yarn colors, always secure the ends and crochet over them where possible to avoid fraying.
- Customization: Feel free to experiment with color combinations or yarn textures to make the pillow unique to your style.
- Sizing: Measure your pillow insert carefully and adjust the number of rounds as needed to ensure a snug fit.
- Washing and Care: Wash your pillow cover gently by hand or use a delicate machine wash setting. Lay flat to dry to preserve its shape.

Enjoy showcasing your handmade creation and bringing warmth and beauty into your home.