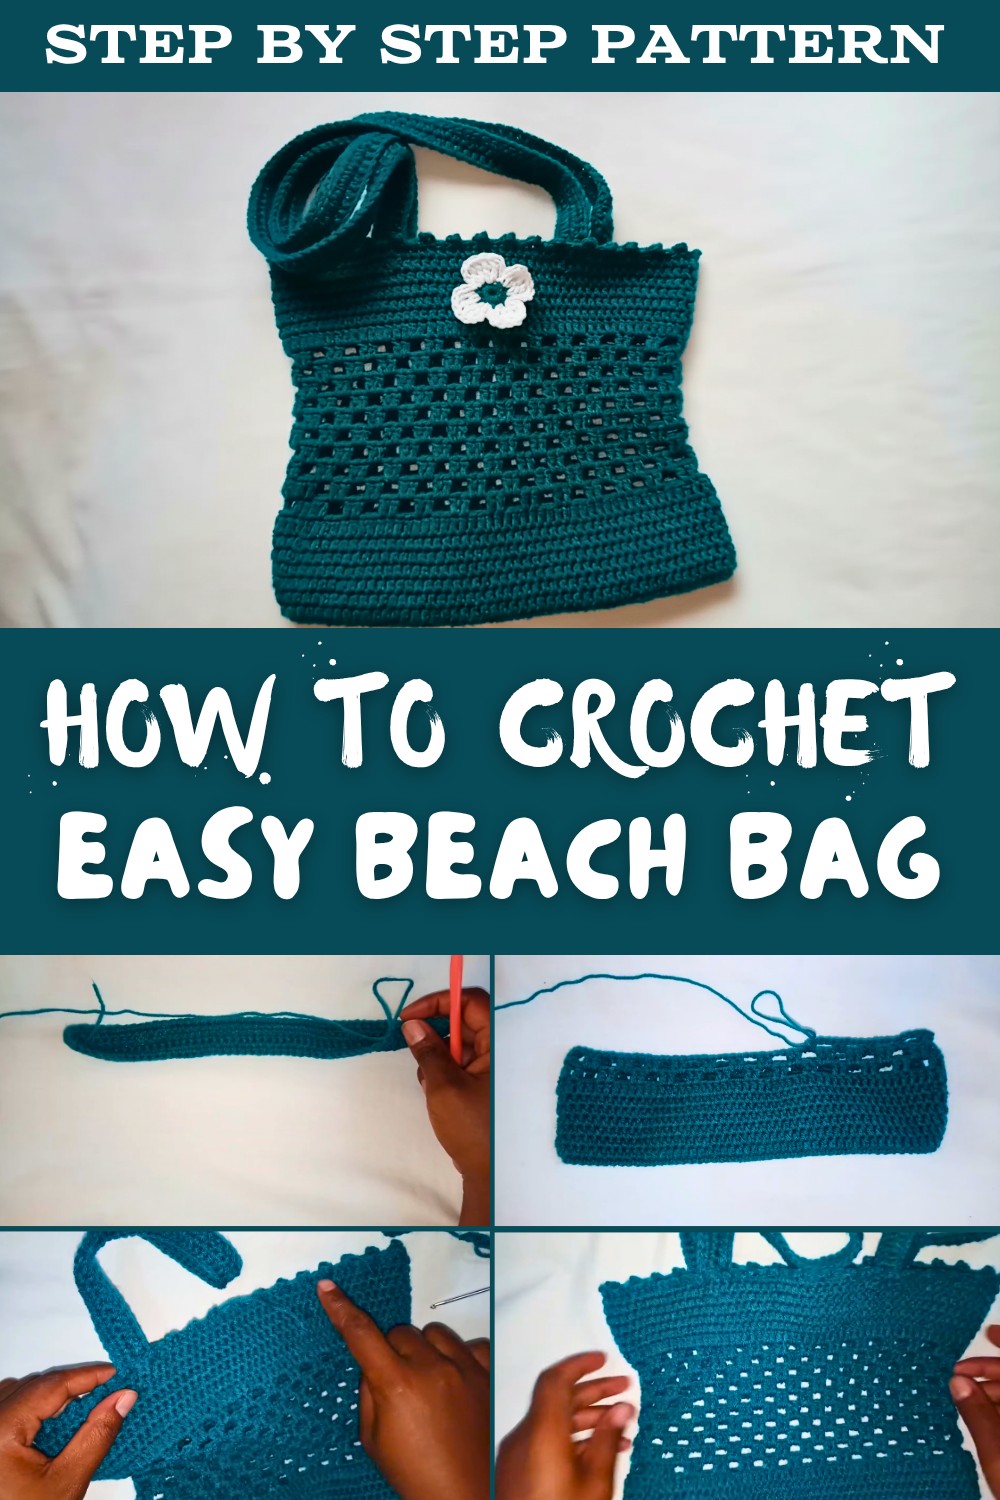
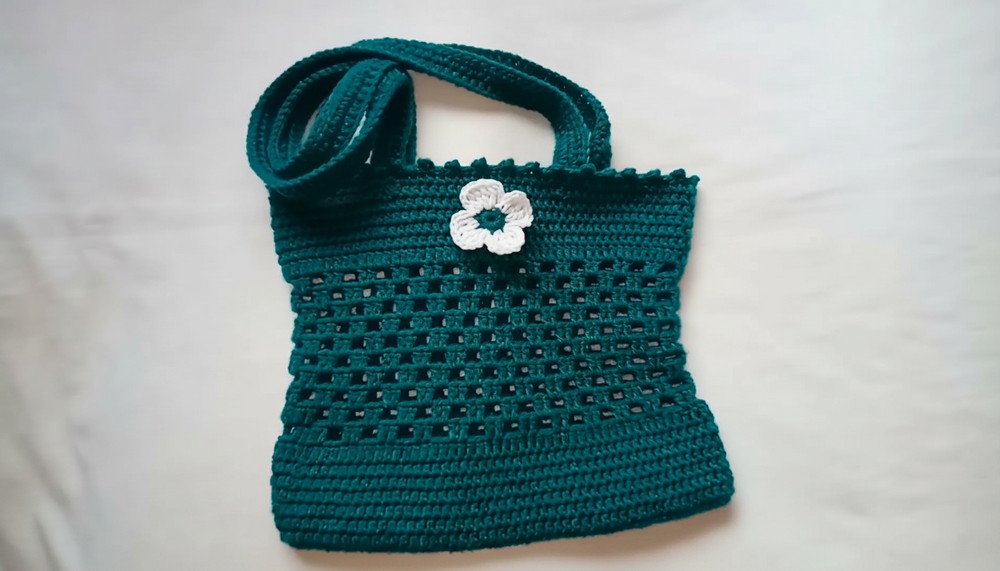
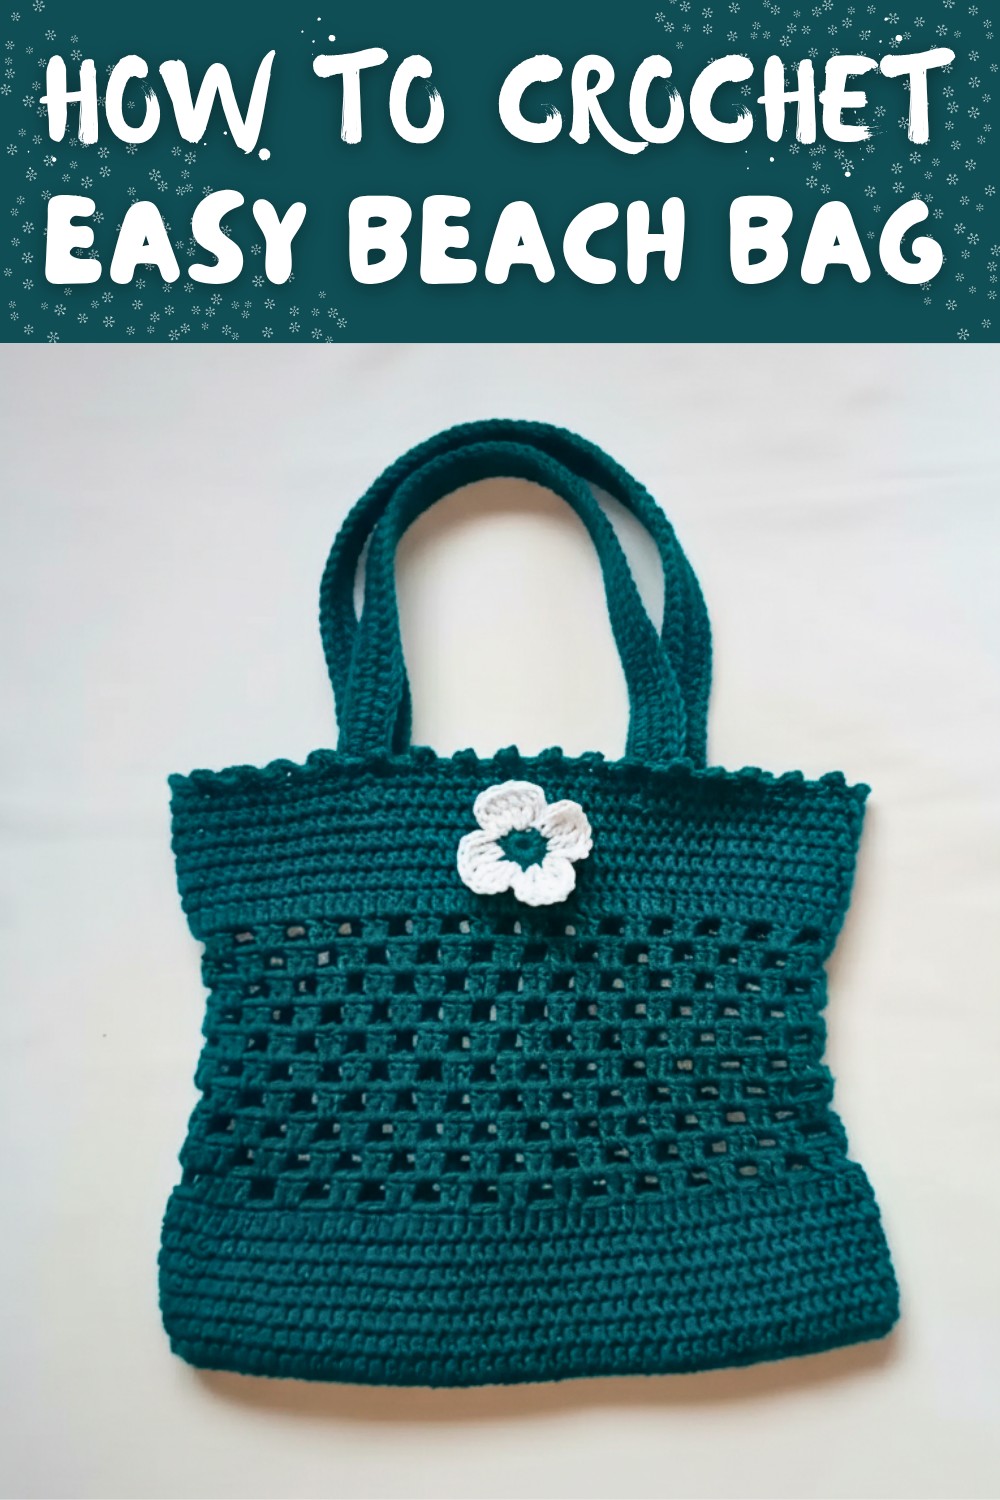
Free Crochet Beach Bag Pattern for Stylish Summer Days
Carry charm and utility in every stitch with a crochet beach bag that's perfect for sunny outings, while showcasing your creativity with ease and flair.
It's hard to settle for store-bought bags when you can create something far more unique and personal. A crochet beach bag is the perfect project for anyone craving a mix of practicality and playful design. Combining the charm of textured stitches with endless color possibilities, this bag is more than just functional-it's a creative outlet you can carry on your arm.
Easy Crochet Beach Bag Pattern to Show Off Your Style
Whether you're hitting the market, lounging by the pool, or heading to the beach, this handmade bag showcases your artistry and adds personality to your wardrobe. What makes it truly thrilling is the freedom to customize; add stripes, embellishments, or quirky handles to match your vibe. Plus, it's a great chance to repurpose leftover yarn, turning scraps into sunshine-ready masterpieces.
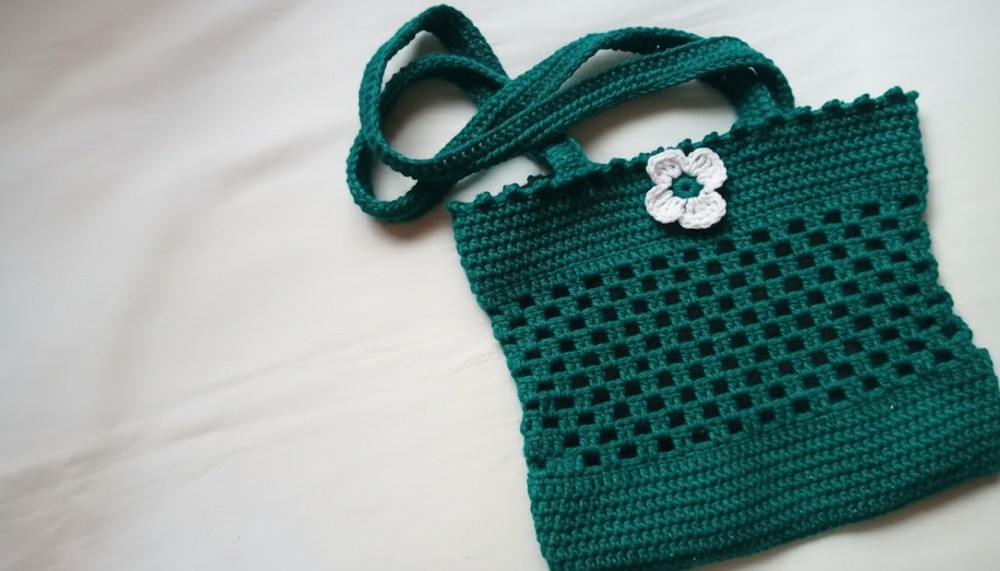
Crochet Beach/Market Bag Pattern
Materials
Required Materials:
- Yarn: Medium (worsted) weight yarn, 100% acrylic. The video used acrylic yarn, though cotton yarn is also ideal for market bags.
- Quantity: Approximately 300-400 g
- Customization: Use any color combination desired.
- Hook: 3.5 mm crochet hook (as specified in the transcription).
- Notions:
- Yarn needle (for sewing handles)
- Scissors
Optional Materials:
- Decorative flower or accessory (tutorial noted at the end for a daisy flower).
Skill Level:
Intermediate
Abbreviations (US Crochet Terms)
- ch = chain
- sc = single crochet
- hdc = half double crochet
- dc = double crochet
- sl st = slip stitch
- st(s) = stitch(es)
- rep = repeat
- sk = skip
Special Techniques
- Edging Pattern: Used at the top brim for a decorative finish. It combines slip stitches and chained loops.
- Handles: Created separately and sewn onto the bag for added durability.
- Adjustable Size: You can easily adjust the size by altering the foundation chain and adding or subtracting rows.
Crochet Bag Instructions
Step 1: Foundation Chain
- Start: Ch 50 (adjust chain count for desired size).
- To increase size, add chains to the foundation chain.
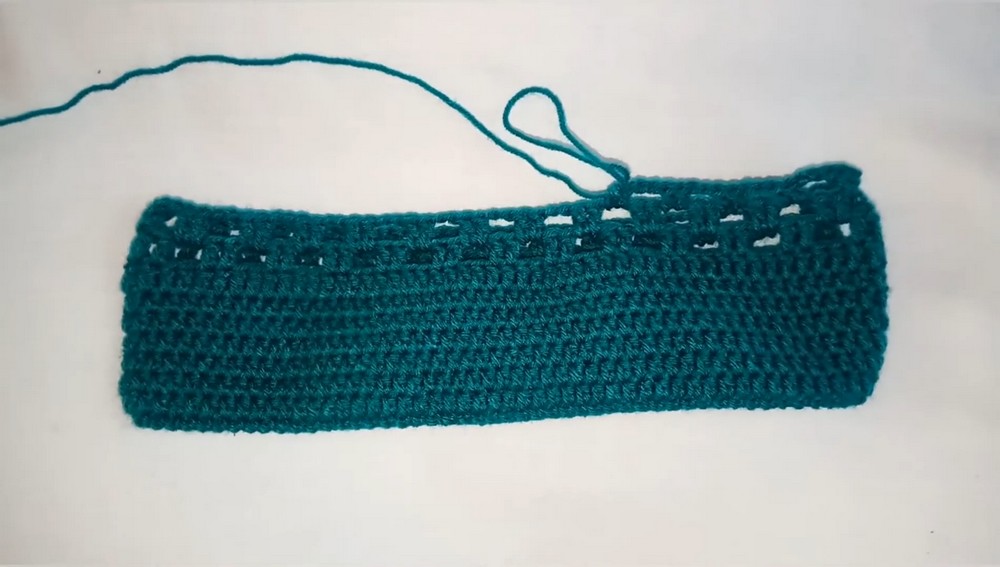
Step 2: Round 1 - Single Crochet
- Start Row:
- Insert hook into the 2nd ch from the hook and make a sc.
- Continue working sc into each ch across the row (49 sc total).
- Turn the Work: At the end stitch of the row, work 2 sc into it to create a rounded edge.
- Work on the Opposite Side:
- Rotate your work and begin working sc into the opposite side of each chain. (You should mirror the stitches from the first side.)
- Work 2 sc at the last chain for the second rounded edge.
- Join the Round:
- Sl st into the top of the first sc to join. (You now have 49 sc on each side + 4 sc at the corners = 102 total sts.)

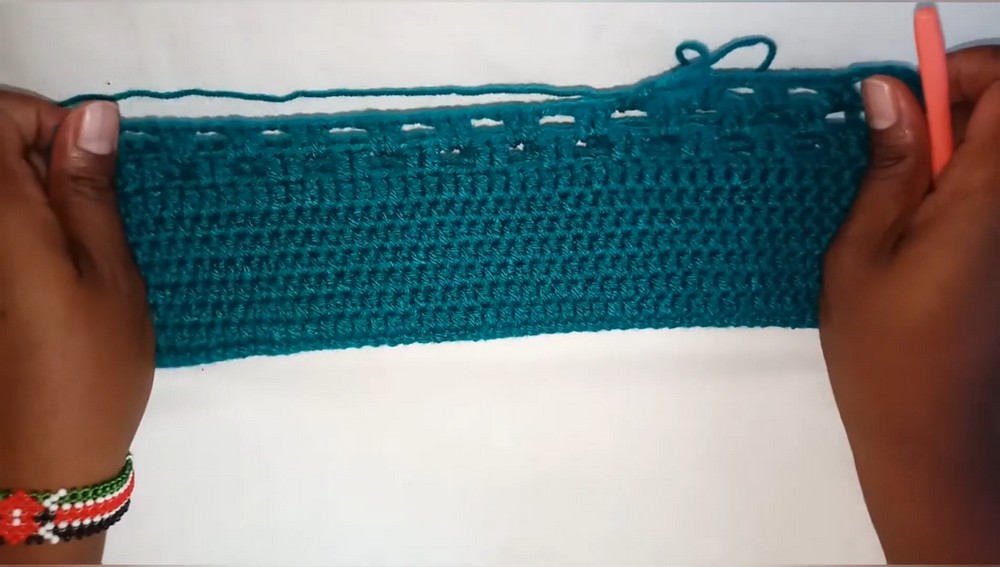
Step 3: Rounds 2-7 - Half Double Crochet (hdc)
- Round 2:
- Ch 2 (does not count as a stitch).
- Into the same stitch, make 1 hdc.
- Continue working hdc into each st around.
- Joining: At the end of the round, sl st into the top of the first hdc.
- Rounds 3-7:
- Repeat the hdc pattern for 6 total rounds.
- Ensure you do not skip any stitches as you work.
Step 4: Round 8 - Double Crochet (dc)
- Ch 3 (counts as the first dc).
- Work dc into each st around to create a single row of double crochets.
- Sl st into the top of the first dc to join.
Step 5: Rounds 9-18 - Mesh Pattern
- Round 9 - Start Mesh Pattern:
- Ch 3 (counts as the first dc).
- Work 1 dc into the next two stitches.
- Ch 2, skip 2 stitches, dc into the next two stitches.
- Repeat Pattern:
- Continue the pattern: Ch 2, sk 2 sts, dc into the next two stitches.
- Round 10:
- Sl st into the top of the first dc to join. Use sl st to move into the next ch-2 space.
- Ch 3, work 1 dc into the same ch-2 space.
- Ch 2, skip 2 dc, work 2 dc into the next ch-2 space.
- Rounds 11-18:
- Continue repeating the mesh pattern: Ch 2, sk 2 sts, dc into ch-2 spaces.
- Sl st into the next space to finish each round.
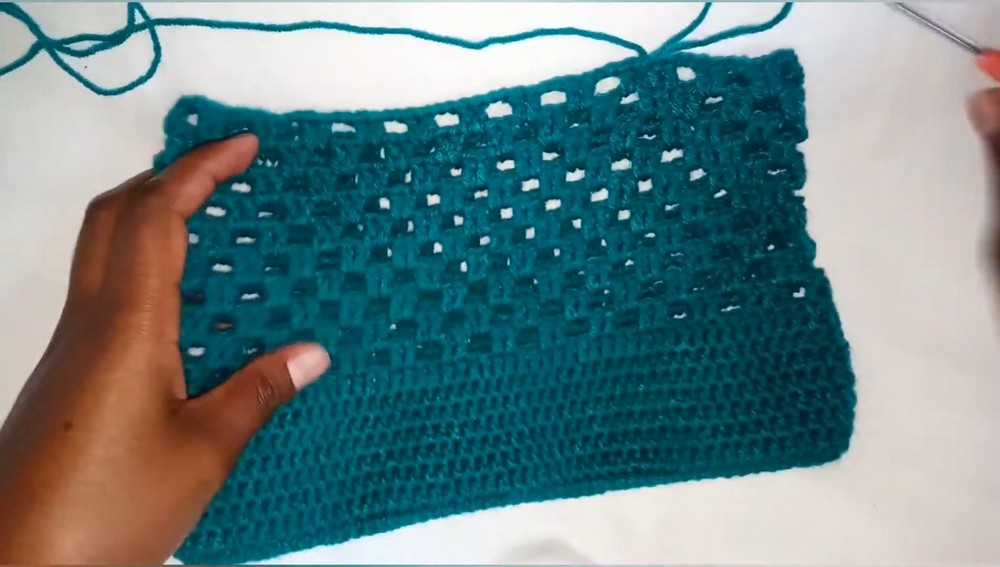
Step 6: Round 19 - Return to Double Crochet
- Ch 3 (counts as the first dc).
- Work 2 dc into each ch-2 space.
- Work dc on top of each regular dc from the previous round.
- Sl st into the top of the first dc to join.
Step 7: Rounds 20-25 - Half Double Crochet (hdc)
- Return to hdc:
- Ch 2 (does not count as a stitch).
- Work hdc into each st around.
- Repeat hdc pattern: Complete 6 rounds.
Step 8: Final Round - Edging
- Ch 1, sl st into the first st.
- Work Edging Pattern:
- Ch 3, sl st into the same stitch.
- Work sl st into the next 3 sts.
- Repeat: Ch 3, sl st into the same stitch, sl st into the next 3 sts.
- Finish & Fasten Off:
- At the end of the round, sl st, ch 1, tighten, and cut the yarn.
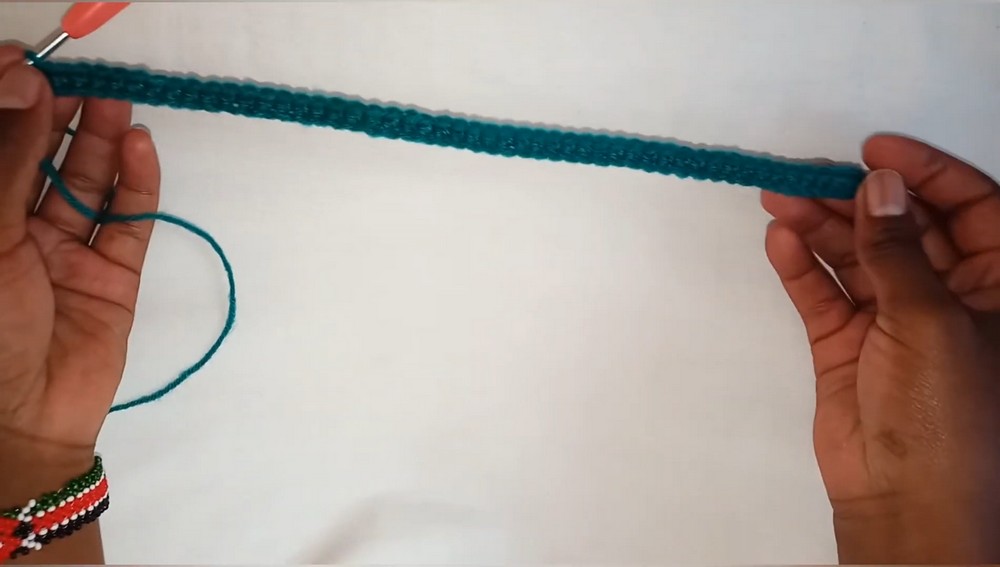
Step 9: Handles
Handle Construction:
- Ch 100 for the first handle.
- Adjust chain count for longer or shorter handles.
- Row 1:
- Work hdc across each ch.
- Row 2:
- Repeat hdc across the row.
- Row 3 (Final Row):
- Work sl st into every stitch across the row for a clean finish.
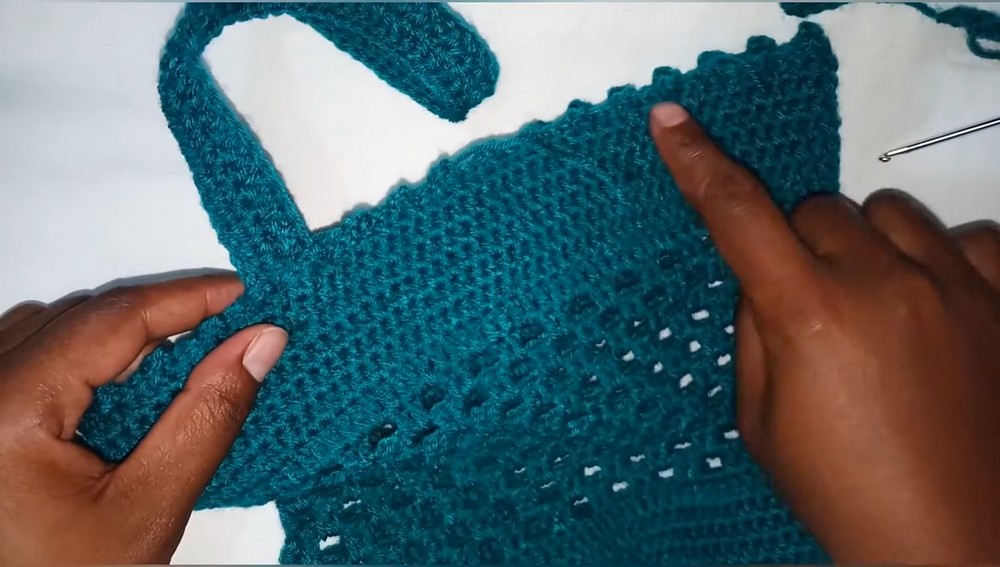
Attach Handles:
- Use a yarn needle to sew the ends of each handle securely onto opposite sides of the bag.
- Ensure symmetry and durability by stitching multiple passes.
Optional Embellishment - Flower
You can attach a decorative flower to the bag if desired. Refer to the tutorial mentioned in the transcription for a daisy flower pattern. Use a glue gun or stitch the flower securely onto the bag.
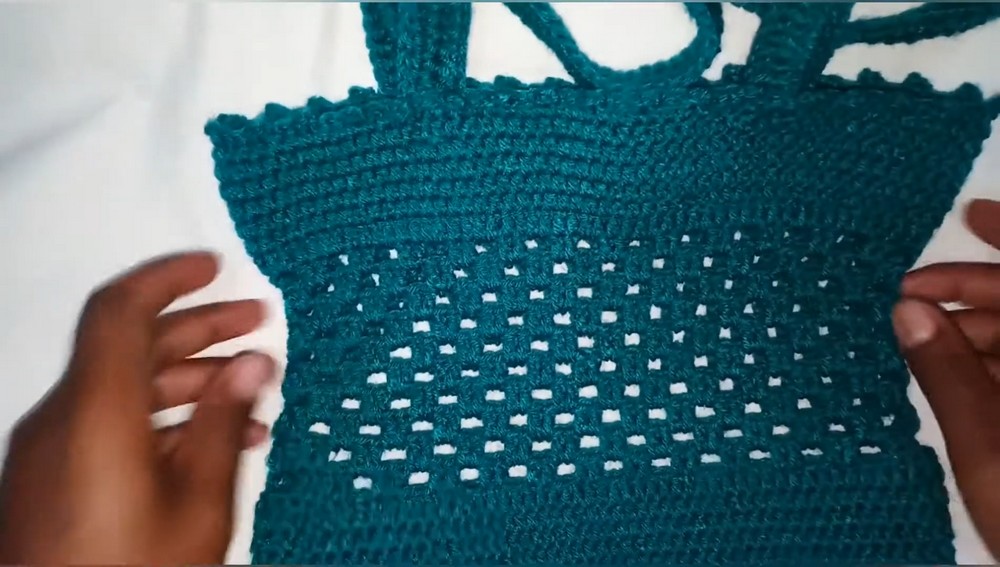
Finishing the Pattern
- Inspect Seams: Ensure the handles are securely attached and the edging is smooth.
- Weave Ends: Use a yarn needle to weave in all loose ends. Trim excess yarn neatly.
- Block the Project: If necessary, lightly block your finished bag to ensure proper shape.
Conclusion
This crochet bag pattern, featuring textures like hdc, dc, and mesh stitch, creates a lightweight and functional bag suitable for various occasions. The addition of an edging and handles completes the design beautifully.
Tips for Maintenance:
- Cleaning: Acrylic yarn is machine washable. Use gentle detergent and avoid high heat to maintain shape.
- Stretch Prevention: Do not overload the bag beyond its capacity to prevent excessive stretch.
- Handle Durability: Periodically check handles to ensure they remain securely attached.