
Beautiful Crochet Fingerless Gloves with Free Pattern
Lift your winter style with this Free Crochet Fingerless Gloves Pattern that lets you create warm and trendy gloves for everyday comfort and ease.
Dream of having a cozy gloves that keep your hands warm but still let you move your fingers easily. This fun crochet project help you make fingerless gloves that are both stylish and practical. These handmade gloves are perfect for chilly days when you want to keep your hands warm but still need to type, write, or scroll on your phone.
Free Crochet Fingerless Gloves Pattern for Comfort

You can use soft yarn to keep things cozy or choose colorful yarns to add vibrant color and personality. The cuffs of the gloves fit snugly, and the fingerless design keeps them lightweight, functional, and suitable for everyday use. The gloves are also crocheted in rounds, ensuring a seamless and polished finish that looks both professional and handmade.
The appearance of these gloves is stunning too. They have a charming handmade look that makes them unique compared to store bought gloves. Whether you choose a plain design or add patterns and decorations, these gloves are sure to make a statement. Plus, they make thoughtful gifts for friends and family.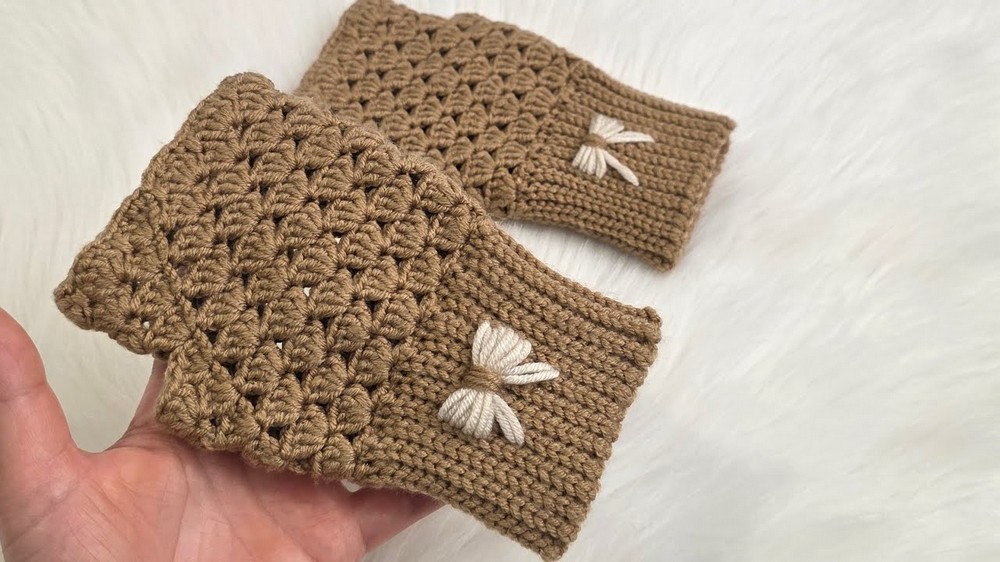
Crocheting these gloves is also a great way to relax and enjoy your creativity. The project is simple enough for beginners, and the pattern will guide you step by step. In the end, you'll have a wonderful pair of gloves that are warm, attractive, and uniquely yours. Give this pattern a try to crochet something both useful and stylish.
Beautiful Crochet Fingerless Gloves with Ribbon Decor - Pattern
Materials Required
- Yarn
- Nako Elite Baby Yarn: Recommended for its softness and elasticity. This is a baby yarn blend that is both durable and gentle on the skin. Feel free to substitute with any similarly textured sport weight yarn.
- Threads for Bow: Use the same yarn for the bow or choose contrasting colors for added flair.
- Crochet Hook
- 2.5 mm crochet hook for precision.
- If you crochet tightly, consider a 3 mm or 3.5 mm crochet hook to ensure elasticity.
- Accessories
- Scissors.
- Tapestry needle for weaving in ends and securing the bow decor.
- Measuring tape (optional for customizing sizes).
Gauge
Gauge is essential for proper fit. However, since the wristband is ribbed and stretchy, minor gauge variations are permissible. For reference, the completed ribbed wristband should measure 14.5 cm without stretching, using sport weight yarn and a 2.5 mm crochet hook.
Finished Size
- Wristband: Approximately 14.5 cm circumference (unstretched).
- Glove Length: Covers the palm and begins just below the fingers.
- Glove Width: Standard adult small/medium size, adjustable by changing hook or yarn thickness.
Special Techniques Used
- Slip Stitch (sl st):
Used for creating the ribbed wristband, this technique ensures flexibility and texture.- Insert hook into stitch, yarn over, and pull through both loops.
- Single Crochet (sc):
Used for creating a sturdy foundation and finishing edges.- Insert hook into stitch, yarn over, pull up a loop (2 loops on hook), yarn over, pull through both loops.
- Double Crochet (dc):
Used for creating the glove's main texture.- Yarn over, insert hook into stitch, yarn over, pull up a loop (3 loops on hook), yarn over, pull through 2 loops, yarn over, pull through remaining 2 loops.
Pattern Instructions
Part 1: Ribbed Wristband
Row 1 - Foundation Chains
- Start by chaining 18 stitches loosely. Avoid tightening too much, as the wristband should remain flexible.
Rows 2-25 - Creating Ribbed Rows
- In the 17th chain (second to last chain), work a slip stitch into the back loop only.
- Continue working slip stitches in each chain along the row for a total of 17 slip stitches.
- At the end of each row, chain 1, turn your work, and continue back along the ribbed rows.
- Work each slip stitch into the back loop only for elasticity and texture.
- Repeat this process for 25 rows, ensuring each row contains 17 slip stitches.

Joining the Ribbed Wristband
- Fold the wristband into a loop and align the edges. Work a row of slip stitches across to join the foundation edge to the last row. Insert the hook through both loops of the stitches at each side and complete the slip stitch. The ribbed wristband is now complete.

Part 2: Glove Body
Round 1 - Base Foundation
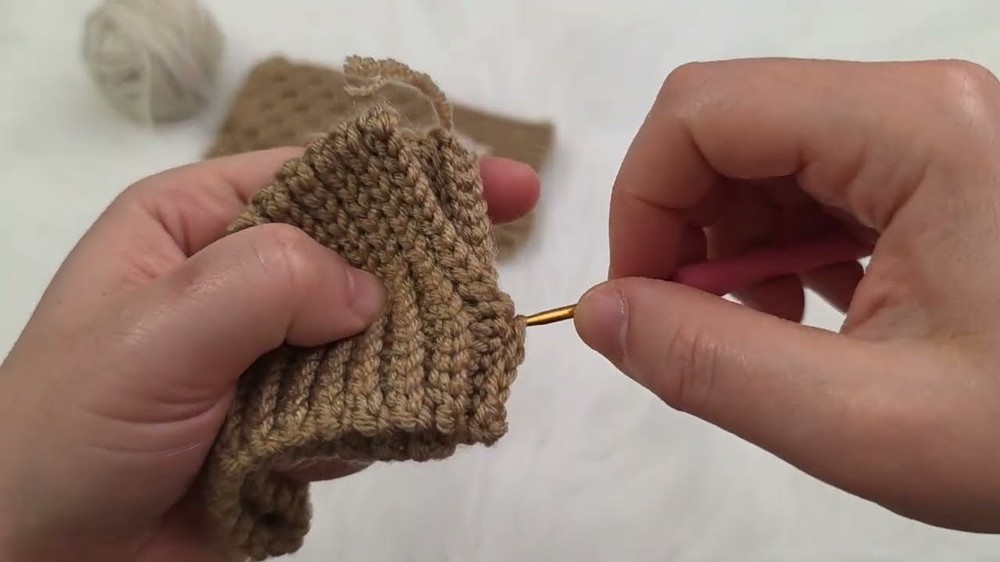
- With the wristband facing lengthwise, join the yarn at the seam and chain 1.
- Work single crochet (sc) stitches evenly along the edge. Insert hook into each "rib row" and work 1 sc.
- Since there are 25 ribbed rows, you will have approximately 50 sc along the wristband edge.
- Join round with a slip stitch into the first sc stitch.
Rounds 2-7 - Textured Body of Glove
- Chain 3 (counts as first dc), then work 3 more double crochets into the same stitch.
- Skip 3 stitches and work 4 double crochets into the 4th stitch.
- Repeat this sequence (skip 3, 4 double crochets into the 4th stitch) around the glove edge. Join with a slip stitch to the top of the starting chain.
- You should have 12 clusters of 4 dc across the round.
- Repeat this pattern for 6 full rounds to complete the glove body.

Part 3: Finger Opening
Round 7 - Creating the Finger Gap
- Begin the 7th round as usual by chaining 3 and working into the previous cluster.
- For the finger opening:
- Skip two clusters (effectively skipping 8 stitches).
- Work into the following cluster after the skipped section and continue the pattern of 4 dc clusters.
- You have now reduced the total clusters from 12 to 10. Continue around the glove.

Part 4: Final Rounds and Edging
Rounds 8-11 - Completing the Glove
- Continue working the same 4 dc cluster pattern for 4 more rounds, maintaining 10 clusters for the body.
- Finish the final edge of the glove by creating a round of single crochet over the existing clusters. Work 1 sc into each stitch at the top of each cluster for a clean, finished edge.
Part 5: Ribbon Decor
Creating the Bow
- Choose a yarn color for the decorative bow (e.g., match the glove or use a complementary color).
- Identify the center of the ribbed wristband.
- Using a tapestry needle and yarn thread, create a bow shape:
- Wrap yarn lengths around four rows of the ribbing.
- Tie securely in the middle and adjust the loops until the bow is symmetrical.

Attaching the Bow
- Sew the bow to secure it to the glove. Ensure it aligns neatly at the wrist section or any preferred position.

Customization Ideas
- Sizing Adjustments:
- Adjust the length of the ribbed wristband for larger wrists. Decrease or increase the chains in Row 1 to fit.
- Add or subtract glove body rounds for longer or shorter gloves.
- Decorative Bow Variations:
- Swap the bow for buttons, small pompoms, or crocheted flowers.
- Use metallic thread or embroidery for added detailing.
- Glove Shapes:
- Extend the pattern length to create longer gloves that cover the wrist and forearm.

Conclusion and Final Remarks
These crochet gloves are perfect for combining elegance and comfort. The slip stitch ribbing ensures the wristband is stretchy and snug, while the cluster pattern gives texture and visual appeal. The optional bow decor adds personality and makes these gloves suitable for gifting or wearing daily.
Tips for Success:
- Elasticity Adjustment: If you're using a tighter or less elastic yarn (e.g., cotton), ensure your starting chain and wristband rows are loose enough to stretch.
- Care Instructions:
- Hand wash or machine wash on a delicate setting.
- Avoid hanging; lay flat to dry to preserve shape.

These gloves are a versatile accessory that combines practicality and charm. Pair them with your winter outfits, gift them to loved ones, or create unique variations to suit your style.