
Crochet Granny Flower Shoulder Bag Step-by-Step Free Pattern
Stitch a colorful Free Crochet Granny Flower Shoulder Bag Pattern with 3D petals, sturdy strap, and roomy sides, for daily use, or handmade gifts.
A shoulder bag with blooming granny flowers is not just an accessory but a piece of art you can carry with pride. The Free Crochet Granny Flower Shoulder Bag pattern features vibrant flower squares that are joined together with precision to give a beautiful 3D floral effect. Every detail is made to stand out, from the petal-like shapes of the flowers to the sturdy structure of the bag that ensures it can carry all your essentials comfortably.
Easy Free Crochet Granny Flower Shoulder Bag Pattern for All
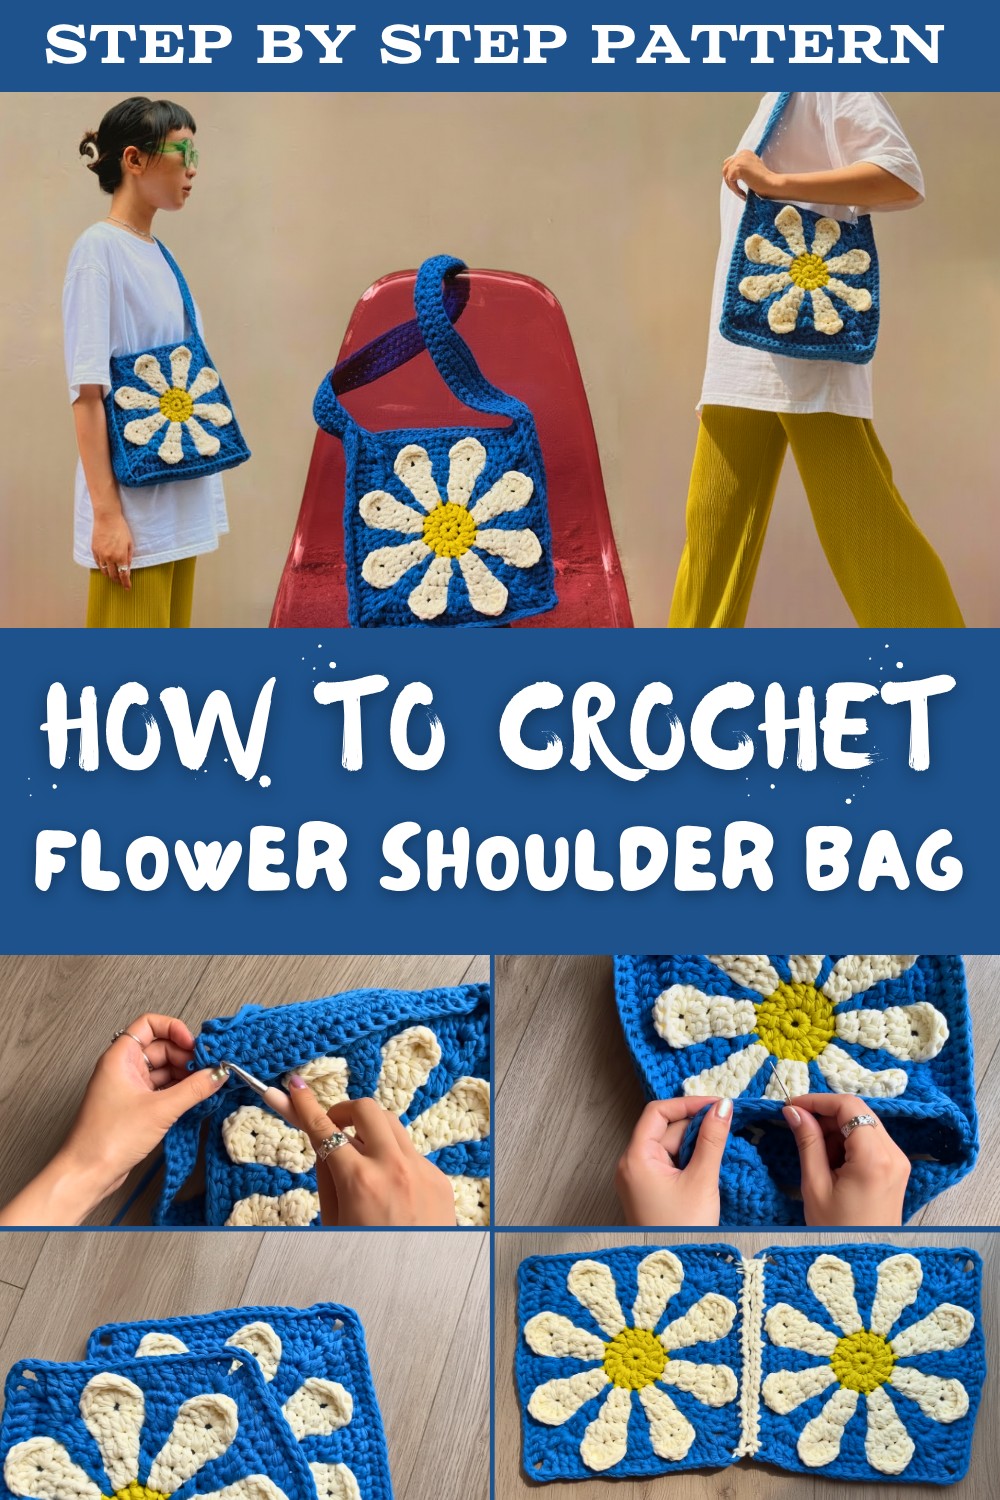
The colors can be chosen to match your style, whether you prefer soft pastels for a subtle look or rich, bold tones for a statement piece. The strap is made durable and comfortable, with carefully stitched single crochet rows, ensuring it sits perfectly on your shoulder. The gusset design gives it the right amount of space for wallets, keys, phones, or other daily essentials.

This bag shines not only as a practical daily companion but also as a thoughtful handmade gift for loved ones. The attention to detail, like the neatly hidden yarn tails and intricate stitches, makes it a standout in both appearance and quality. Perfect for outings, shopping trips, or casual gatherings, this shoulder bag brings beauty and functionality together in one elegant package.
Flower Square Crochet Bag Pattern
Skill Level
Intermediate: Requires familiarity with single crochet (sc), slip stitches (sl st), treble crochet (tr), and working in chain stitches. The project also involves sewing and finishing techniques for clean detailing.
Finished Dimensions
The bag dimensions depend on the size of your flower squares, gusset rows, and strap length:
- Approximate Size:
- Bag width: The width of one square.
- Bag height: The combined height of the gussets and two squares.
You can adjust the strap length based on personal preference.
Materials
- Yarn:
- Type: 4-ply cotton yarn (or medium-weight yarn). Cotton is recommended for durability and structure.
- Amount: Approximately 100g total (depending on square size and strap length).
- Hook:
- Crochet hook: Size 3 mm (adjust based on your yarn thickness).
- Notions:
- Scissors: For cutting yarn.
- Darning needle: To weave ends and sew finishing details.
- Measuring tape: For dimensions.
- Stitch markers (optional): Helpful for keeping track of corners and edges during assembly.
Key Abbreviations (US Terminology)
- ch - Chain
- sc - Single Crochet
- sl st - Slip Stitch
- tr - Treble Crochet
- yo - Yarn Over
Special Techniques
Standing Single Crochet
Instead of connecting new yarn with a slip knot followed by ch 1, use a standing single crochet for a seamless start:
- Wrap yarn around your hook and pull up a loop directly into the target stitch.
- Yarn over and pull through both loops to complete the sc.
Pattern Instructions
1. Step-by-Step Guide to Flower Square
This bag starts with two crochet flower squares.
You can watch a tutorial for the flower square construction on the creator's channel or follow the written pattern for making the squares.
Once both squares are ready, leave one aside and proceed to work on the bag body.

2. Bag Body: Gusset Border
The gusset border connects the front and back panels of the bag, creating depth and structural integrity.
Step 1: Starting the Gusset
- Create a Slip Knot: Begin with a slip knot on your hook.
- Joining Yarn: Locate the corner of the square (where tr, ch 2, and tr meet).
- Insert your hook into the second chain stitch of the corner.
- Pull up a loop and yarn over to complete a standing single crochet.

Step 2: First Gusset Row (Single Crochet Around the Square)
- Work sc into each treble crochet (tr) along the edge.
- When you reach the corner:
- Sc into each of the 2 chain stitches (not in the chain space).
- Continue working sc along all edges of the square, remembering to place sc into both chain stitches at every corner.
- Recap: You will crochet around 3 sides of the square, stopping at the first corner of the fourth side.
Step 3: Additional Gusset Rows
Repeat the following steps to add depth to the gusset:
- Ch 1, turn work, and begin working sc across every stitch for the second row.
- Continue making rows of sc in flat rounds (always turning at the end) along the three sides.
- Crochet a total of 4 gusset rows, ensuring the last row leaves you on the wrong side (WS) of the square.
3. Joining the Front and Back Panels
Step 1: Prepare for Joining
- Place the two squares with their wrong sides facing together.
- After completing the gusset on the first square, ch 1 at the end of the last row.
Step 2: Joining with Single Crochet
- Insert your hook into the first stitch of the gusset and into the corresponding second chain stitch of the corner on the other square.
- Work sc through both layers, joining the panels.
- Ensure your hook catches both squares' corresponding stitches.
- Continue working sc around the remaining gusseted edges.
Step 3: Corners
At every corner:
- Insert your hook into a regular stitch and into the chain stitch (not the chain space).
- Work sc to maintain the clean edge detail.
Step 4: Complete the Row
- Crochet along all edges and corners.
- At the final stitch:
- Sc in the corner tr stitch of both squares.
- Sc into the last chain stitch of both squares.
- Ch 1, cut yarn, and tighten your knot.
4. Gusset Border
To mimic the 3D gusset effect on the open sides:
Step 1: Add Surface Single Crochet
- Turn your work to the open edge where the gusset starts.
- Insert your hook into the corner chain stitch.
- Work surface sc along the edge into each treble (tr) stitch and chain stitch, ensuring uniform stitches.
Step 2: Corners
- When reaching a corner:
- Insert your hook into the chain stitch, not the chain space.
- Continue the surface sc along the next row.
Step 3: Repeat for All Open Gusset Edges
Continue working until the 3D edge matches the joined gusset. Cut yarn, tighten your knot, and weave in the ends.

5. Bag Strap
Use single crochet for durability.
Step 1: Foundation Chain
- Ch 60 for the strap length (adjust for preference).
Step 2: Row 1 (Back Loop Single Crochet)
- Turn your chain over to the back bumps.
- Work 1 sc in each back bump across (59 sc total).
Step 3: Row 2 (Opposite Side)
- Leave a big loop at the end of the row to turn your work.
- Flip the strap and sc into the back loops on the opposite edge.

Step 4: Additional Strap Rows
Repeat sc rows for additional strength, ensuring neat edges. You can work up to 5 rows for a thicker strap.
6. Joining Strap to Bag
- Place the strap ends inside the bag so the front sides face each other.
- Use sl st to join the strap edge to the bag panel edge:
- Insert hook into the first stitch of the bag edge and into the first stitch of the strap edge.
- Work sl st through both halves.
- Seam through the entire strap edge until securely attached.

Tip: Imitate the "V" stitch pattern on visible seams for a clean finish.
Finishing
- Weave Ends:
- Use a darning needle to neatly hide all yarn tails within the gusset and strap stitches.
- Change direction at least 3 times while weaving ends to prevent unraveling.
- Shape the Bag:
- Steam blocking or wet blocking helps structure the bag and smooths out gusset edges or strap joins.
Final Words
Your flower square bag is now complete! It's a versatile accessory that highlights your crochet skills while being practical for everyday use. The 3D gusset effect adds a professional touch, and the sturdy strap ensures functionality.

Tips
- Customization: Use contrasting colors for squares and gussets to create a unique bag.
- Sizing: Add extra gusset rows for a deeper bag or extend the strap to make a crossbody bag.
- Finishing Touch: Embellish the bag with tassels, beads, or buttons for added flair.