
Crochet Pouch Bag Free Pattern for a Travel-Friendly Bag
Hook up your crochet skills with this Free Crochet Pouch Bag Pattern, featuring a cute minimalist design, textured tweed finish, and practical size for everyday use.
Making a crochet pouch bag is a delightful and creative project that anyone can enjoy. By following a Free Crochet Pouch Bag pattern, you can easily create a beautiful yet practical accessory using just a few basic materials. This pattern simplifies the process, teaching you how to use Treehouse Berries Tweed Yarn to crochet a stylish pouch with a soft, textured finish. The bag is perfectly sized at 15 cm wide and 19 cm tall, making it ideal for storing small essentials like keys, phones, or makeup.
Crochet Pouch Bag Pattern Made with Treehouse Berries Tweed Yarn

What makes this pouch so special is its elegant design, featuring an oval base, a secure drawstring closure, and a braided strap that's both strong and visually appealing. Even beginners can master this project, as it only requires simple stitches like short and long knits.
You can also customize your pouch by adding cute pendants, charm labels, or adjusting its size to better suit your needs. With just two balls of yarn, a crochet hook, and some braided cord, you'll have everything needed to crochet this stunning bag. It's an excellent way to get creative while making a functional and stylish item you'll love to use or gift to someone special.

Crochet Pouch Bag with Treehouse Berries Tweed Yarn
Skill Level
Beginner to Intermediate: Familiarity with crochet basics such as chain (ch), single crochet (sc), slip stitch (sl st), and long crochet stitches is necessary. Knowledge of working in the round and basic finishing techniques is required.
Finished Size
- Bag Dimensions: Approximately 15 cm wide x 19 cm tall.
- Strap Length: Approximately 90 cm (adjustable).
Materials
Yarn and Hook
- Yarn:
- Two balls of Treehouse Berries Tweed Yarn (#204, or color of choice).
- Optional: Purchase additional thread for modifications to size or denser stitches.
- Hook:
- Primary Hook: 5 mm (US size H-8) for the body.
- Secondary Hook (Optional): Use a thicker or thinner hook depending on personal tension.
Strap and Fastening
- Braided Bag Strings:
- 4 x braided strings, ~3.5 m each (cut according to preference).
- Optional: For a longer crossbody style strap, purchase longer lengths (e.g., 4-5 m).
Notions and Decoration
- Scissors to cut the yarn.
- Tapestry needle or darning needle for weaving in ends and connecting seams.
- Stitch Marker/Single Rings: To mark starting stitches and improve accuracy.
- Optional Accessories:
- Labels (e.g., leather or fabric) and metal pendants for the bag.
- Glue, hot glue gun, or instant adhesive for securing straps.
Instructions
1. Foundation & Base
Foundation Chain
- Using two strands of yarn held together, make a slip knot.
- Chain 20, ensuring the chains are evenly tensioned.
Base Foundation Row (Short Knit Technique)
- Add a column chain to start the short knit technique:
- Insert hook into the second chain from the hook, yarn over, and pull through both loops.
- This forms a single crochet, referred to in this pattern as the short knit technique.
- Work 1 additional short knit into the same chain.
- This creates 2 short knits in the second chain from the hook.

Continue Across the Chain
- Work 1 short knit technique into each chain across the foundation chain until the last chain.
- In the last chain, work 3 short knits to create a rounded edge.
- Place a stitch marker in the first stitch of the round to mark your starting point.

Back Across the Foundation
- Work 1 short knit technique into each chain along the opposite side of the foundation chain.
- In the last stitch, work 1 additional short knit to complete the base oval.

2. Build the Bag Body
Second Round (Short Knit Stitch with Increases)
- Start this round with short knits as follows:
- In the first stitch, work 2 short knits (this is an increase).
- Work 1 short knit into each stitch across until the next corner.
- At the curved end, work 2 short knits in each of the 3 corner stitches to maintain even shaping.
- Work 1 short knit into each stitch along the other side.
- In the final stitch, work 2 short knits.
- The total stitch count in this round will be 48 stitches.


Rounds 3-25: Repeat Short Knit Technique
- Continue working 1 short knit into each stitch for the next 23 rounds without further increases.
- Use a stitch marker to help identify the starting point of each round. Move the marker every 2-3 rounds to monitor your progress.

Tip: Check that the work is smooth and cylindrical, ensuring even sides and tension.
3. Drawstring Closure
Round 26: Transition to Long Crochet Stitches
- Switch to single-strand yarn and begin with two chain stitches.
- Work long crochet stitches into each stitch around as follows:
- Insert the hook through the front loop only, yarn over, pull through (three loops on hook).
- Yarn over, pull through two loops, then yarn over again and pull through the remaining two loops.
- Every fourth stitch, work 2 long stitches into the same space (increase).
Note: This round creates a slight flare to add space for the drawstring.
Round 27-32
- Work 1 long crochet stitch into each stitch without increases for these rounds.
- The total stitch count will remain 60 stitches.
Divide the Top for Drawstring Loops
- For rounds 28-32, divide the work into two flat panels of 30 stitches each.
- Work 5 rows of flat stitches on one side.
- Leave adequate yarn ends to seam the edges later.
- Repeat the same process for the opposite side.
4. Seaming the Drawstring Loops
- Fold the top edges of the bag inward along the fluted line created in Round 26.
- Using a tapestry needle, whipstitch the top edges to the base of the 32nd row.
- Leave a small tunnel on each side to insert the braided strings.

5. Attaching the Straps
- Thread the braided bag straps through the drawstring loops.
- One string enters from the right and exits on the same side; the second works oppositely.
- Tie knots at each end of the strings to secure them. Cut any excess fabric neatly.
- Use glue or a hot glue gun to prevent fraying at the ends.
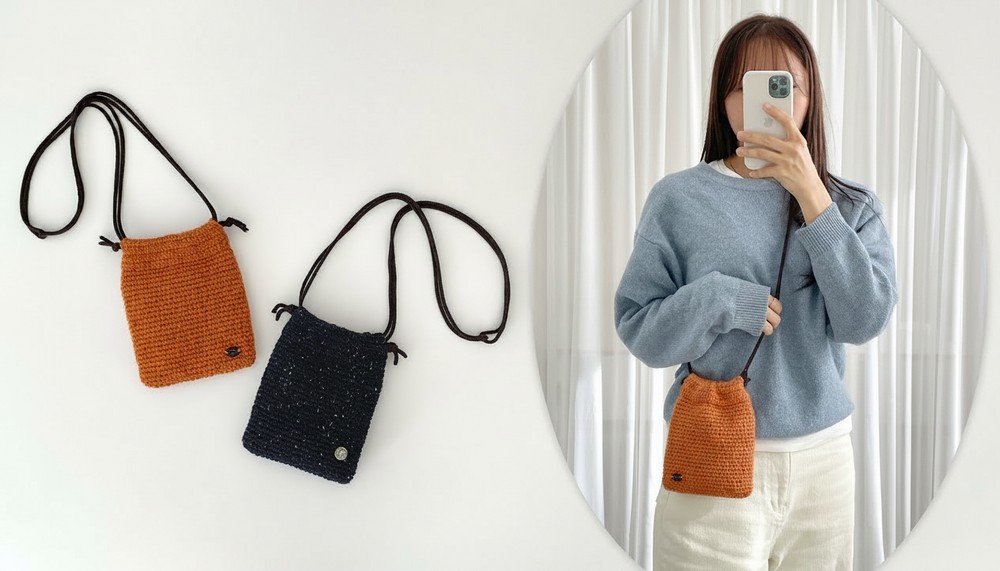
Finishing Touches
- Add a decorative label or embellishment as desired.
- Weave in any remaining loose ends and trim.
- Optional: Lightly block the bag to shape it evenly.

Tips for Success
- Adjusting the Size:
- Increase or decrease the foundation chain length for a wider or narrower bag.
- Add or reduce the number of rounds for a taller or shorter bag.
- Gauge Considerations: Tighten tension for a more compact bag or loosen it for more flexibility.
- Strap Length: Customize the strap length to fit your needs (e.g., crossbody or shoulder-length).
Conclusion
Congratulations on completing your crochet pouch bag with Treehouse Berries Tweed Yarn! This elegant project is perfect for carrying everyday essentials in style. Its tweed texture and durable braided straps make it both practical and fashionable.
Final Remarks
- Care: Hand wash in cold water and reshape while drying to maintain structure.
- Reusability: Easily customize this pattern with different yarns, colors, or decorative elements for a variety of looks.