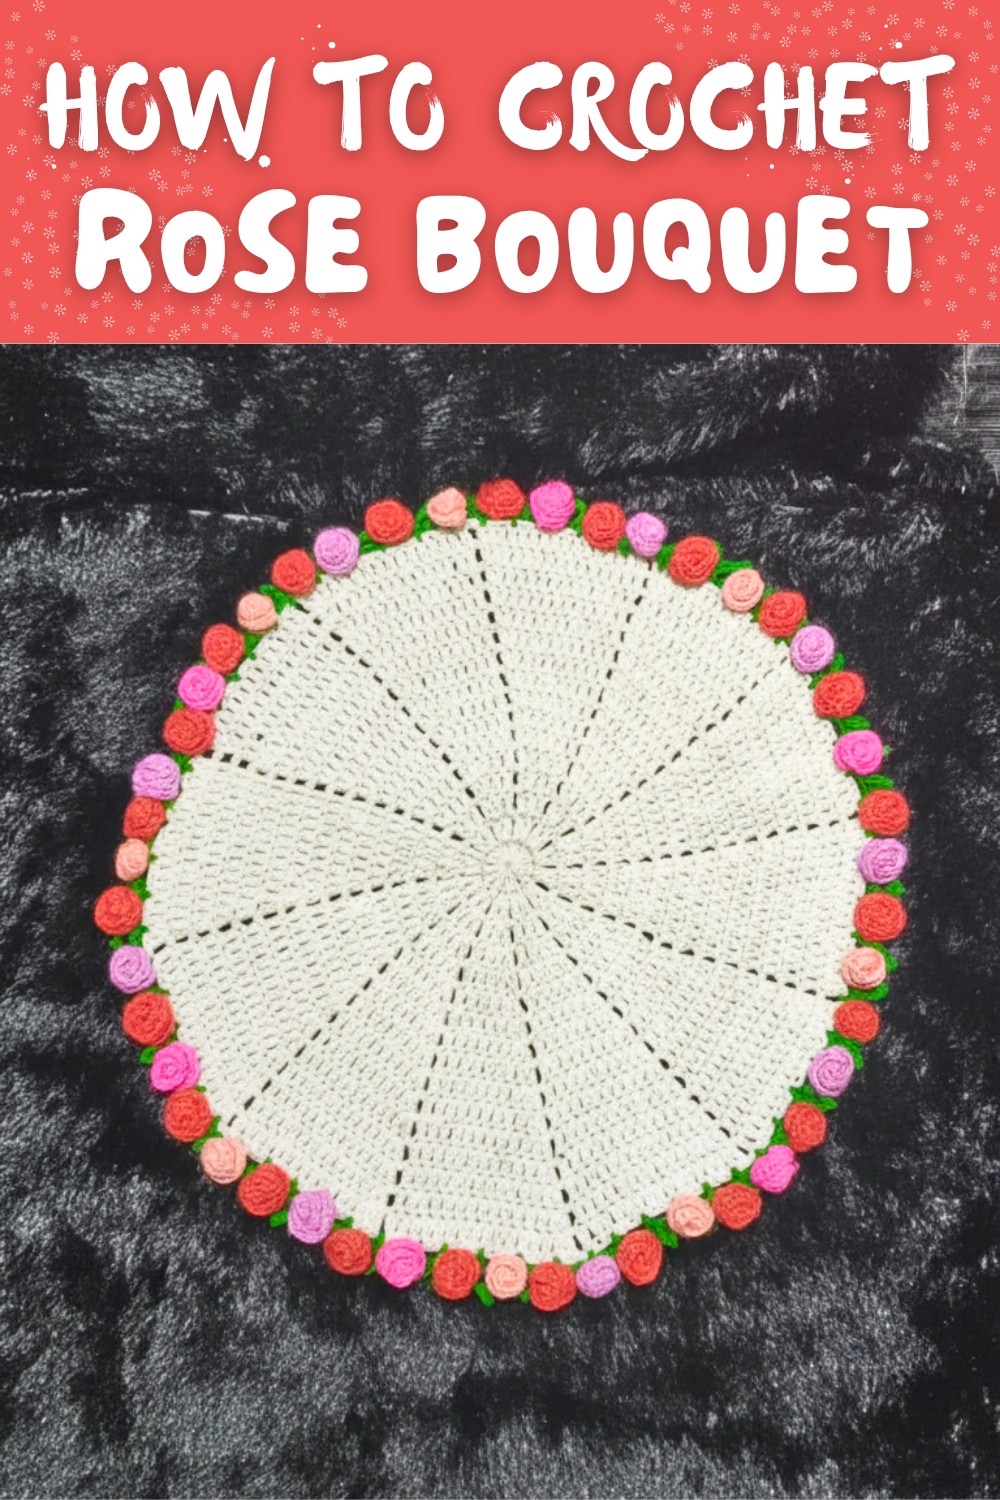
Crochet Rose Bouquet Pattern – Free and Easy Guide
Create stunning everlasting roses with this free crochet rose bouquet pattern that's for gifting or adding charm to your home.
Crocheting something that never wilts and stays beautiful forever. A crochet rose bouquet pattern is perfect for crocheting timeless roses that look as delicate and charming as real ones. Each rose is made with soft yarn that can be shaped into stunning petals, forming a bouquet full of elegance and detail.
Free Crochet Rose Bouquet Pattern to Brighten Any Space

The beauty of the crochet roses lies in their lifelike appearance, paired with endless color options that allow you to design bouquets to match any style or occasion. Whether it's for decorating your home, gifting someone special, or brightening up a celebration, this handmade bouquet adds a unique and heartfelt touch.
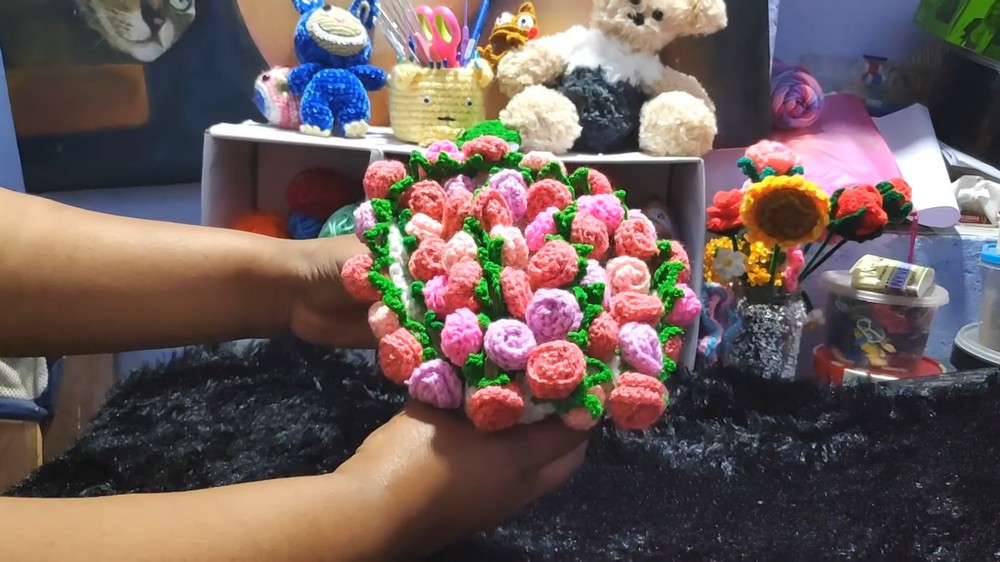
The roses can stand proudly in a vase or be tied elegantly into a bunch, making any space bloom with warmth and love. Simple to make and fun to customize, the crochet rose bouquet is ideal for bringing creativity and joy to life.

This pattern makes a round base with small rose flowers on top.
You can use one or several motifs as:
- Coasters
- Table mats
- Baby blanket (joining many motifs)
- Cushion tops, runners, etc.
The size is completely adjustable by continuing the round increases.

2. Materials
- Yarn
- Base circle: Light or medium (DK / worsted) weight yarn in Color A (e.g., white).
- Leaf/green round: Color B (green).
- Roses: Color C (any rose/flower color - pink, red, yellow, etc.).
- Hook
- A hook size that matches your yarn weight (commonly 3.5-4 mm for DK, 4-4.5 mm for worsted).
- Use the hook recommended on the yarn label if unsure.
- Yarn needle (tapestry needle)
- To weave in tails and to sew roses onto the base, if needed.
- Scissors
- (Optional) Fabric glue
- If you prefer gluing the roses instead of sewing them.
3. Special Techniques Used
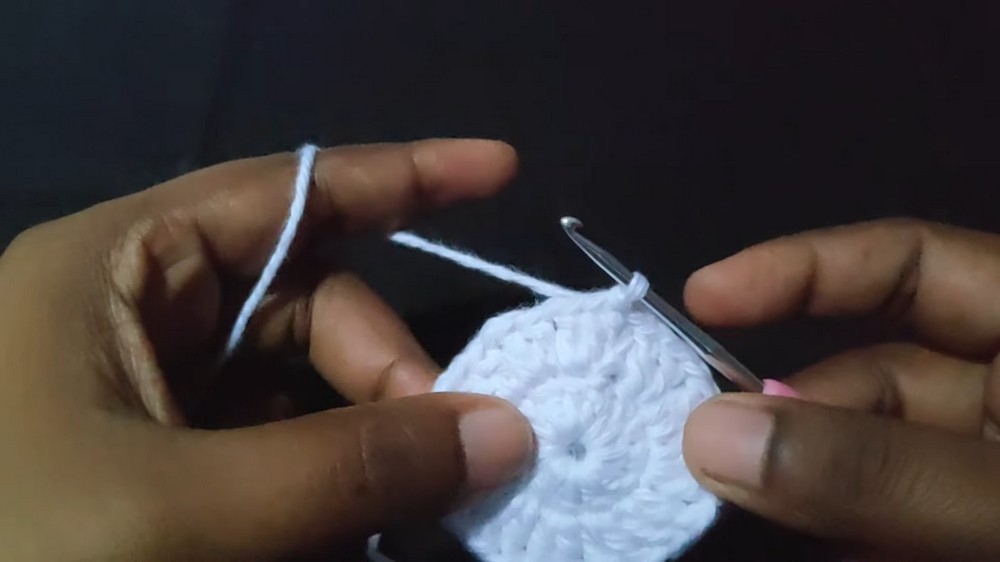
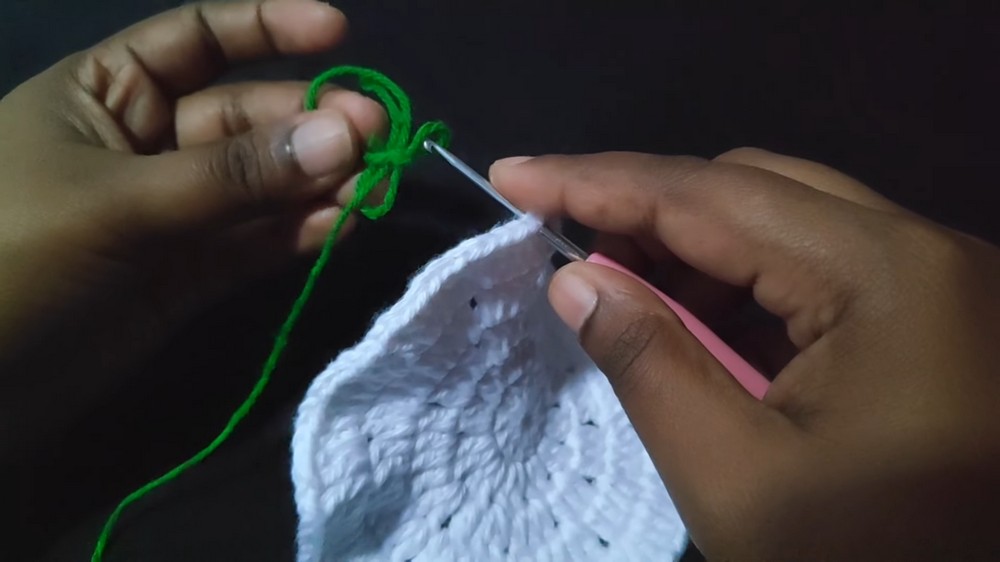
3.1 Magic Ring (Magic Circle)
Used to start the round base:
- Wrap the yarn around two fingers to form an
Xshape. - Insert the hook under the first strand and catch the second strand.
- Pull it through to form a loop.
- Slide your fingers out and gently tighten.
- Chain to secure and start working into the ring.
You can also substitute with:
- Chain 4, slip stitch into the first chain to form a ring, and work the stitches into this ring.
3.2 Basic Stitches
All stitches are in US terms (they match the Malayalam description):
- ch - chain
- sl st - slip stitch
- sc - single crochet
- hdc - half double crochet
- dc - double crochet
dc:
Yarn over, insert hook into stitch, yarn over and pull up a loop (3 loops on hook).
Yarn over, pull through 2 loops (2 loops left).
Yarn over, pull through remaining 2 loops.
hdc:
Yarn over, insert hook, yarn over and pull up a loop (3 loops on hook).
Yarn over, pull through all 3 loops.
sc:
Insert hook into stitch, yarn over, pull up a loop (2 loops).
Yarn over, pull through both loops.
4. General Pattern Logic (Base Circle)
You are working a flat circle in dc with one chain separating groups.
Each round increases each segment by 1 dc before the increase.
Round logic described in the video:
- Round 1: 12 dc into magic ring.
- Round 2: (2 dc in each st, ch 1) around.
- Round 3: (1 dc, 2 dc in next st, ch 1) around.
- Round 4: (1 dc in next 2 sts, 2 dc in next st, ch 1) around.
- Round 5: (1 dc in next 3 sts, 2 dc in next st, ch 1) around.
And so on.
Next round would be: (1 dc in next 4 sts, 2 dc in next st, ch 1), etc.
You may stop at any round, depending on the size you want.
5. Detailed Step‑by‑Step Pattern
5.1 Base Circle (Color A - e.g., white)
Round 1
- Make a magic ring.
- Ch 3 (counts as first dc).
- Work 12 dc total into the ring (including the ch‑3 as one dc).
- If you are counting stitches: the ch-3 is the first dc, then make 11 more dc.
- Gently pull the magic ring tail to tighten the center (not too tight yet).
- Join with a sl st to the top of the initial ch‑3.

You should have 12 dc in the round.
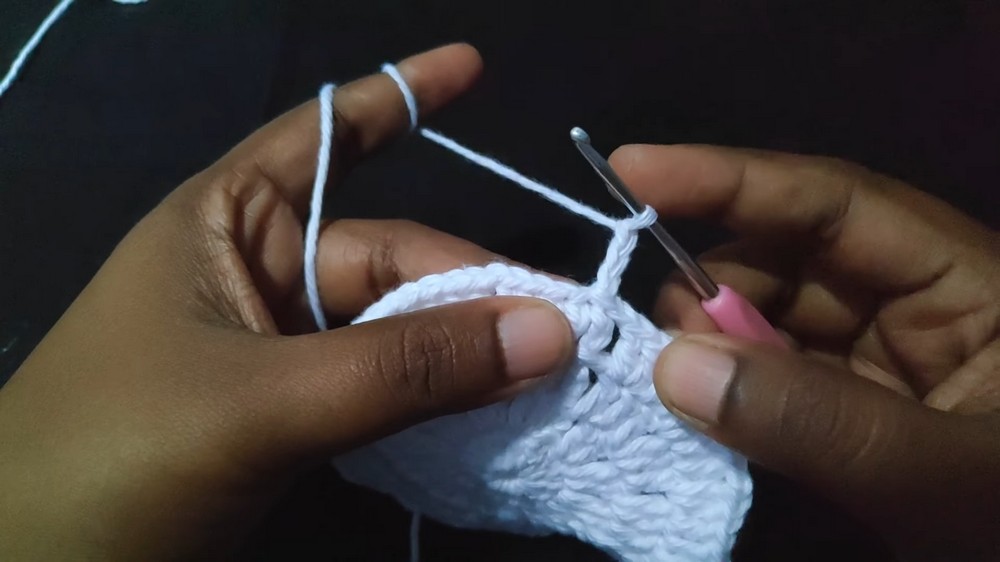
Round 2
- Ch 3 (counts as first dc).
- In the same stitch as ch‑3, work 1 dc (so that stitch now has 2 dc).
- Ch 1.
- In the next stitch, work 2 dc in the same stitch.
- Ch 1.
- Repeat:
- (2 dc in next stitch, ch 1)
around the circle.
- (2 dc in next stitch, ch 1)
- At the end, after the last ch‑1, join with a sl st to the top of the initial ch‑3.
You now have groups of 2 dc separated by ch‑1 spaces.
Round 3
- Ch 3 (counts as first dc).
- In the same stitch, work 1 dc (so: 2 dc in that first stitch).
- In the next stitch, work 2 dc in the same stitch (this is the increase).
- You now have 3 dc in this sequence.
- Ch 1.
Your repeating set for this round is:
1 dc in the first stitch of the set,
2 dc in the next stitch,
ch 1.
But as explained:
- First set: (1 dc in first stitch (the ch‑3), 1 more dc in same stitch = 2 dc there, then 2 dc in next stitch) → total 3 dc, then ch 1.
- Then:
Repeat (1 dc in next st, 2 dc in next st, ch 1) all the way around.
- Continue around:
- (1 dc in next stitch, 2 dc in next stitch, ch 1) repeat.
- After the last ch‑1, join with a sl st to the top of the ch‑3.

Round 4
- Ch 3 (counts as first dc).
- In the same stitch, work 1 dc (so 2 dc total in first stitch).
- Work 1 dc in each of the next 1 stitch so you have:
- 1st stitch: 2 dc (because ch-3 + dc)
- 2nd stitch: 1 dc
- In the next stitch, work 2 dc in the same stitch (increase).
- Ch 1.
Now, your repeating pattern for Round 4:
1 dc in next 2 stitches,
2 dc in the next stitch,
ch 1.
- Repeat around:
- (1 dc in next 2 sts, 2 dc in next st, ch 1).
- At the end, ch 1, then join with a sl st to the top of ch‑3.
Round 5
- Ch 3 (counts as first dc).
- In the same stitch, work 1 dc (2 dc in the first stitch).
- Work 1 dc in each of the next 2 sts.
- In the next stitch, work 2 dc in the same stitch (increase).
- Now each set has 3 normal dc + 1 increase = 5 dc per set.
- Ch 1.
Repeat pattern for Round 5:
1 dc in next 3 sts,
2 dc in next st,
ch 1.
- Continue around with this set:
- (1 dc in next 3 sts, 2 dc in next st, ch 1).
- At the end, ch 1, then join with a sl st to the top of ch‑3.
At this point, the video stops the base at this approximate size (small circle suitable for a coaster). You can continue more rounds following the same logic:
- Next round: (1 dc in next 4 sts, 2 dc in next st, ch 1)
- Then: (1 dc in next 5 sts, 2 dc in next st, ch 1)
- And so on.
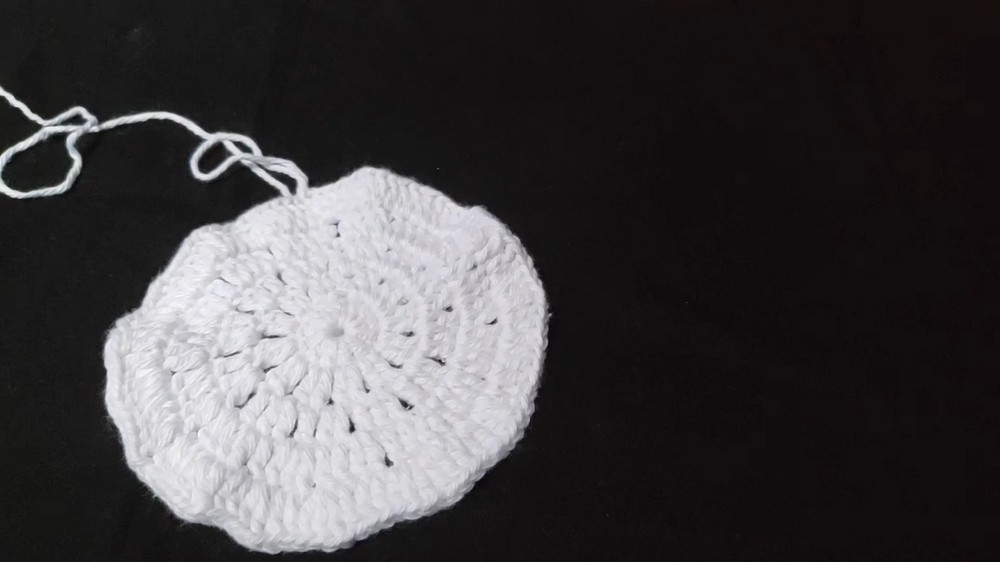
After finishing your final round in Color A:
- Fasten off Color A.
- Weave in or hide the center tail:
- Tighten the magic ring fully.
- Pass the tail through to the center.
- Tie with the working yarn tail if needed and trim.
6. Green "Leaf" Round (Color B)
This round creates little green arches all around the circle, which will serve as the base for the roses.
Round - Green Arches
- Attach Color B (green) in any stitch of the final base round:
- Make a slip knot on the hook (loose).
- Insert hook into any stitch of the last white round.
- Pull the green yarn loop through and tighten gently.
- Ch 1 to secure, then ch 3 more (so total 3 chains for the first loop).
- Skip 2 stitches of the white round.
- In the next stitch, work 1 sc.
- Repeat around:
- Ch 3, skip 2 stitches, sc in next stitch.
Continue:
(ch 3, skip 2 sts, sc in next st) around the circle.
- When you reach the starting point, join if needed with a sl st to the first sc (or simply end neatly where you started the first loop; the video keeps this simple).
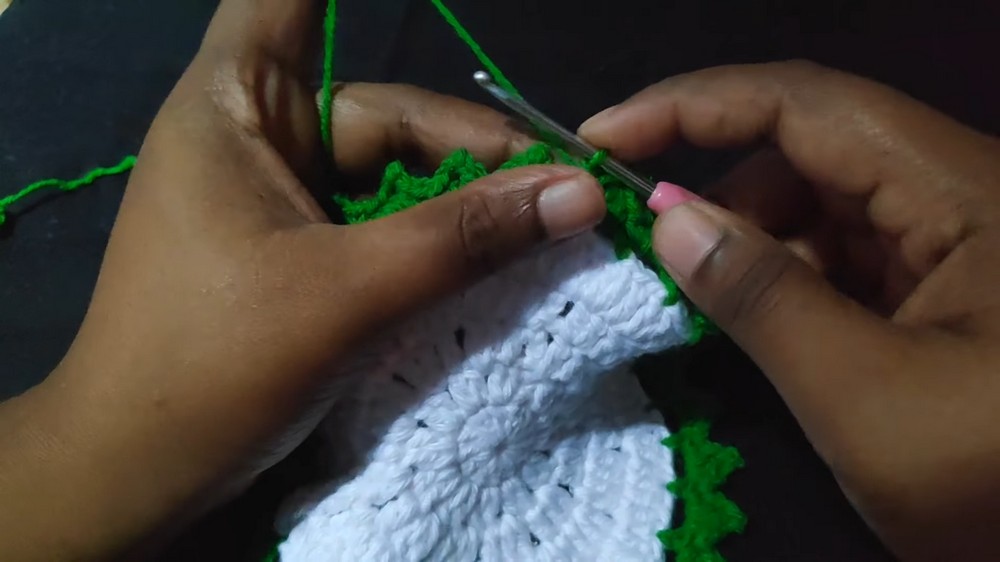
This forms a ring of evenly spaced chain‑3 arches.
7. Petal Round on Green Arches (Color B, continued)
Now work into each ch‑3 space:
For each chain‑3 arch:
- In the ch‑3 space: work 1 sc.
- Then 1 hdc in the same space.
- Ch 2.
- In the first chain of this ch‑2, work a sl st (this makes a tiny picot/point).
- Ch 1.
- Again in the same ch‑3 space: work 1 hdc.
- Then 1 sc.
So, for each arch, the full set is:
sc, hdc, ch 2, sl st into first ch, ch 1, hdc, sc.
Repeat this entire sequence in every chain‑3 space around.
After the last arch is completed:
- Ch 1 (for safety).
- Cut the green yarn.
- Pull through and fasten off.
- Weave in or hide the green tail.
Now you have a decorative green border with small pointed shapes (like leaves/petals) around the circle.
8. Rose Flowers (Color C)
These are made separately and attached into the small gaps between the green shapes.
8.1 Where to Attach
The roses are attached in the small gap between two scs:
- In the green round, each segment started with a sc and ended with a sc.
- The gap between these two scs (at the top of each green shape) is where a rose is placed.
- The video sometimes skips one gap and uses the next, to leave some space between flowers when the base is small.
You can:
- Place roses in every gap, or
- Skip one gap between roses, depending on how dense you want the flowers.
8.2 Rose Strip
For each rose:
- With Color C, make a slip knot on the hook.
- Insert hook into one of the chosen small gaps (between the two scs) and pull the loop through, or simply plan to sew the flower later and just work it separately.
- Ch 15 (this was used in the video; you can adjust for larger or smaller roses).
Row - Rose Petals
- Skip the first 2 chains from the hook.
- In the 3rd chain from the hook, work 3 dc into that same chain.
- In the next chain, work 3 dc.
- Continue across the row:
- Work 3 dc in each chain until you reach the last chain.
So your row is:
3 dc in 3rd ch from hook,
3 dc in each remaining ch.
This creates a long, very frilled strip.
- At the end of the strip:
- Ch 1 for security.
- Cut yarn, leaving a tail long enough for stitching (if not already attached).
8.3 Rolling the Rose
- Starting from the first end of the strip, roll the strip tightly like a spiral:
- The dc clusters become petals.
- Keep rolling until the entire strip is coiled into a rose shape.
- Make sure the bottom is flat and the petals face outward attractively.
8.4 Securing the Rose
There are two options:
Option 1: Sew with Tail
- Thread the tail yarn into the yarn needle.
- From the underside of the rose, sew through multiple layers of the rolled base:
- Go in and out in a few places to secure the spiral so it does not unroll.
- Bring the tail down through the center of the rose and into the coaster base at your chosen gap.
- On the back side of the coaster, tie the flower's tail with the original attachment tail (if you attached at the start) or sew through the base a few times.
- Knot securely and weave in the ends; trim excess.
Option 2: Glue
- Make the rose separately and sew only enough to secure its own shape.
- Apply a small amount of strong fabric glue on the underside.
- Press it into the desired gap on the green round.
- Allow to dry completely.
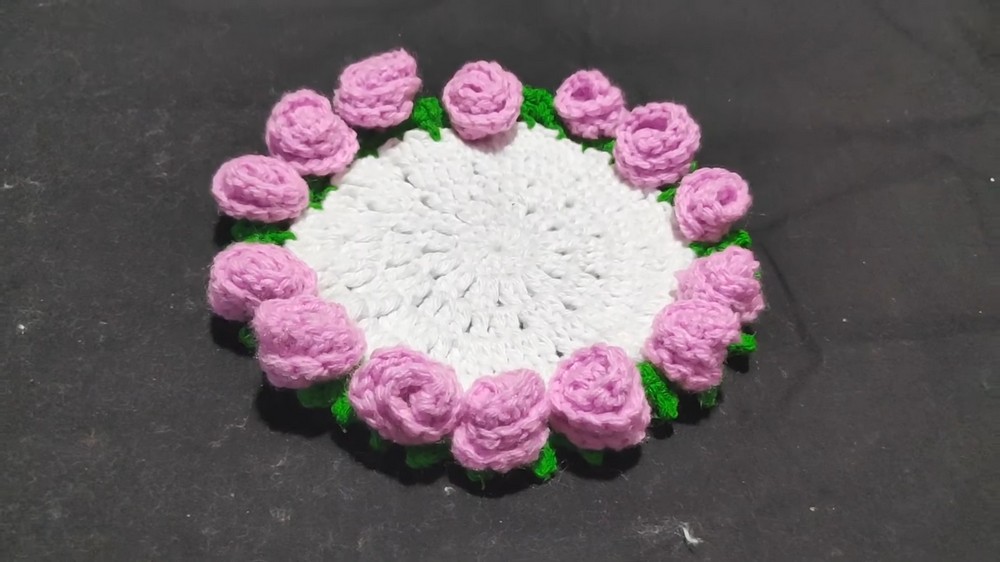
8.5 Placement Suggestions
- On a small base, place a rose in every second gap (skip one in between) to avoid crowding.
- On a larger base, you can either:
- Place roses in every gap, or
- Make multiple circles and attach them together for a blanket and then decorate each as you like.
9. Finishing the Pattern
- Ensure all yarn tails:
- From the magic ring.
- From color changes (white, green, flower color).
- From attaching flowers.
are woven in neatly on the back side.
- If the center magic ring is still slightly open:
- Pull the inner tail firmly.
- Tie with any nearby tail if needed.
- Weave in and trim.
- Gently flatten the coaster/mat with your hands.
If required, you may:- Lightly steam block or wet block (depending on yarn type).
- Shape into a flat circle and let it dry.
Your rose coaster/mat motif is now complete.
10. Tips, Suggestions & Maintenance
10.1 Pattern Suggestions
- Size control:
- To make larger mats or blanket motifs, simply continue the base circle rounds:
- Next round after Round 5: (1 dc in next 4 sts, 2 dc in next st, ch 1) repeated.
- Keep adding one more single dc before each increase in each new round.
- To make larger mats or blanket motifs, simply continue the base circle rounds:
- Flower size:
- For smaller roses: Chain 10-12 instead of 15 and still work 3 dc in each chain.
- For fuller roses: Chain 18-20 and work 3 or even 4 dc in each chain.
- Color play:
- Use white/cream for base, green for leaves, and multiple flower colors for a garden effect.
- For a blanket, alternate rose colors on different motifs.
- Attachment options:
- Flowers can be:
- Permanently sewn, or
- Lightly tacked so they can be repositioned later, or
- Glued (not recommended for items that will be washed frequently).
- Flowers can be:
10.2 Tips for Neat Work
- Keep your tension even, especially in the dc rounds, to maintain a flat circle.
- Do not pull joins too tight; this can distort the circle.
- When rolling roses, keep the petals slightly loose at the top for a natural look.
- Always check the wrong side (back) to make sure tails are flat and not bulky.
10.3 Care and Maintenance
- Washing:
- If made with acrylic: Gentle hand wash or machine wash on delicate in a laundry bag, cold water.
- If made with cotton or wool: Follow yarn label instructions; generally hand wash for wool.
- Drying:
- Lay flat to dry.
- Reshape the circle and petals while damp.
- Storage:
- Store flat to avoid the roses being crushed.
- If using as a blanket, fold loosely without pressing the flowers.
11. Final Words
This rose blanket/mat/coaster motif is beginner‑friendly yet looks very decorative. The base circle uses only double crochet and simple increases, while the roses are built from an easy frilled strip. By repeating the same logic of increases, you can make the motif as small or as large as you wish and assemble many motifs into larger projects like blankets or throws.
With color variation and placement of flowers, each finished piece can be unique.
If you are comfortable with the base motif, you can expand the rounds and flower placement to design your own custom rose blanket.