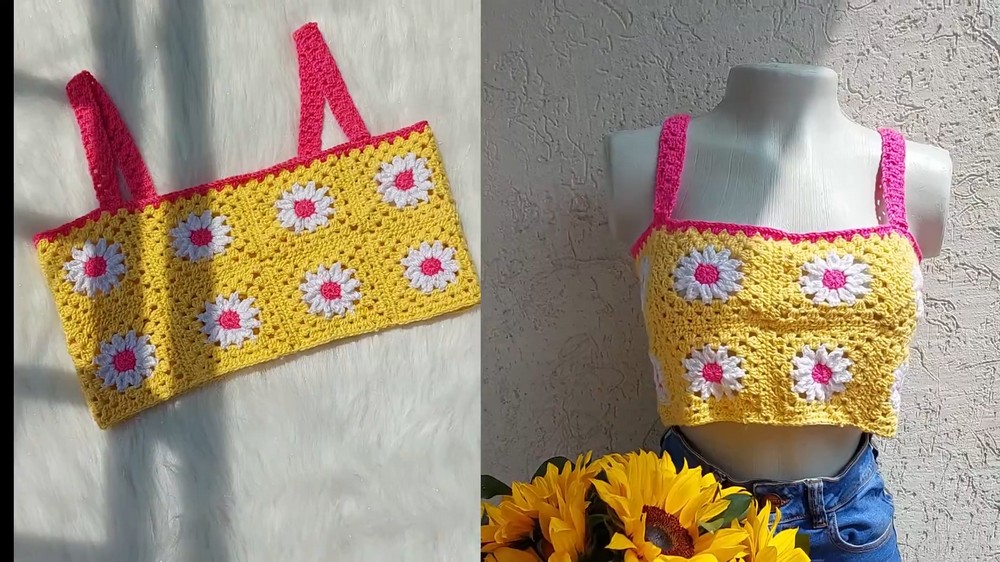
Cute Crochet Daisy Crop Top with This Free Pattern
Rock a charming crochet daisy crop top that's simple to stitch and perfect for casual outings, offering a fresh, stylish look everyone will love.
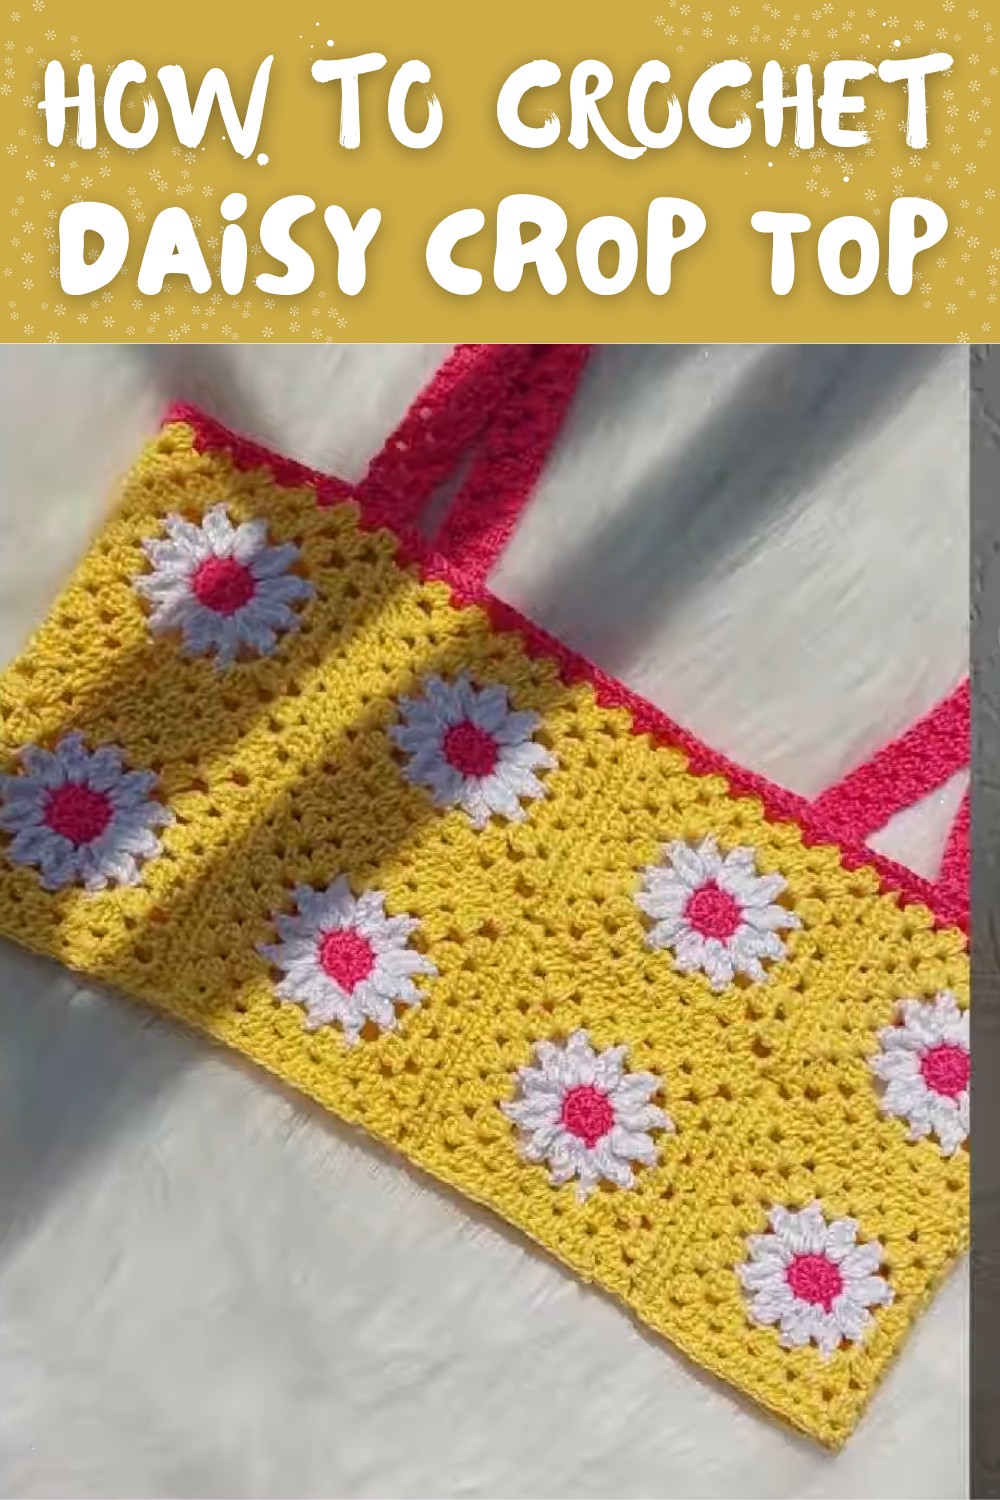
Don't settle for boring outfits when you can add a touch of charm with a cute daisy crop top. This crochet top stands out with its soft texture and bright floral design, bringing a lively and cheerful look to your wardrobe. The daisy details create a fresh, summery vibe, making it perfect for casual get-togethers, outdoor adventures, or relaxing beach trips.
Free Crochet Daisy Crop Top Pattern for Summer Vibes

It's lightweight and comfortable, allowing you to feel free and stylish all at once. The handmade daisy accents make this top unique and full of personality, giving you a standout appearance wherever you go. Its simple yet eye-catching features make it a delightful addition to your collection, while the floral theme adds a playful and natural feel.
Whether you're looking for a fun project or a trendy piece to wear, this design offers both beauty and practicality. Perfect for yourself or as a thoughtful gift, it's an enjoyable way to brighten up any outfit.
Crochet Granny Square Blouse Pattern
Materials
- Yarn:
- Three colors of 100% acrylic yarn:
- Color 1: Pink (for the center of the Granny Square).
- Color 2: White (for the flower petals).
- Color 3: Yellow (for the outer rounds of the Granny Square).
- Choose medium-weight (Category 3 or 4) yarns for a durable and soft blouse.
- Three colors of 100% acrylic yarn:
- Hook Size: 3.5 mm crochet hook.
- Scissors
- Tapestry Needle: For weaving in ends and seaming.
- Measuring Tape: To ensure accurate sizing.
Gauge
Granny Square measurements vary slightly depending on the yarn and tension:
- Each finished Granny Square after three rounds measures approximately 10 cm x 10 cm.
- Adjust hook size or yarn weight if your square size differs significantly.
Size and Number of Granny Squares
The blouse is made of 16 Granny Squares: 8 for the front and 8 for the back.
- Bust Measurement: Adjust the number of Granny Squares you make according to your measurements:
1 square measures 10 cm x 10 cm when stretched.- For a bust circumference of 80 cm, use 8 squares per row (4 on the top row and 4 on the bottom).
- For larger or smaller sizes, adjust the number of squares and/or the number of rounds per square.
Step-by-Step Pattern Instructions
1. Granny Square
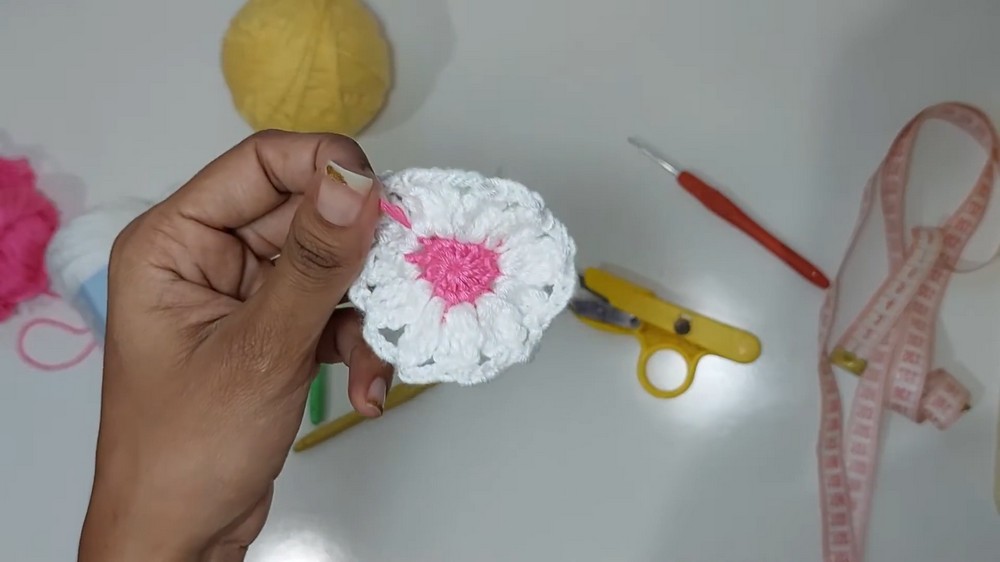
Each Granny Square consists of three colors: the first round is the center, the second round forms petals, and the remaining rounds create the square.
Round 1: Center (Pink)
- Make a magic ring.
- Chain 2 (counts as the first double crochet, dc).
- Work 11 dc directly into the magic ring (total = 12 dc). Pull the yarn tail to close the center tightly.
- Make a slip stitch into the first dc to close the round.
- Fasten off the pink yarn, leaving a short tail for weaving in.

Round 2: Petals (White)
- Attach the white yarn to any dc from Round 1 with a slip stitch.
- Chain 4 (counts as the first treble crochet, tr).
- Work the following special 4-treble cluster stitch into the same space:
- Yarn over twice, insert hook into the same stitch, pull yarn through (4 loops on your hook).
- Yarn over, pull through 2 loops (3 loops remain).
- Yarn over, pull through 2 loops again (2 loops remain).
- Yarn over.
- Repeat this process 3 more times until you have 5 loops on the hook. Pull the yarn through all the loops.
- Chain 4.
- Move to the next stitch and work another 4-treble cluster followed by 4 chains.
- Repeat Step 5 in every stitch around until you have 12 petals.
- Finish with 4 chains and make a slip stitch into the top of the first petal.
- Fasten off the white yarn, hiding loose ends.

Rounds 3-4: Body of the Granny Square (Yellow)
Round 3: Adding the Base Layer:
- Attach the yellow yarn to any 4-chain space from the petal round.
- Work 3 dc into the space.
- In the next chain space, work 3 dc.
- When reaching the 6th chain space (a "corner"), work:
- 3 dc, chain 3, 3 dc (this creates the corner).
- Continue this process across the round: work 3 dc into each chain space, with 3 dc, ch 3, 3 dc in each corner chain.
- Close the round with a slip stitch into the first dc.

Round 4 (Optional):
Repeat the process above, ensuring 3 dc are placed into each chain space and that each corner uses the following sequence: 3 dc, ch 3, 3 dc.
Each Granny Square should now measure 10 cm x 10 cm when stretched. Fasten off the yarn and weave in ends.
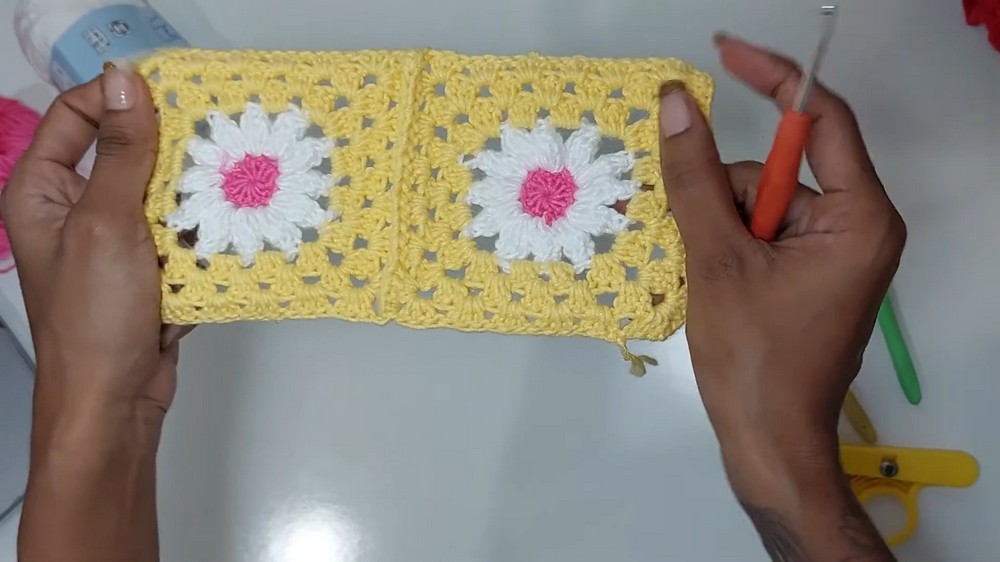
2. Assembling the Granny Square Panel
To create the blouse, you will need 8 squares for the front and 8 for the back.
Joining the Squares
- Use the continuous join-as-you-go method while crocheting the last round of yellow on each square. Alternatively, you can crochet (or sew) separate squares together at the end.
- To join using the seamless join method:
- Hold two squares with their right sides facing each other (wrong sides are on the outside).
- While crocheting the final round, whenever you reach a corner, make 1 dc in the first stitch, insert the hook into the corresponding 3-chain corner space of the adjacent square, and make a slip stitch.
- Continue crocheting the group of 3 dc, slip-stitching at regular intervals to seam the squares together.
- Work along all edges until all 8 squares are connected into a row.
- Repeat the process to create the bottom row of 8 Granny Squares.
- After making both rows, join the two rows together by seaming along the top edge of the bottom row and the bottom edge of the top row.

3. Creating the Top and Bottom Blouse Seams
- With the front and back panels completed, seam the sides of the blouse:
- Lay the two panels together with right sides facing each other.
- Seam along the left and right edges, leaving enough unseamed space at the top for the armholes.
- Once completed, turn the blouse right-side out.
4. Adding Straps
Straps for Shoulders:
- Attach yellow (or your preferred color) yarn at one corner of the top edge on the front panel.
- Chain until the strap is approximately 60-70 cm long (adjustable based on desired fit).
- Work back along the chain by making a row of single crochet (sc) stitches to strengthen the strap.
- Attach the strap to the corresponding corner on the back panel.
- Repeat the process for the second strap.
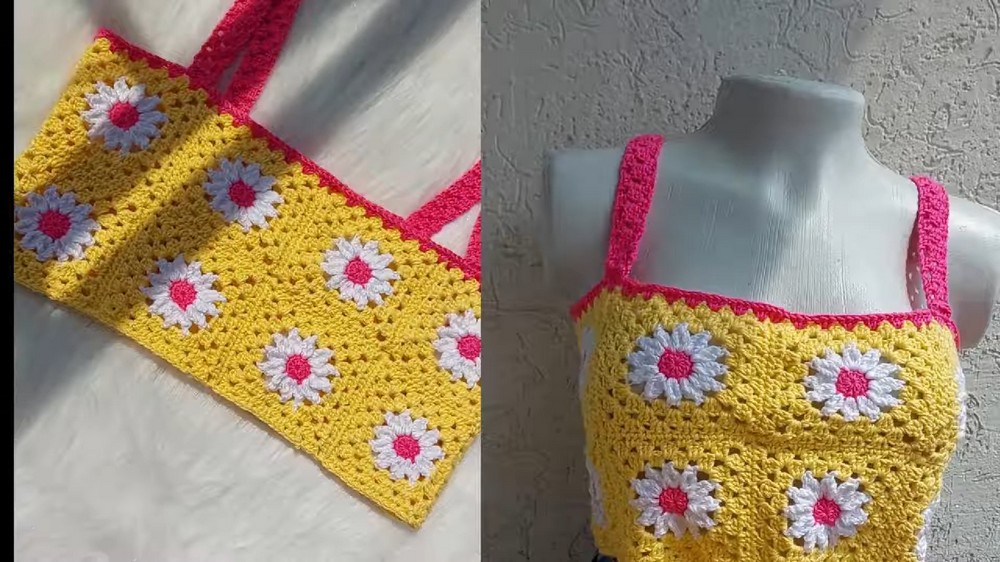
Pro tip: Try the blouse on to ensure the straps are the desired length before attaching them to the back panel.
Finishing Touches and Suggestions
- Blocking:
- Block each Granny Square before joining for a polished and even look. Stretched and squared Granny Squares assemble more neatly.
- After assembling, lightly steam block the finished blouse to set the shape and even out the texture.
- Weaving in Ends:
- Use a tapestry needle to securely weave in all loose ends. Tuck the ends into the yarn pattern for a clean finish.
- Customization Tips:
- Color Variation: Use multiple contrasting colors for a more vibrant and eclectic look.
- Adjust Length: Add more rows of Granny Squares to make a tunic-length top or a cropped version.
- Sleeves: Extend the project by adding sleeves using the same Granny Square technique or continuous rounds.
Final Words
Congratulations! You've successfully completed your Granny Square Blouse. This versatile blouse is perfect for summer outings, casual events, or even layering over a tank top. With its customizable nature, you can adapt it to your style for an elevated handmade piece.