
Easy Free Crochet Puff Flower Pattern for Sweet Projects
Find joy with this Free Crochet Puff Flower Pattern that's soft, textured blooms that are versatile, fun to try, and perfect for any creative project.
Creating something beautiful with your hands is always special, and this crochet puff flower is a perfect example. Soft, fluffy, and shaped like a delicate flower, it brings a unique charm to your crafting projects. With its puffy petals and colorful appearance, it stands out as both simple to make and pleasing to the eye. This flower can be used in many creative ways for decorate a blanket, design stylish accessories, or add a personal touch to your home.
Free Crochet Puff Flower Pattern Perfect for Home Accents

Its gentle texture feels warm and inviting, while its vibrant look spreads happiness wherever it's placed. Whether you're making it for fun or giving it as a gift, it's sure to bring smiles. The crochet puff flower pattern is not just a crochet but a way to turn ordinary yarn into something magical, and with every stitch, you create your own beautiful masterpiece.

Crochet Puff Flower Pattern
Skill Level
Beginner: Knowledge of basic crochet stitches (chains, single crochets) required. The tutorial walks through each stitch used, making it approachable for newer crocheters.
Finished Size
- Approximately 2.5 inches (6-6.5 cm) in diameter, depending on your tension and yarn used.
Gauge
- Not critical for this project. However, with worsted weight yarn and a 4.5 mm hook:
- 5 chain stitches = 1 inch (2.5 cm).
- Adjust hook size if the completed flower appears too tight or too loose.
Materials Needed
- Yarn:
- Worsted Weight (4) Acrylic Yarn (any brand and color of your choice).
- Crochet Hook:
- 4.5 mm (G) hook.
- Other Supplies:
- Scissors.
- Tapestry needle (for weaving in ends).
Abbreviations (US Crochet Terminology)
- ch: Chain
- sc: Single crochet
- sl st: Slip stitch
- yo: Yarn over
- pst: Puff stitch
- st(s): Stitch(es)
Special Techniques
- Magic Circle Alternative: If you find the magic circle challenging, start by chaining 4 and slip stitching into the first chain to create a ring.
- Puff Stitch Technique:
- Worked by yarning over, inserting the hook into the same stitch, pulling up a loop to match the desired height, and repeating the process multiple times before pulling through all loops on the hook.
- Weaving in Ends: To secure your project, weave tails tightly using a tapestry needle and trim excess with scissors.

Pattern Instructions
Foundation
- Make a Slip Knot:
- Wrap the yarn around two fingers, pinch the yarn tail with your thumb, place the hook under the first strand, and lift the second strand over. Pull tight to secure.
- Place the loop on the hook and tighten it slightly.
- Chain 4:
- Make 4 chains by yarn over (yo) and pulling the yarn through the loop on your hook.
- Create a Circle:
- Sl st into the first chain to form a loop (circle).
Round 1: Forming the Base
- Insert the hook into the center of the circle.
- 11 sc into the circle, ensuring all stitches go into the center.
- For each sc:
- Insert the hook into the circle, yo, pull up a loop (2 loops on the hook).
- Yo again and pull through both loops.
- For each sc:
- Once you've made 11 sc, sl st into the first sc to complete the round.
- If necessary, pull the yarn tail from the center to tighten the ring.
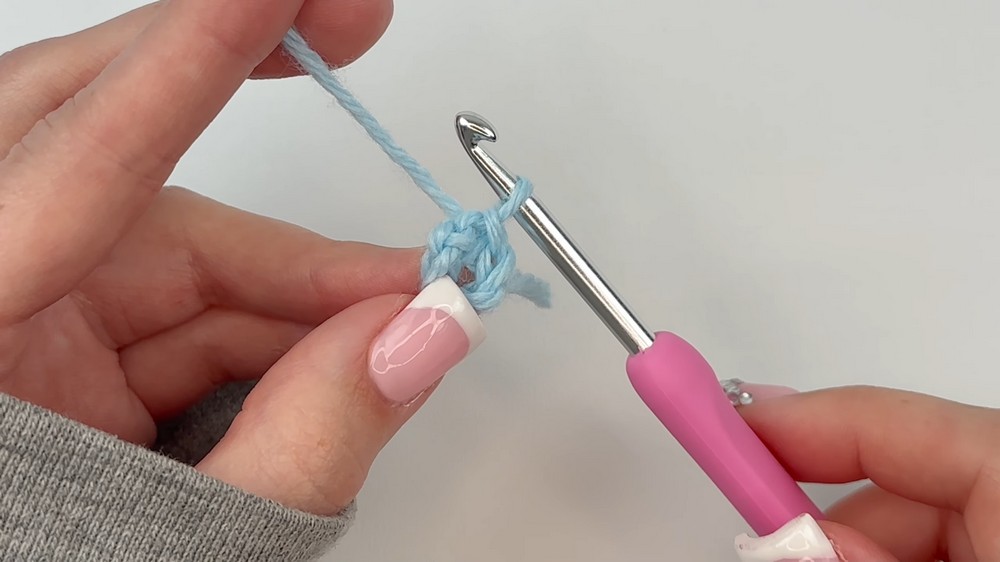

Round 2: Creating the Puff Stitch Petals
- Start with a Chain 4:
- This creates the height for the puff stitch in the first petal.
- Work First Half of the Petal (Puff Stitch - Three Loops):
- Yarn Over (yo), insert hook into the same stitch as the chain 4, pull up a loop to match the height of the chain 4 (three loops on the hook).
- Yo and pull through two loops only.
- Repeat this two more times, working into the same stitch, so you now have four loops on your hook (chain 4 counts as one loop).
- Work Second Half of Petal:
- Move to the next stitch.
- Repeat the same process (yo, insert hook, pull up loop, yo through two loops) three times in this next stitch, resulting in seven loops on the hook.
- Complete the Petal:
- Yo and pull through the first six loops of the seven.
- Yo and pull through the remaining two loops to close the petal.
- Chain 3:
- Crochet three chains to secure the petal shape.
- Slip Stitch to Anchor the Petal:
- Insert the hook into the same stitch as the second half of the petal, sl st to anchor.
- Repeat for the Remaining Petals:
- For each subsequent petal, begin with a chain 4, work the first puff stitch half in the current stitch, the second puff stitch half in the next stitch, and finish as described above.
- You should create 5 petals in total.


Finishing
- Once all 5 petals are complete, sl st into the base of the first petal.
- Tie Off:
- Ch 1, then cut your yarn with scissors, leaving a 4-5 inch tail. Pull this yarn tail through the chain and pull tight to secure.
- Weave in all yarn tails:
- Use a tapestry needle to weave the ends into the back loops.

Final Look
- The flower should have 5 puff petals, each slightly overlapping for a 3D effect.
- Push the back of each petal gently to enhance the "puffed" appearance.
- The small circle in the center can be tightened completely or left slightly open, adding to the aesthetic.

Customization Ideas
- Yarn Color: Use a contrasting color for the petals and another for the center. You can also switch colors between petals for a multicolored flower.
- Yarn Weight: Experiment with fine yarn for delicate flowers or bulky yarn for larger, statement flowers. Adjust the hook size accordingly.
- Beaded Center: Attach a bead or button to the center for an embellishment.
Conclusion and Final Tips
Congratulations on completing your puff flower! These versatile decorations can be made quickly and adapted to countless projects. Whether you're a beginner or seeking a simple pattern for quick projects, this flower is a perfect staple for your crochet repertoire.
Corrections and Suggestions
- To ensure smooth assembly, use stitch markers to mark the first stitch of each round.
- Always match the tension when pulling up loops in the puff stitches for a neat, uniform appearance.
- If the petals are curling excessively, try slightly looser tension or smaller loops.