
Easy Free Crochet Vest Sweater Pattern for Any Weather
Stay cozy and stylish with this free crochet vest sweater pattern that's for wearing in any season & ideal for upgrading your outfits.
Wrapping yourself in a cozy, stylish piece that feels both timeless and modern. A free crochet vest sweater pattern offers a unique charm that blends comfort with elegance. With its soft textures and intricate details, this vest sweater becomes a versatile addition to any wardrobe. It's perfect for layering over your favorite tops or dresses, adding a touch of warmth and style to casual outings, workdays, or even relaxed evenings at home.
Free Crochet Vest Sweater Pattern You'll Love to Wear

The beauty lies in its handcrocheted appeal, making it a standout piece that is both trendy and functional. Whether you prefer neutral tones for a subtle look or vibrant colors to express your personality, this crochet sweater exudes charm effortlessly. Lightweight yet snug, it fits perfectly for all seasons and occasions. Plus, making one yourself adds a personal touch that transforms an ordinary outfit into something truly special.
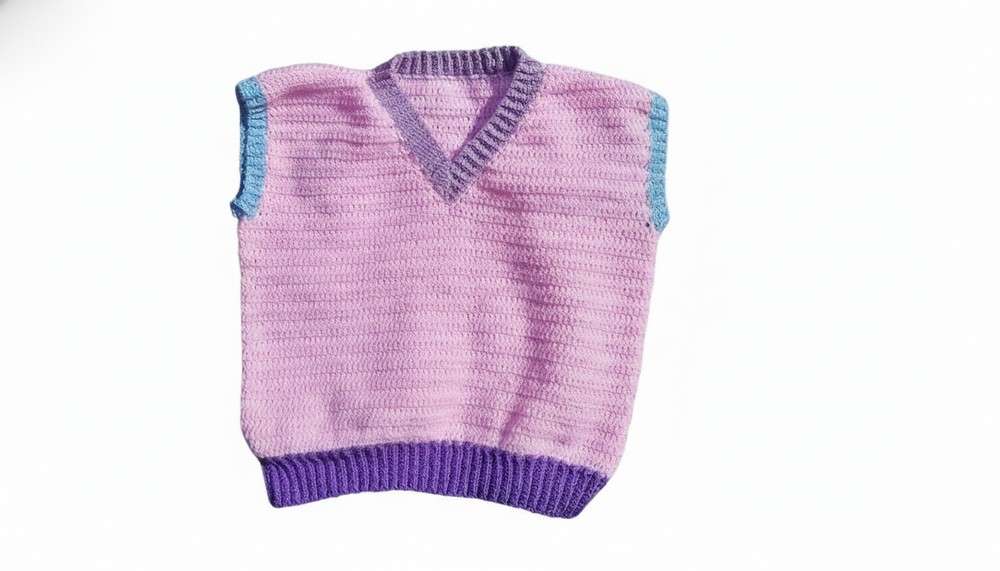
Crochet Pullover Vest (Sweater Vest) Pattern
1. Materials List
Yarn
- Yarn Type: Medium-weight yarn (Category 4). Thick, 100% acrylic yarn is suggested for a warm and durable vest.
- Suggested colors: Choose solid or contrasting colors depending on your style.
Hook Size
- Crochet Hook: 4mm hook for the body of the vest.
- Optional: A 3.5mm hook or 3mm hook is used for ribbing for a tighter look.
Additional Tools
- Scissors.
- Yarn needle (for sewing and weaving in ends).
- Stitch markers to mark decreases, increases, and symmetrical points.
2. Gauge
- Gauge: Not explicitly provided, but to match the instructions, work up a swatch of double crochet stitches (dc) with the specified yarn and hook size to determine even tension.
3. Finished Size
- Suitable for medium to large size. For reference:
- Front panel: 80 chains wide and 25 rows long before decreasing.
- Adjust rows to customize length and chains to alter width for other sizes.

4. Skill Level
Advanced Beginner to Intermediate
This pattern requires knowledge of:
- Basic crochet stitches: Chain (ch), Single Crochet (sc), Double Crochet (dc), Slip Stitch (sl st).
- Ribbing technique: Working into back loops only.
- Simple techniques for decreasing, joining yarn, and finishing.
5. Abbreviations (in US Crochet Terms)
- ch: Chain
- dc: Double Crochet
- sc: Single Crochet
- sl st: Slip Stitch
- dec: Decrease (dc two stitches together).
- yo: Yarn Over
Special Decrease (dc2tog):
Insert hook into next stitch, yo, pull up a loop (2 loops on hook). Insert hook into next stitch, yo, pull up a loop (3 loops on hook). Yo, pull through all 3 loops.
6. Special Techniques
- Back Loop Only (BLO):
- To create ribbing, work into the back loop only. Insert your hook under the back loop of each stitch instead of through both loops.
This adds the characteristic ridged effect.
- To create ribbing, work into the back loop only. Insert your hook under the back loop of each stitch instead of through both loops.
- Joining Yarn:
- When your yarn runs out, simply lay the new yarn over the previous tail end, tie it together with a secure knot, and continue crocheting. You can weave in the tails later.
- Checking Symmetry:
- Use stitch markers to identify the middle of panels and crucial points (e.g., decreases). This ensures balanced proportions.
6. Pattern Instructions
Step A: Front Panel
- Foundation Chain:
- Start with 80 chains for a medium-size vest.
- For a smaller/larger vest, adjust the number of chains based on your desired width.
- Row 1:
- After chaining 80, ch 3 (counts as 1 dc).
- Begin your first dc by working into the 4th chain from the hook.
- Work 1 dc into each chain across. You will have 80 dc total by the end of the row.
- Subsequent Rows (Rows 2-25):
- Ch 3, turn.
- Work 1 dc into each stitch across, ensuring you maintain even tension.
- Repeat for 25 rows.
- Decreasing for the Neck (Row 26 Onwards):
- After completing 25 rows, divide the width for your neckline:
- Mark the 40th stitch as the center using a stitch marker.
- You will decrease 4 stitches on each side of the neckline.
- After completing 25 rows, divide the width for your neckline:

Step B: Decreasing for the Neckline
- On Row 26:
- Work 1 dc into the first stitch.
- Skip the next 4 chains, then continue crocheting 1 dc into each stitch up to the stitch marker (midpoint).
- Decrease at the stitch marker by performing a dc2tog.
- Crochet rows with straight edges on one side and continue decreasing at the neckline until you reach 17 rows of decrease.
- Repeat on the Opposite Side: For symmetry, begin decreasing on the other half of the panel by starting where you previously left off. Ensure decreases mirror the first side.


Step C: Back Panel
- Create a second panel, following the same instructions for the front, but without neckline decreases.
- Create a simple rectangular shape, 80 chains wide by 25 rows long.
- At the shoulders, continue straight without shaping a neckline.
- Decreasing for the Back Shoulder:
- At Rows 26-41, add slight shaping by skipping 4 dc on each side, maintaining 15 rows for the shoulder width.

Step D: Joining Panels
- Align the front and back panels with the wrong side facing out.
- Use stitch markers to align the shoulders and side seams.
- Join the Shoulders:
- Use slip stitches or single crochet to sew the shoulder edges together.
- Join the Side Seams:
- Starting at the bottom hem, sew up each side evenly, leaving proper spacing for armholes (adjust armhole size based on preference).
Step E: Armhole Ribbing
- Attach yarn to the base of the armhole opening.
- Chain 4 and work back-loop-only (BLO) single crochet to form the ribbing.
- For each subsequent row, attach to the armhole with 2 slip stitches, then turn and work BLO back to the starting point.
- Continue ribbing rounds until the armhole is completed. Fasten off securely.
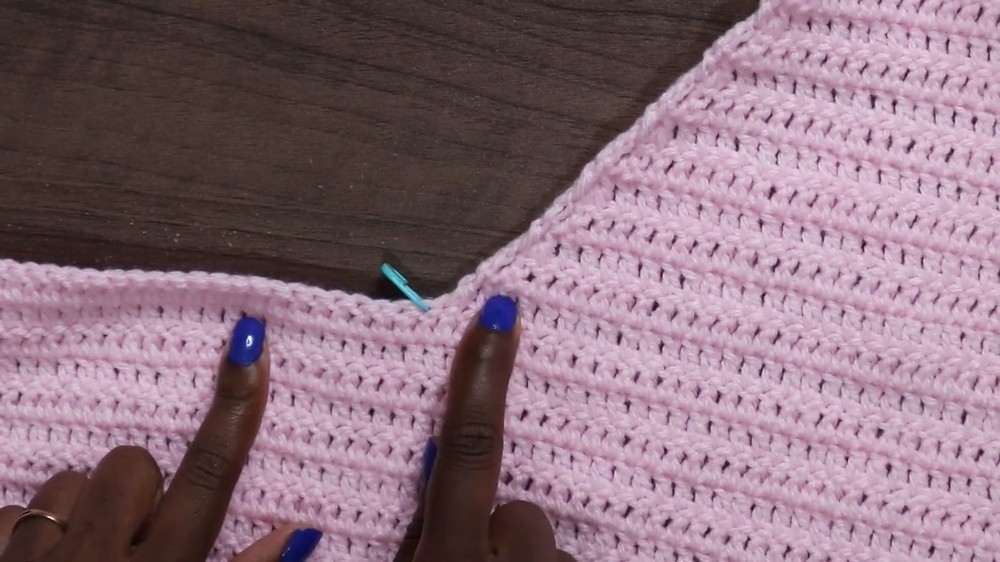
Step F: Neckline Ribbing
- Start at the center back of the neckline and attach yarn.
- Chain 6, working BLO single crochet stitches back and forth around the neckline in the same ribbing pattern as the armholes.
- Finish by slip stitching the neckline ribbing edges together, ensuring a V-shape is formed.

Step G: Bottom Ribbing
- Attach yarn to the bottom hem and chain 12.
- Work ribbing in BLO single crochet, going up to the base of the vest and down to the edge.
- Slip Stitch to Attach every couple of rows to tighten and form a neat edge.
Repeat around the hemline until complete. Join edges using slip stitches and weave in loose ends.
7. Special Notes and Tips
- Count Your Stitches: Regularly count ribbing stitches to avoid accidentally increasing or decreasing.
- Tighter Ribbing: Use a smaller hook size for edges for a more fitted look.
- Customize Lengths: Add or subtract rows in the body panels to adjust the length of your vest.
- Colors: Experiment with color-blocking to create a more modern, trendy style.
8. Conclusion
This crochet pullover vest is versatile, warm, and stylish! Whether you wear it layered over a shirt or on its own, it offers both functionality and elegance. With proper care and styling, it can be a staple piece in any wardrobe.