Elegant Free Crochet Doily Pattern for Home Decor
A Free Crochet doily Pattern is one of those beautiful handmade projects that slowly turns simple yarn into a decorative piece full of detail and charm. Many crocheters begin with scarves or small swatches, but making a doily feels extra special because every round reveals a lovely floral lace design. It gives a relaxing experience while also helping you improve your stitch control and round shaping. As the pattern grows larger, it starts looking like an elegant flower opening layer by layer which makes the whole process enjoyable from start to finish.
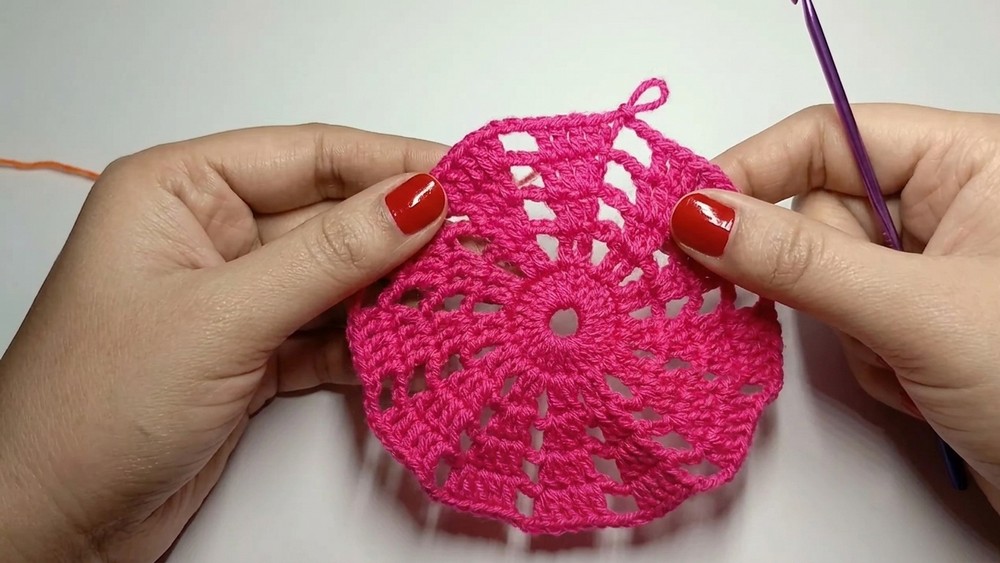
Stunning Free Crochet Doily Pattern for Tables
This Free Crochet doily Pattern features soft lace textures with floral inspired rounds that look graceful on dining tables, shelves, coffee corners, and side stands. Cream and white shades give it a classic vintage touch, while pastel pink, lavender, light blue, and sage green can make it look modern and stylish. The pattern mainly uses Chain Stitch, Double Crochet Stitch, and delicate shell details to form the airy lace effect.

By making small adjustments, you can also turn this pattern into Coasters, Placemats, Tray Covers, Wall Décor, and Decorative Pillow Covers. For the best results, use Cotton Crochet Yarn with a 2 mm to 3 mm Crochet Hook because it helps the lace stitches stay neat and visible. The finished flower style doily usually measures around 10 to 14 inches depending on yarn weight and added rounds.
- Count stitches carefully after every round
- Keep yarn tension soft and even for a flat shape
- Use stitch markers to avoid missing joins
- Block the finished doily to enhance the lace design
- Replay difficult rounds slowly to understand stitch placement

Some crocheters may face curling edges, uneven circles, or gaps between stitches while working on the pattern. These problems usually happen because of tight tension or skipped stitches during joining rounds. You can fix curling by loosening your tension slightly and flattening the piece after every few rounds.
Uneven edges can easily improve during blocking, while missed stitches can be corrected by checking stitch counts before starting the next round. Using lightweight cotton yarn and carefully following the round repeats can help you achieve a cleaner and more polished result in the end.

Elegant Crochet Doily Pattern
Infuse your home with a touch of handmade magic with this radiant orange crochet doily! Inspired by sunbursts and playful floral motifs, this large doily (about 15 inches across) brings color and texture wherever it's displayed-from your favorite table to a special gift box. Crafted from simple stitches and rhythmic repeats, this project is perfect for makers who want to create something beautiful, unique, and practical, even for those with minimal doily experience.
Skill Level & Terminology
- Skill Level: Easy/Advanced Beginner
- Terminology: US Crochet Terms
Materials & Tools
- Yarn: 4-ply acrylic or fingering weight yarn, about 60g, in your favorite color (sample shown in orange)
- Hook: 2.5 mm crochet hook
- Notions: Yarn needle (for weaving in ends), scissors, measuring tape
Gauge
- Gauge is not critical for this decorative item, but for reference:
After Rounds 1-3, your circle will be about 2.5" (6 cm) across.
Finished Size
- Approximately 15 inches (38 cm) in diameter
Abbreviations List
| Abbreviation | Meaning |
|---|---|
| ch | chain |
| dc | double crochet |
| sc | single crochet |
| sl st | slip stitch |
| rep | repeat |
| st(s) | stitch(es) |
| sp | space |
Special Stitch Instructions
- Magic Circle: Loop yarn around fingers to make a ring, crochet into the ring, then pull yarn tail to cinch closed.
- Increase (inc): Work two double crochets into the designated stitch.
- Slip Stitch (sl st): Insert hook in stitch, yarn over, pull through stitch and loop on hook.
- Petal Section: Worked back-and-forth after main rounds are complete.
The Pattern
Main Doily Rounds
Round 1:
- Start with a Magic Circle.
- Ch 3 (counts as first dc), work 23 dc into the circle (24 dc total).
- Join with sl st in top of starting ch 3. Pull yarn tail to close center.

You made the firm circle that anchors the whole doily. There will be 24 double crochets forming the base.
Round 2:
- Ch 3 (counts as dc), dc in next st (2 dc total), ch 3.
- Dc in next two stitches, ch 3; repeat from * to * around. (You will have groups of 2 dc followed by ch 3 spaces)
- Join with sl st to starting ch 3.
This forms the open and closed sections that alternate around-your doily will look like it has "windows" already!
Round 3:
- Ch 3 (counts as dc), dc in same st (increase), dc in next st (3 dc).
- Ch 3.
- 2 dc in first st (inc), dc in next st, ch 3; repeat around. Join with sl st.
In this round, you begin increasing so the doily will grow in a flat, circular shape. Pay attention to the increases at the beginning of each group.
Round 4:
- Ch 3, dc in same st (increase), dc in next 2 sts (4 dc).
- Ch 3.
- 2 dc in first st, 1 dc in each of next 2 sts, ch 3; repeat around. Join with sl st.
The logic of this part is simple: every "group" grows by one stitch each time, with the first stitch doubled for the increase.
Round 5:
- Ch 3, dc in same st (increase), dc in next 3 sts (5 dc).
- Ch 3.
- 2 dc in first st, 1 dc in next 3 sts, ch 3; repeat. Join with sl st.

Continue this basic rhythm of adding one stitch per group, always increasing in the first st after every ch-3 space.
Rounds 6-14:
- Each round:
Ch 3, dc in same st (increase), dc in each stitch of the group (each group grows by 1 stitch per round).
Ch 3 between groups. - Repeat this pattern, always increasing at the start of each set and chaining 3 between groups.
- Continue this way until you complete 14 rounds.
The doily will get wider, and the "spokes" flatter and more defined. Count your stitches to be sure you're keeping the pattern even-a little patience pays off for big drama at the end!
Shaping the Petals
Round 15:
- Ch 3, dc in same st (increase), dc in next 3 sts.
- Ch 5.
- Dc in next 10 sts, ch 3, 2 dc in first st of next section, dc in next 3, ch 5; repeat around.
- Join with sl st.

Big chain spaces are introduced to make the petal points possible-marking out each "petal's" top curve. Don't worry if it looks open now, the next rounds will shape it.
Round 16:
- Ch 3, dc in same st (increase), dc in next 3 sts.
- Ch 5, skip last st, sc in ch-5 space.
- Ch 5, skip next two sts, dc in next 8 sts.
- Ch 3, repeat petal section: inc in first st, dc in next 3, ch 5, skip st, sc in ch-5 sp, ch 5, skip 2 sts, dc in next 8.
- Repeat for each petal, end with sl st.
You're dividing the doily into 12 petal points, each framed by large chain spaces. These become the "scallops" on the final round.
Round 17:
- Ch 3, dc in same st (increase), dc in next 3 sts.
- Ch 5, skip last st, sc in left ch-5 corner, sc in the next st, sc in right ch-5 corner.
- Ch 5, skip first two stitches, dc in next 5.
- Ch 3, repeat petal section: inc in first st, dc in next 3, ch 5, sc in left corner, sc in next st, sc in right corner, ch 5, skip two, dc in 5.
- End with sl st.
The "petal" arches are taking shape, and you have fewer stitches in each group. These points are where you'll work the tall, dramatic petal overlays.
Working Petals Individually
You will now work across each petal (12 total), back and forth in rows.
For Each Petal:
Row 1:
- Attach yarn to the 3rd dc of a group in the petal.
- Ch 3, dc in next 2 sts, 2 dc in ch-5 space, ch 5, sc in center sc of petal top, ch 5, 2 dc in ch-5 space (left), dc in next 3 sts. Turn, leaving last 2 unworked.

You begin forming the petal shape working out from the narrow base to the arch.
Row 2:
- Sl st into first 2 sts.
- Ch 3, dc in next 2, 2 dc in side ch sp, ch 2, skip center, 2 dc in next ch sp, dc in next 3. Turn.
Notice the "gap" in the middle (ch 2, skip center), which keeps the petal thin and lacy.
Row 3:
- Sl st into first 2 sts.
- Ch 3, dc in next 2, 2 dc in ch-2 sp, dc in next 3. Turn.
This round closes the top with compact stitches for crisp petal points.
Row 4:
- Sl st into first 2 sts.
- Ch 3, dc in next 3 sts (total 4 dc).
- Fasten off, leaving a short tail. Weave tails through with a needle.
The petal is complete-neatly finished points with a natural curve. Repeat for all 12 petals using the same sequence.
Repeat Rows 1-4 for each petal around the whole doily (12 total petals).
Assembly & Finishing
- Carefully weave in all yarn ends with a yarn needle.
- Gently block your doily by pinning it to a soft surface, spraying with water to open up the lace and even out the points.
- Allow to dry completely before displaying.
You did it!
You've crocheted a stunning, statement doily using only fundamental stitches, simple increases, and chain spaces. The petal sections may look complex, but by taking one step at a time, you'll soon see the whole pattern blossom into a floral work of art. This pattern is great practice for increasing, shaping, and working in flat rows and in the round-all in one joyful project!