
Quick & Simple Free Crochet Clutch Pattern
Grab this Free Crochet Clutch Pattern and turn yarn into a chic accessory that's for beginners, it's fun, easy to make, and a fabulous handmade treasure.
Sometimes, a small accessory can completely change the way you carry yourself. A crochet clutch is that perfect combination of beauty and practicality. With its intricate texture, compact size, and endless color possibilities, it can complement casual outings, special occasions, or even be that standout statement piece for your outfit. From holding your phone and keys to makeup essentials, it's designed to be as functional as it is stylish. The delicate woven appearance brings elegance, while the durability of crochet ensures it's made to last.
Free Crochet Clutch Pattern for All Your Essentials

For beginners, crocheting a clutch is a lovely way to dip your toes into the world of crochet. The straightforward design makes it achievable for those just starting out, and the best part? You can personalize it to your liking with buttons, tassels, or custom patterns.
It's not just a project, it's an opportunity to create something unique for yourself or as a thoughtful, handmade gift. The joy of carrying something that is both a reflection of your personal style and a testament to your creativity. A crochet clutch can be simple, fun to make, and the perfect step into practical and stylish projects that you'll use again and again.

Crocheted Clutch Bag Pattern by Ariane Torres
Skill Level
Intermediate to Advanced
Materials
- Yarn: Approx. 1-2 skeins of thick, tubular yarn (e.g., Irene's #15 mm knitting yarn by Piratininga, or similar "t-shirt yarn" or "spaghetti yarn")
- Crochet Hook: 5 mm (US H-8)
- Lining Fabric: Lightweight cotton, tricoline, or viscose (enough for clutch interior)
- EVA Foam: (thin, flexible foam sheet for bag structure)
- Button: 1 small button for closure (magnetized button is optional)
- Tapestry Needle: For sewing in ends and lining
- Thread & Sewing Needle: To sew lining and button
- Cardboard (for tassel): 12 cm wide
- Scissors
- Optional: Carabiner, extra yarn for making a crocheted strap, additional fringe or tassel decorations
Key Abbreviations (US Terms)
- ch - chain
- sc - single crochet
- dc - double crochet
- sl st - slip stitch
- st(s) - stitch(es)
- sp(s) - space(s)
- beg - beginning
- rep - repeat
- RS/WS - right/wrong side
Special Notes
- Maintain a firm and structured gauge throughout the project.
- Pattern is worked flat as a large solid granny square, then folded, edged, and seamed for a clutch shape.
- The handle is constructed as part of the upper edging.
- Lining and EVA foam give the bag structure and a professional finish.
- You may need to adjust the number of rounds for your yarn thickness and desired size.
Finished Size
- Approximately 25 cm wide x 17 cm tall (9 rows)
You may customize the size by adding or subtracting rounds.

Instructions
1. Main Body: Solid Granny Square
Step 1:
Make a magic ring.
Step 2:
Round 1:
- Ch 3 (counts as 1 dc), 2 dc into ring (first corner group made).
- Ch 2 (corner).
- Repeat [3 dc, ch 2] three more times into ring (four "corner" groups of 3 dc total).
- Sl st to top of beg ch-3 to join.
- Pull tail to close magic ring.
Step 3:
Round 2:
- Sl st to next corner sp.
- Ch 3, 1 dc in same corner, dc in each dc across to next corner, (2 dc, ch 2, 2 dc) in corner sp, rep around.
- Join with sl st to top of beg ch-3.

Step 4 (Round 3+):
- Continue as established:
- Ch 3 at start of each round,
- 2 dc, ch 2, 2 dc in each corner sp,
- 1 dc in each dc along sides.
- Repeat until you have 9 total rounds or your piece measures 25 cm square.

2. Folding, Edging & Handle
Step 1:
Fold the square into a rectangle or clutch shape (bottom to top). Use stitch markers to hold in place if helpful.
Step 2:
Starting at one corner on the top edge, work 1 sc in each dc and 2 sc in each corner sp across the top edge.
Continue down and up the other side. At each side seam, sc through both thicknesses to join.
Step 3:
On the upper edge, work a total of 3 rounds of centered single crochet (ssc) to create a neat, firm finished edge.

- For centered (waistcoat) sc: Insert your hook into the "V" of the dc below (not normal top two loops), yarn over, pull up loop, finish as usual.
3. Forming and Spacing the Handles
- After the three rows of centered sc, count your stitches across the top (approx. 37 sts).
- Mark out 11 stitches at each side and leave 15 at the center for the handles. For the handle gap, you will ch 13 (the result will span 15 sts).
- On the next round:
- Work 1 ssc in each side st.
- When you reach the 15 center handle sts, ch 13, skip 15 sts, ssc in next st.
- Complete remainder of round as for the first side.
- Repeat for second handle if making two.
- On the next rounds, work 1 ssc into each sc and also into each ch across the handle gap, to firm up and complete the handles.
- Work four rounds total around the handles.
- For ultimate structure, work one final round of slip stitches through both loops to reinforce and close the handle edges.

4. Assembly
- Side Seams:
- Use slip stitch or tapestry needle to sew the clutch sides (inside-out for invisible seam).
- Weave in all ends.
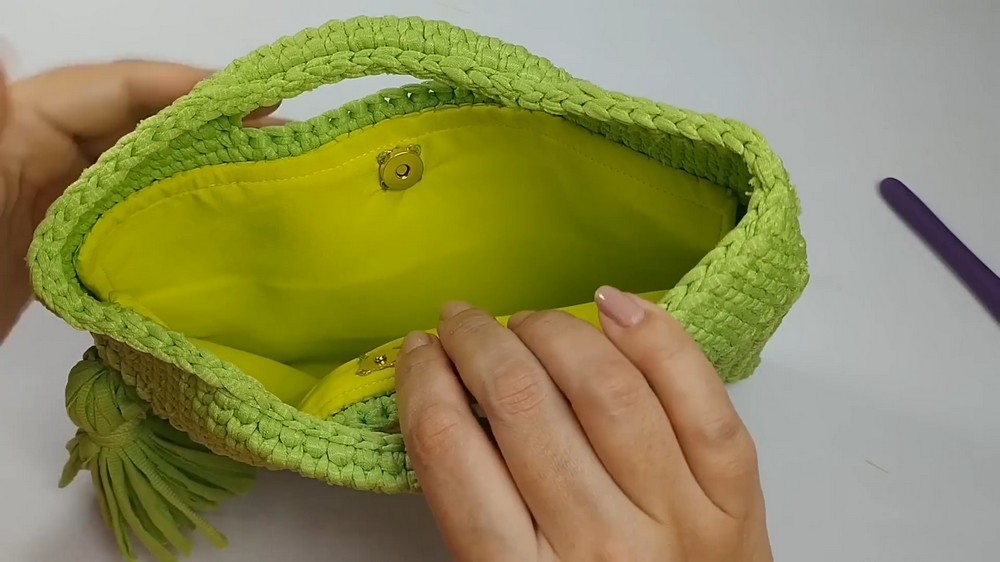
- Lining and EVA Foam:
- Cut EVA foam and fabric lining to fit inside your bag (down to the base of the handle openings).
- Sew lining fabric right sides together, turn right side out, insert EVA foam.
- Hand sew the open edge closed.
- Insert lining and sew neatly to inner edge of the bag, just under the handle arches, catching yarn and lining together.
- Button:
- Sew magnetic button or regular button to the desired location (see Special Notes for placement if using lining).
- Tassel (Optional):
- Wrap yarn around 12 cm cardboard many times; tie at top, cut at bottom, wrap extra strand around "neck."
- Secure tassel to bag side.
- Strap (Optional):
- Use remaining yarn for a crocheted strap, or attach a carabiner/handle as desired.
Pattern Correction
- Ensure your granny square remains a perfect square by placing marked corners and keeping increases only in the corners.
- Always work 2 dc, ch 2, 2 dc in each corner space.
- For the edge and handle opening, centered single crochet offers a stiffer, more knit-like edge.
Tips
- Use a tight tension to maintain structure; bag should feel stiff and firm.
- For a cleaner look, block your square before folding and assembling.
- If short on yarn, omit the tassel or border rounds.
Conclusion
This clutch is both practical and stylish, with a modern, bold texture thanks to thick yarn and a solid, structured interior. The centered single crochet and slip stitch final edging provide a polished finish, while a removable, washable lining adds durability. Make a handle or add a custom strap for versatility.