
Free Crochet Granny Squares Beach Bag Perfect for Sunny Days
Create a vibrant summer accessory with the Crochet Granny Squares Beach Bag Pattern featuring timeless motifs and endless ways to customize your look.
Nothing says summer quite like a vibrant and handmade accessory to carry all your essentials. A Crochet Granny Squares Beach Bag Pattern is a delightful project that combines classic charm with modern functionality. This design uses the timeless granny square motif, a favorite among crochet fans, to piece together a spacious and stylish beach bag. Its modular nature makes it an enjoyable, beginner-friendly project where you can mix and match colors to create striking patterns.
Crochet Granny Squares Beach Bag Pattern for Fun

The bag is perfect for holding sunscreen, towels, snacks, and more, whether you're off to the beach, park, or heading for a casual day out. What's even more exciting is the creative twist you can add, experimenting with bold color combinations or embellishing the squares with buttons or tassels for added flair. Not only is this pattern practical, but it also lets you explore your creativity while crafting something both functional and uniquely beautiful.

Crochet Beach Bag Pattern
Skill Level
Beginner
Materials
- Yarn: 100% cotton, DK or light worsted weight
- 100g/230m balls; ~2.5 balls (~250g, ~575m total)
If using 50g balls (~100-150m): use 5 balls
- 100g/230m balls; ~2.5 balls (~250g, ~575m total)
- Crochet hook: 2.5 mm (US B/1 or C/2)
- Yarn needle: for weaving ends and sewing squares & handle
- Scissors

Gauge
- Each square: approx. 5.5-6 inches (14-15cm) per side after blocking.
- Finished bag (after joining squares): approx. 16-17 inches (40-43cm) wide, 17-18 inches (43-45cm) tall, excluding handle.
Special Techniques
- Magic Ring (Loop): Used for center start.
- Cluster (3-dc together): Used for petals.
- Joining Squares (Whip Stitch or Slip Stitch): Sew squares through outer loops only.
- Handle Technique: Crochet handle directly onto bag with special joining method for secure, neat connection.
Abbreviations (US Terms)
| Abbreviation | Stitch |
|---|---|
| ch | chain |
| sc | single crochet |
| dc | double crochet |
| tr | treble crochet (yarn over twice) |
| sl st | slip stitch |
| MR | magic ring/loop |
| st(s) | stitch(es) |
Pattern
SQUARE MOTIF (make 14-20 squares for the bag, as desired)
Row 1: Magic Ring Start
- Make a magic ring and leave a 15cm yarn tail.
- Ch 2 (counts as first dc).
- Work 15 dc into the ring (16 dc total).
- Pull tail to close ring.
- Sl st into top of first dc/ch-2 to join. Fasten off if changing colors.

Row 2: Arches Row
- Ch 3 (counts as first dc).
- (dc in next st, ch 1) repeat around.
- You'll have 16 dc and 16 ch-1 arches.
- At end, ch 1, sl st into 2nd ch of beginning ch-3. Fasten off if changing colors.

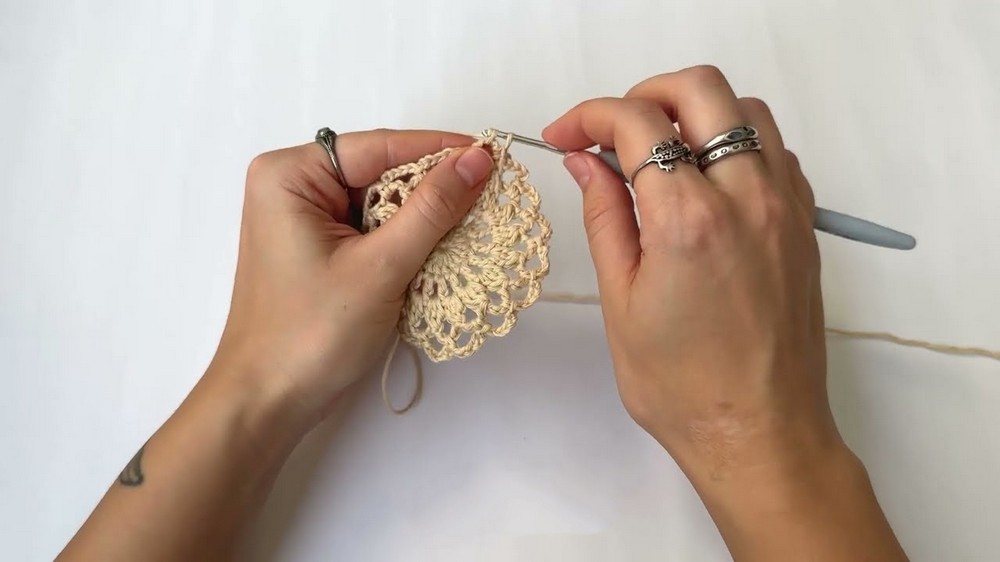
Row 3: Petal (Cluster) Row
- Ch 2.
- 3-dc cluster into each arch (work as follows:
- Yarn over, insert hook in arch, pull up loop, yarn over, pull through 2 loops.
- Repeat this step twice more (3 times in total), leaving all stitches unfinished, so you have 4 loops on hook.
- Yarn over, pull through all 4 loops together: cluster made.)
- After cluster, ch 4 (chain arch).
- Repeat: (3-dc cluster in next arch, ch 4) around.
- At end, sl st into top of first cluster to join.
Row 4: Arches & Single Crochet Row
- Move to center of first arch: sc twice into arch.
- Ch 5, sc into next arch.
- Repeat (ch 5, sc in arch) around.
- Sl st into base of first arch to join.
Row 5: Petal and Corner Formation
- Move to center of first arch: sc twice.
- (10 dc in arch, sc in next arch,
[5 dc, ch 4 (corner), 5 dc in next arch],
sc in next arch) - Repeat sequence around for four round petals and four corners.
- Sl st into top of first petal to join.

Row 6: Square Shaping
- Start in center arch (side): dc, ch 2, tr in same arch.
- Ch 4, sl st into petal center.
- Ch 4, (2 tr in next arch), ch 4,
In corner arch: (2 dc, ch 4, 2 dc), ch 4. - In next side arch: 2 tr, ch 4, sl st into petal, ch 4, 2 tr in arch, ch 4, corner etc.
- Repeat for all sides.
At end, sl st into top of beginning stitch to join.
Row 7: Outline Row
- Ch 2 (counts as dc).
- (dc in each st and space, working 4 dc into each chain-4 arch,
dc into each tr and dc as encountered).
In corner spaces: (2 dc, ch 4, 2 dc) - Repeat for each side and corner.
At end, sl st into top of first dc to join.
Row 8: Border Row
- Sl st into first dc, ch 3 (counts as dc).
- (Skip next st, dc in next st, ch 1, skip next st, dc in next st, ch 1)
- In corner: dc in corner space, ch 4, dc in same corner space.
- Repeat * to next corner.
- At end, sl st into top of first dc to join.
Finishing Square
- Cut yarn, leaving ~20cm tail.
- Weave ends neatly on wrong side using a yarn needle.
Bag Construction
Joining Squares
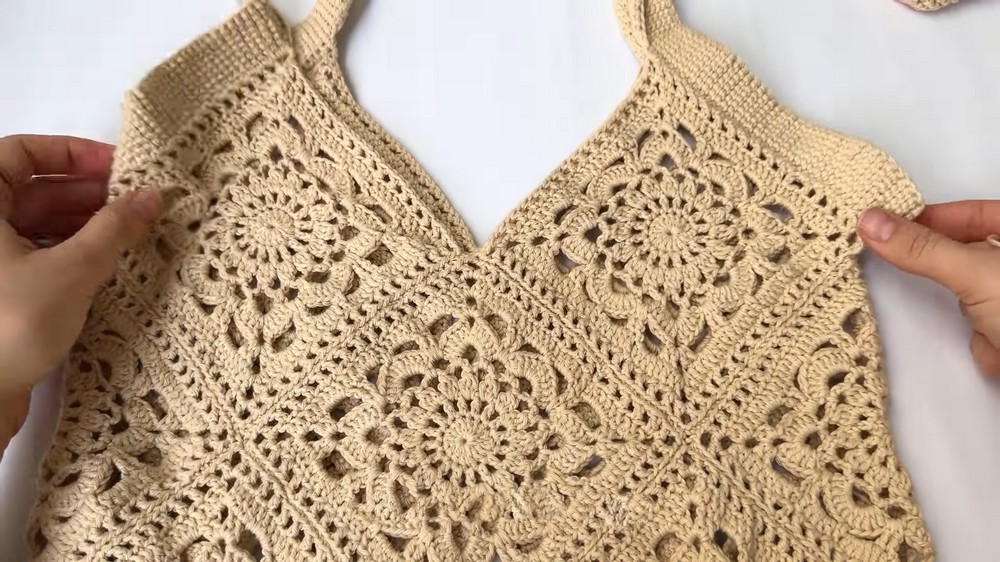
- Lay squares out in desired shape (see video for layout).
- Sew squares together using yarn needle, working through outer loops only for a flat, nearly invisible seam.
- Join squares row-by-row and column-by-column as needed.
- Fold and sew to shape the bag (side and bottom seams).
- Fold bag as shown in video to achieve final tote shape.

Handles (Shoulder Straps)
Handle width: 7 chains wide
Handle length: work ~80 rows, or adjust to taste.
- Attach yarn at designated corner of square.
- Ch 7 (first ch made with both yarn tails, remaining chains with working yarn only).
- Turn; skip first ch, pick up loop from 2nd ch, repeat for each chain (7 loops on hook).
- Attach handle row to top loop of square, working sc to join as shown.
- Next row: pick up side loop from previous row, repeat for 7 loops.
- Attach row as before.
- Continue until desired length is reached (typically ~80 rows).
- Attach other end of handle to opposite square corner.
- Sew handle edges inside the bag for neat finish.
Final Touches
- Sew all remaining open seams and handle ends securely.
- Tidy up interior by weaving all tails.
- Block bag lightly if desired to square up motifs.
Finished Size
- Bag: approx. 16-17 inches (40-43cm) square
- Handle: depth ~11-14 inches (28-35cm) or as preferred.
Tips and Customization Ideas
- Color: Use multiple colors for squares or handles for a bold, beachy look.
- Yarn: Substitute linen or poly-cotton for extra durability.
- Number of Squares: The bag is easily scaled; make a larger tote by adding squares, or a smaller bag by using fewer.
- Lining: Add a sewn lining for more structure and to conceal seams.
- Sewing: For a professional finish, always join the squares through outer loops and weave ends with the same color.
- Blocking: Lightly block squares before joining for perfect alignment.
Special Techniques and Important Remarks
- Magic ring start ensures a tight center for each square.
- Handle is crocheted directly onto bag corners for strength-use firm stitches when attaching.
- Always check rows end with the same stitch count as started; if not, check for missed stitches or added ones.
Conclusion
Your finished beach bag features elegant, floral-inspired squares joined into a sturdy tote, with soft cotton yarn making it lightweight yet durable for summer use. The handle attachment method ensures strength and a comfortable carrying experience.