
Free Crochet Mobile Bag Pattern to Free Up Your Hands
Learn how to make a beautiful and easy crochet mobile bag with simple steps and a creative design that is perfect for carrying your phone safely and in style.
A crochet mobile bag is a wonderful and practical accessory that is easy to make and beautiful to look at. It is perfect for anyone who wants to keep their phone safe and stylish at the same time. This Free Crochet Mobile Bag Pattern is great for beginners because it uses simple stitches and easy to follow steps. The bag has a unique and elegant design that makes it stand out. The decorative pattern gives it a charming look, with small details that make it look special. You can choose different colors of yarn, such as bright and bold colors to make it eye catching or soft pastel tones for a simple and smooth appearance. It's all up to you.
Free Crochet Mobile Bag Pattern for Gifts and Daily Use

It is the perfect size to hold your phone securely, keeping it safe from scratches or damage as you carry it around. You can also add a strap, making it extremely convenient to wear on your shoulder or around your neck. This feature makes it easy to carry whether you are walking, shopping, or just relaxing at home. Another exciting feature is that you can customize the bag to suit your style. Want to give it a personal touch? You can add small accessories like beads, buttons, or even crochet flowers.
This crochet mobile bag is not just useful but also an eco friendly option because it is handmade and reusable. It makes a thoughtful gift for friends or family since it is stylish and made with care. This simple yet adorable bag is a perfect project for creativity and everyday use.

Crochet Mobile Bag Pattern
Materials Required
- Yarn: Poly Cherry (or yarn of your choice, depending on the desired size and thickness of the bag).
- Crochet Hook: Size 3 mm.
- Stitch Markers (optional, for marking beginning points).
- Scissors.
- Tape measure (for finished size or customizing dimensions).
- Yarn needle (to weave in ends).
Gauge
The gauge is not specified in the video, but it is crucial to create a few rows of Single Crochet (SC) with your yarn and hook and measure the length to ensure the proper size. For this project, adjust the gauge if needed for tighter or looser stitches.
Finished Size
The final size of the handphone bag may vary based on yarn and tension. From the pattern, the bag is approximately:
- Width: 10 cm (4 inches).
- Height: 16 cm (6-6.5 inches).
Customize using the base chain count for smaller or larger sizes.
Pattern Instructions
Step 1: Create the Foundation Chain
- Begin by making a Slip Knot on the hook.
- Crochet 25 chains in total: Create 24 chains (multiples of 6) and add 1 extra chain for turning.
Step 2: Work the First Row
- Insert the hook into the second chain from the hook (the 24th chain) and make a Single Crochet (SC).
- Continue working 1 SC into each chain across the row, resulting in 24 SC stitches at the end.
- Once you reach the end, add 1 chain for turning.

Step 3: Work the Second and Third Rows
- Turn your work and crochet 1 SC into each stitch across the second and third rows.
- Continue until you complete three rows.
- You should now have a rectangular foundation with three rows of SC stitches.
Step 4: Create the Rounded Base (Foundation Round)
- Begin working in the round at the base. This step involves creating SC stitches around the perimeter of the rectangular foundation.
- Work 1 SC into each stitch along the long sides of the foundation.
- At the corners (the ends of the rows), use 2 SC stitches in the same stitch to increase and round the corners.
- For ease, place a stitch marker in the first stitch of this round to mark the starting point.
- Repeat this process around the rectangle's edge until you complete the entire round.
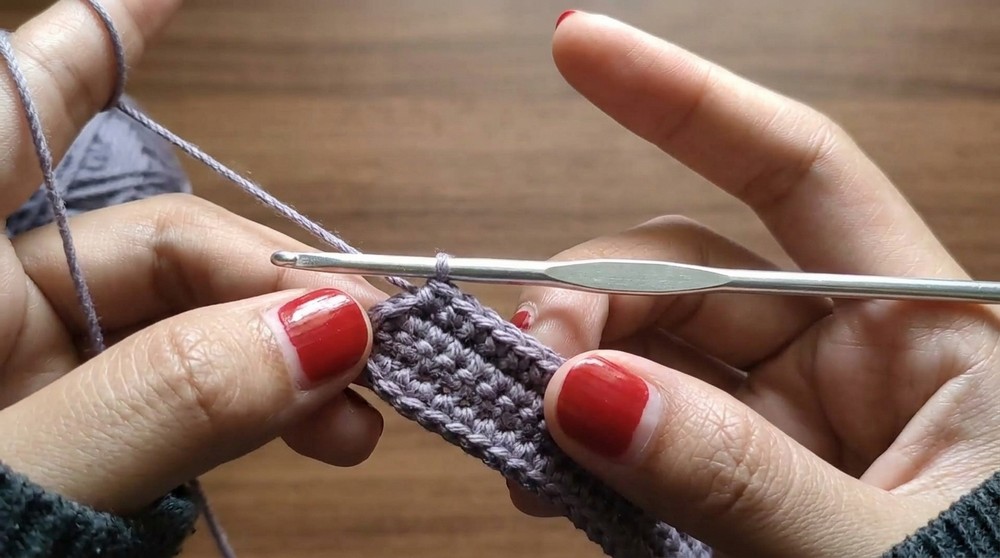

Step 5: Work the Second Round (Base Foundation Round)
- Crochet 1 SC into each stitch around the perimeter, skipping additional increases at the corners.
- Continue working in the round until you reach the stitch marker at the start of the row.
- Ensure your stitches are even and tight for a sturdy base.

Designing the Main Body Pattern
Step 6: Introduce the Decorative Pattern
- Start by joining the next round with a Slip Stitch followed by 1 chain.
- Begin the decorative motif:
- Work 1 SC into the first stitch.
- Chain three stitches.
- Skip two stitches and work 3 Double Crochet (DC) into the third stitch.
- Skip two stitches again and work 1 SC followed by three chains.
- Repeat this pattern in a circular manner, alternating SC, three chains, skip two stitches, and groups of 3 DC.
Step 7: Additional Rounds for the Decorative Pattern
- For subsequent rounds, continue building on the pattern:
- Work 3 DC into the chain spaces from the previous round.
- Alternate SC and chain groups as instructed.
- Repeat the same pattern, ensuring clean joins at the end of each round with a Slip Stitch.
Step 8: Adding Height to the Bag
- Repeat the pattern until you achieve the desired height. Based on the pattern constructs the body in approximately four decorative pattern rows.
- Measure your bag's height periodically to ensure it fits your intended needs for the handphone.
Step 9: Final Row of the Decorative Pattern
- For the last round, finish with Slip Stitches to provide a clean edge and secure the stitches.
- Cut the yarn and weave in the ends using a yarn needle for a polished finish.

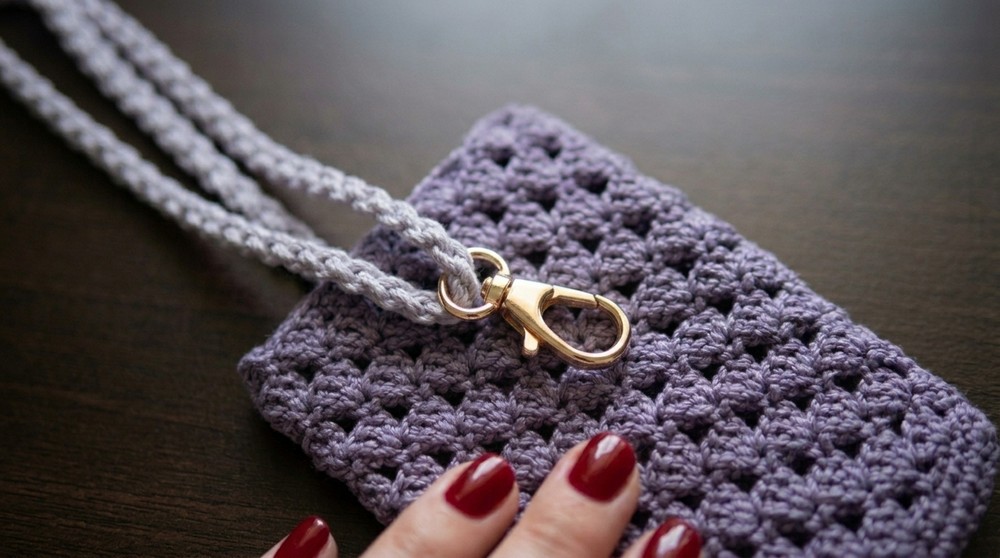
Making the Bag Strap
- Using white yarn (or the color of your preference), create a long strap using chains.
- Crochet a chain of appropriate length (approx. 120 chains for a short strap or more for crossbody styling).
- Attach the ends of the strap evenly to the sides of the bag using single crochet or stitch the ends securely with yarn and a needle.
Customization Ideas
- Change Yarn Colors:
Use contrasting or variegated yarn to make your bag look unique. For example, the bag was made with red and white in the pattetn to represent August's Independence theme. - Add Embellishments:
- Attach small crochet flowers, beads, or buttons to give your bag a personal touch.
- Sew on a decorative zipper or use a magnetic snap for closure.
- Customize the Size:
You can easily adjust the size by increasing or decreasing the foundation chain. Make larger bags for books or smaller ones for wallets. - Add a Lining:
Insert a fabric lining inside the bag to add durability and make it suitable for carrying small items safely.

Special Techniques Used
- Slip Stitch Join:
Used to seamlessly join the ends of each round for a polished look. - Increases at Corners:
Add 2 SC stitches in a single stitch to create rounded edges for the base. - Skipping Stitches for Design:
Skipping stitches between SC and DC groups creates the decorative open work pattern.
Tips for Enhanced Results
- Check Your Gauge:
Regularly measure your stitches to ensure the size matches your expectation. - Use a Stitch Marker:
Marking the start of rounds makes tracking easier, especially for beginners. - Keep Edges Neat:
Tighten the Slip Stitch joins and weave loose ends properly for a professional finish.
Conclusion
This crochet handphone bag is stylish, practical, and customizable. The combination of simple SC stitches with decorative motifs creates a functional yet elegant piece. Whether you make it for yourself or gift it to a loved one, this bag is a great way to showcase your crochet skills. With customizations like color choices, strap designs, or added embellishments, you can make each bag as unique as you want.
Final Remarks
The finished look of the bag showcases a lovely design with alternating SC and DC groups that provide texture and depth. The red and white color theme highlights its celebratory tone, while the sturdy strap ensures convenience and usability. Follow this step by step pattern, and you'll have a handmade creation that's both stunning and practical.