Crochet Ruffle Skirt Free Pattern with Custom Sizing Tips
Learn how to make a beautiful crochet ruffle skirt with this free and easy pattern that is perfect for all skill levels and great for adding a fun style to your outfits.
Soft ruffles and gentle movement give this skirt a charming, feminine appeal that suits many occasions. The fabric feels light against the skin, offering comfort throughout the day, whether you're out with friends or attending a special event. An elastic waistband ensures a secure, flexible fit that adapts nicely to different body shapes, allowing easy wear without discomfort.
Free Crochet Ruffle Skirt Pattern for Every Skill Level
The silhouette flatters the figure without feeling restrictive, making it a reliable choice for both casual and slightly dressier looks. Available in a range of colors, it pairs effortlessly with simple tops, blouses, or light knitwear. Subtle detailing along the hem enhances its graceful flow with every step. Ideal for those who enjoy clothing that feels comfortable yet polished, this skirt easily becomes a favorite piece in any wardrobe.

Ruffled Waist Skirt Crochet Pattern
Skill Level
Intermediate to Advanced - Requires familiarity with basic crochet stitches, working in rows and rounds, creating increases, and using the magic ring technique.
Materials List
- Yarn:
- Charity Double Knit Yarn: An affordable yarn, suitable for this design. (Feel free to substitute any DK-weight acrylic or cotton yarn.)
- Approximately 300-450g of yarn, depending on your size and desired length.
- Hooks:
- 4 mm crochet hook: For creating the waistband.
- 4.5 mm crochet hook: For the body of the skirt.
- Optional: 3.5 mm crochet hook: To create tighter, more delicate ruffles.
- Scissors: For cutting yarn ends.
- Measuring tape: Optional for sizing and checking dimensions.
- Stitch marker: Useful for marking the start of your rounds. If unavailable, a piece of contrasting yarn can be used.
Key Abbreviations (US Terminology)
- Ch: Chain
- St: Stitch
- Sc: Single Crochet
- Hdc: Half Double Crochet
- Dc: Double Crochet
- Sl St: Slip Stitch
- Inc: Increase, two stitches worked into the same space
- BLO: Back Loop Only
- MC: Magic Circle
Special Notes
- Sizing Adjustments: The waistband section can be adjusted by increasing or decreasing the number of rows in the foundation to fit your specific waist size. Stretch the piece slightly while measuring to account for natural yarn elasticity.
- Working in the Back Loop: This creates a ribbed look for the waistband. Pay attention to ensure you're consistently inserting the hook into the back loop.
- Seamless Look: To avoid gaps or visible joins, ensure your tension is consistent, and place the slip stitch join carefully.
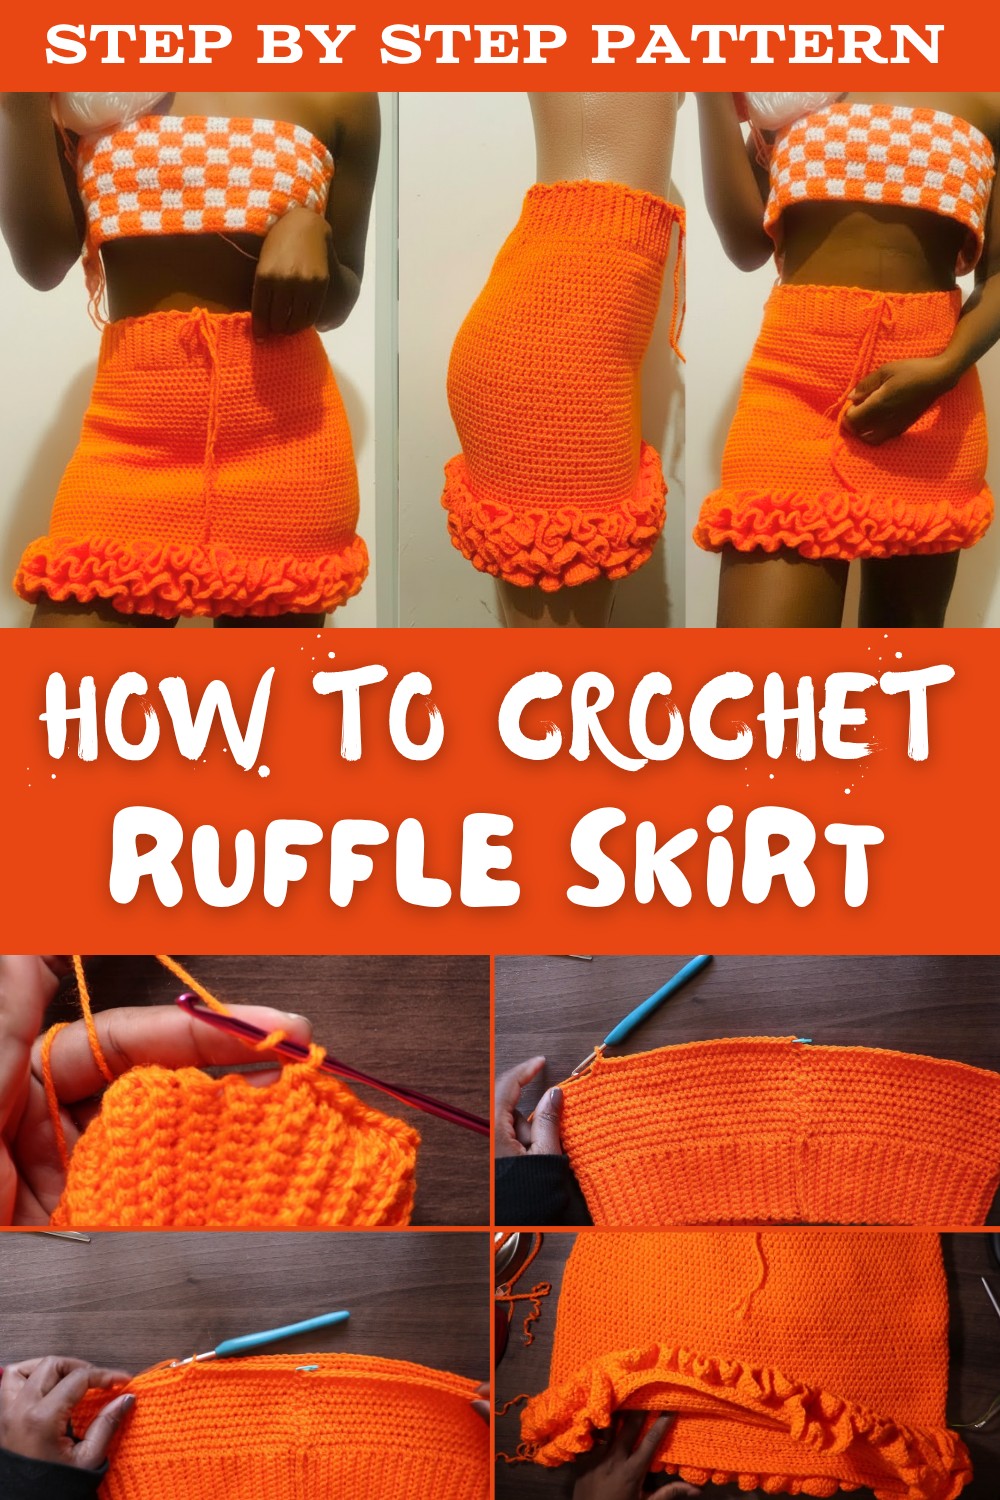
Pattern Instructions
1. Waistband
- Start with a Magic Ring (MC):
- Wrap the yarn around your fingers to form a ring, pull yarn through, and secure it to create an adjustable loop.
- Ch 12 stitches for the foundation:
- This will create a ribbed waistband. Adjust the number of chains if you'd like a wider or narrower waistband.
- Row 1:
- Starting from the 2nd chain from the hook, Sc in each chain across. You should have 12 Sc at the end of the row.
- Turn your work.
- Row 2 (and beyond):
- Ch 1, and work 12 Sc BLO (Back Loop Only) across the row. This technique creates a ribbed texture for the waistband.
- Turn. Repeat this process until the waistband is long enough to stretch comfortably around your waist.
- Measure Length of the Waistband:
- For example, the video tutorial gave 125 rows for a medium size, but adjust this for your size. Stretch it slightly to check the fit.
- Join the Waistband:
- Fold the waistband in half so the starting row meets the ending row.
- Use Sc to join both sides together. This will form a loop for the waistband.

2. Skirt Body
Round 1: Foundation Round
- Switch to the 4.5 mm hook to allow for more flow and flexibility in the body of the skirt.
- Attach yarn to the seam of the waistband, Ch 2 to begin.
- Work 1 Hdc into each row of the waistband ribbing. Continue placing 1 Hdc per row around the waistband until you return to the starting point.
- Sl St into the top of the first Hdc to join, and Ch 2 to begin the next round.


Rounds 2-8: Even Crochet
- Work 1 Hdc in each stitch around, ensuring consistent tension.
- Sl St to join, then Ch 2 at the start of each new round.
- Stop and measure the length of your skirt. The tutorial aimed for 8 Hdc rounds for this section before increasing. Adjust your preferred number for different skirt lengths.

3. Increase Section
- Round 9:
- Begin evenly spaced increases: Place 2 Hdc into one stitch approximately every 20 stitches. (Add 4 total increases: two for the front, two for the back.)
- Mark the approximate midpoints of the front and back, and ensure increases are placed symmetrically for a balanced fit.
- Round 10:
- Work 1 Hdc in each stitch around, with no increases.
- Repeating Increase Rows:
- Alternately increase and skip increase rounds until the skirt comfortably fits your hip and offers the desired flare. The tutorial achieved this with approximately 16 rows of increase + no increase repetitions.
- Final Straight Rows (Lengthening the Skirt):
- After completing increases, stop increasing and simply repeat 1 Hdc per stitch for as many rows as needed to reach your desired skirt length.

4. Create Ruffles
- Switch to a 3.5 mm hook (optional, for tighter ruffles), or continue with a 4 mm hook.
- Attach yarn to the topmost back-loop rib row, and begin the following sequence:
- Ch 3 to count as your first Dc.
- Work 3 Dc into one stitch, then 2 Dc into the next stitch, alternating each step (3 Dc cluster, 2 Dc cluster).
- Continue all the way around. Sl St to close the row.
- Row 2 of Ruffles:
- Ch 3, and repeat the ruffle pattern. Either alternate 2 and 3 Dc clusters, or for tighter and more defined ruffles, work only 3 Dc clusters in every stitch.
- Repeat for each "ribbed line" you created earlier in the skirt. Attach yarn to the next ribbed back-loop row and repeat the ruffle pattern until you complete 2 rows per section.


5. Drawstring (Optional)
- Create a simple chain long enough to be woven around the waistband hem.
- Weave the chain through the waistband, alternating in and out of each row.
- Optional: Add tassels or beads to the ends of the drawstring for decoration.
Conclusion
Your ruffled-waist skirt is now complete! The ribbed waistband ensures a snug yet comfortable fit, while the ruffles bring a playful, feminine touch. The option to add a drawstring is a practical addition that enhances both the design and fit.

Pattern Correction
Should the waistband rows not fit as desired, simply adjust the number of Sc rows for a tighter or looser fit. Similarly, adjust the number of increase stitches in the body section to fit your specific hip measurements.
Tips for Success
- Count Stitches Regularly: Keep track of your stitches (especially for the waistband and increases) to ensure that your work doesn't become uneven.
- Gauge and Size: The pattern is very adjustable. Check the fit frequently, especially during the increase rows and as you approach your desired length.
- Neat Edges on Ruffles: Keep tension even to ensure smooth, consistent ruffles.
- Choose Hook Sizes Carefully: Tighter hooks (e.g., 3.5 mm) allow for delicate curls in the ruffles, while larger hooks (e.g., 4.5 mm) will produce looser, more dramatic ruffles.