
Free Crochet Watermelon Keychain Pattern For Backpack
Bring some fruity fun to your accessories with this adorable crochet watermelon keychain pattern that's quick, easy, and free to make.
Have you ever wanted to make cute, colorful, and super fun Keychain? A crochet watermelon keychain is the perfect choice. With its bright colors and adorable design, this mini watermelon slice will bring a smile to your face every time you see it. Whether you attach it to your keys, bag, or give it as a gift, it's a quick and easy project that everyone will love. The watermelon keychain stands out with its cheerful red, green, and white colors, complete with tiny sewn on black seeds that make it look like a real slice of fruit. It's small, super lightweight, and perfect for adding a creative, handmade touch to your everyday things.
Free Crochet Watermelon Pattern Charm For Zipper Pull Style

The best part is you can make this in no time, even if you are just starting to crochet. You can also customize it-change the colors, try different sizes, or make matching fruit keychains for your family and friends. It's an enjoyable activity for anyone and makes for a thoughtful, handmade gift.
This crochet watermelon keychain isn't just an accessory-it's a fun way to show your personality and creativity. So, grab your yarn, follow the steps, and get ready to make something amazing.

Finished Size
The finished Watermelon Slice Kitchen Bag measures approximately 8-10 inches in diameter and includes details like black seeds to mimic the look of a real watermelon.
Gauge
Gauge is not essential for this pattern. However, if you want specific dimensions:
- Starting Circle (Rounds 1-6): Approximately 4 to 5 inches in diameter after completing Round 3.
- Adjust your hook size if the circle is significantly smaller or larger.

Materials
- Yarn:
- Red Yarn (Main Watermelon Slice): Ganga Summer Love, appropriate 8 ply or medium weight acrylic or cotton yarn.
- Green Yarn (Outer Shell of Watermelon): Same weight as the red yarn.
- White Yarn (Inner Rind of Watermelon): As above.
- Black Yarn: For stitching seeds (small length).
- Crochet Hook: 2.5 mm.
- Sewing Needle: For stitching the seeds and to weave in loose ends.
- Scissors: For cutting yarn neatly.
- Polyfill Cotton: For stuffing the bag (optional).
- Stitch Markers (optional): To mark the beginning and end of rounds.
Customization
- Size: Increase the number of rounds in the pattern to make a larger bag.
- Colors: Use different shades of yarn to create unique slices like orange for an orange slice or yellow for a lemon.
- Accessories: Add a small crochet handle or a zipper to make it a mini purse for kids.
- Multi use: Instead of polyfill, you can leave the bag unstuffed and use it for storing small items like garlic, onions, or small toys.
Special Techniques
How to Make Half Double Crochet (hdc):
- Yarn over (yo), insert the hook into the designated stitch.
- Yarn over and pull up a loop (3 loops on the hook).
- Yarn over and pull through all 3 loops.
How to Crochet 2 Half Double Crochets Together:
- Yarn over, insert the hook into the stitch, pull up a loop.
- Yarn over and pull through 2 loops (2 loops remain).
- Yarn over, insert the hook into the next stitch, pull up another loop.
- Yarn over and pull through all 3 loops.
Pattern Instructions
1. Start with the Watermelon Slice (Red Yarn)
Magic Circle and Round 1:
- Wrap the red thread twice around your index and middle finger to create a magic circle.
- Insert the hook through the circle and pull up a loop to begin a slip knot.
- Make 8 single crochets (sc) into the magic circle.
- Pull the tail of the yarn to tighten the loop, closing the circle.
- Complete the round with a slip stitch (sl st) into the first sc.
Round 2:
- Chain (ch) 2.
- In the same stitch, work 1 half double crochet (hdc).
- Work 2 hdc in each stitch around (increase in each st). You should have 16 hdc at the end of this round.
- Join the last hdc to the first with a sl st.
Round 3:
- Ch 2.
- Work 2 hdc in each stitch of the previous round. Continue until you have 32 hdc.
- Join the last hdc to the first with a sl st.
2. Move to White Yarn
Round 4:
- Join the white yarn to the first stitch with a slip knot and sl st.
- Ch 2, work 1 hdc in the same stitch.
- Work 1 hdc in the next stitch, then 2 hdc in the next. Repeat from * around. You should have 48 hdc by the end of this round.
- Join with a sl st to the first hdc.

Round 5:
- Continue with white yarn.
- Ch 2, work 1 hdc in each stitch around.
- Join with a sl st to complete the round.
3. Work the Green Rind
Round 6:
- Join green yarn to the first hdc of the previous round with a slip knot and sl st.
- Ch 2, work 1 hdc in the same stitch.
- Work 1 hdc in the next stitch, then 2 hdc in the next. Repeat from * around. You should now have 72 hdc.
- Join with a sl st and fasten off.

4. Add Seeds with Black Yarn
- Insert black yarn into the sewing needle.
- Using French knots, stitch small watermelon seeds onto the red section. Work seeds evenly spaced, leaving equal gaps between them for a neat look.
- Knot securely at the back of the fabric.

5. Stitch and Finish
- Fold the circle in half to create the semi circle watermelon slice shape.
- Use the same green yarn to slip stitch or sew the curved edge using a backstitch but leave the straight edge open.
- Lightly stuff the bag with polyfill or cotton.
- Join the straight edges using black or green yarn to create the complete bag shape. Alternatively, leave a section open for use as a pouch if desired.

6. Add Handle
- Using either green or black yarn, attach the yarn to the top corners of the bag.
- Ch 20 (or a length that comfortably fits your desired handle size) and then attach the chain to the opposite side of the bag using a slip stitch.
- Fasten off and weave in the ends using the yarn needle.
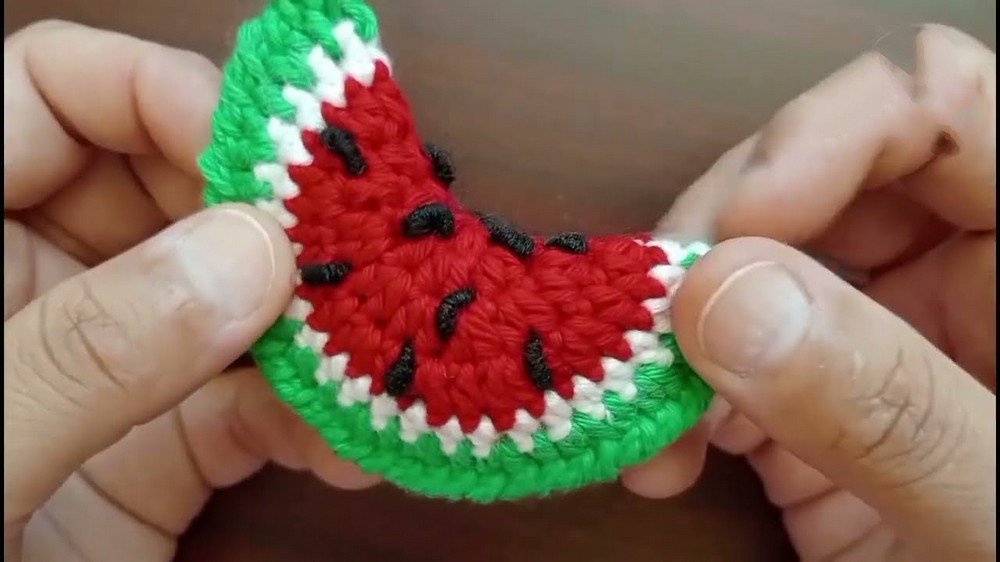

Final Look
Your Watermelon Slice Kitchen Bag is now complete. This charming and cheerful design is perfect for the kitchen, as a hanging bag for small items, or as a decorative piece. The bright colors, intricate seeds, and unique design make it a functional yet attractive creation.

Tips for Success
- Thread Tension: Maintain consistent tension while working, especially with the final rows, to avoid the bag becoming uneven.
- Custom Sizes: Add more rounds if you want a larger slice or reduce rounds for a smaller one.
- Seed Placement: Use a light pencil to mark seed placement if you want evenly spaced seeds.
- Handle Replacement: For a sturdier handle, braid three strands together instead of using a simple chain.
Conclusion
This Watermelon Slice Kitchen Bag is not only a great project for crocheters of all levels but also delivers a fun and vibrant addition to your kitchen or daily life. Its playful colors and practical shape make it an eye catching and useful accessory. Whether you keep it for yourself or gift it to someone special, this project is sure to spread smiles.
