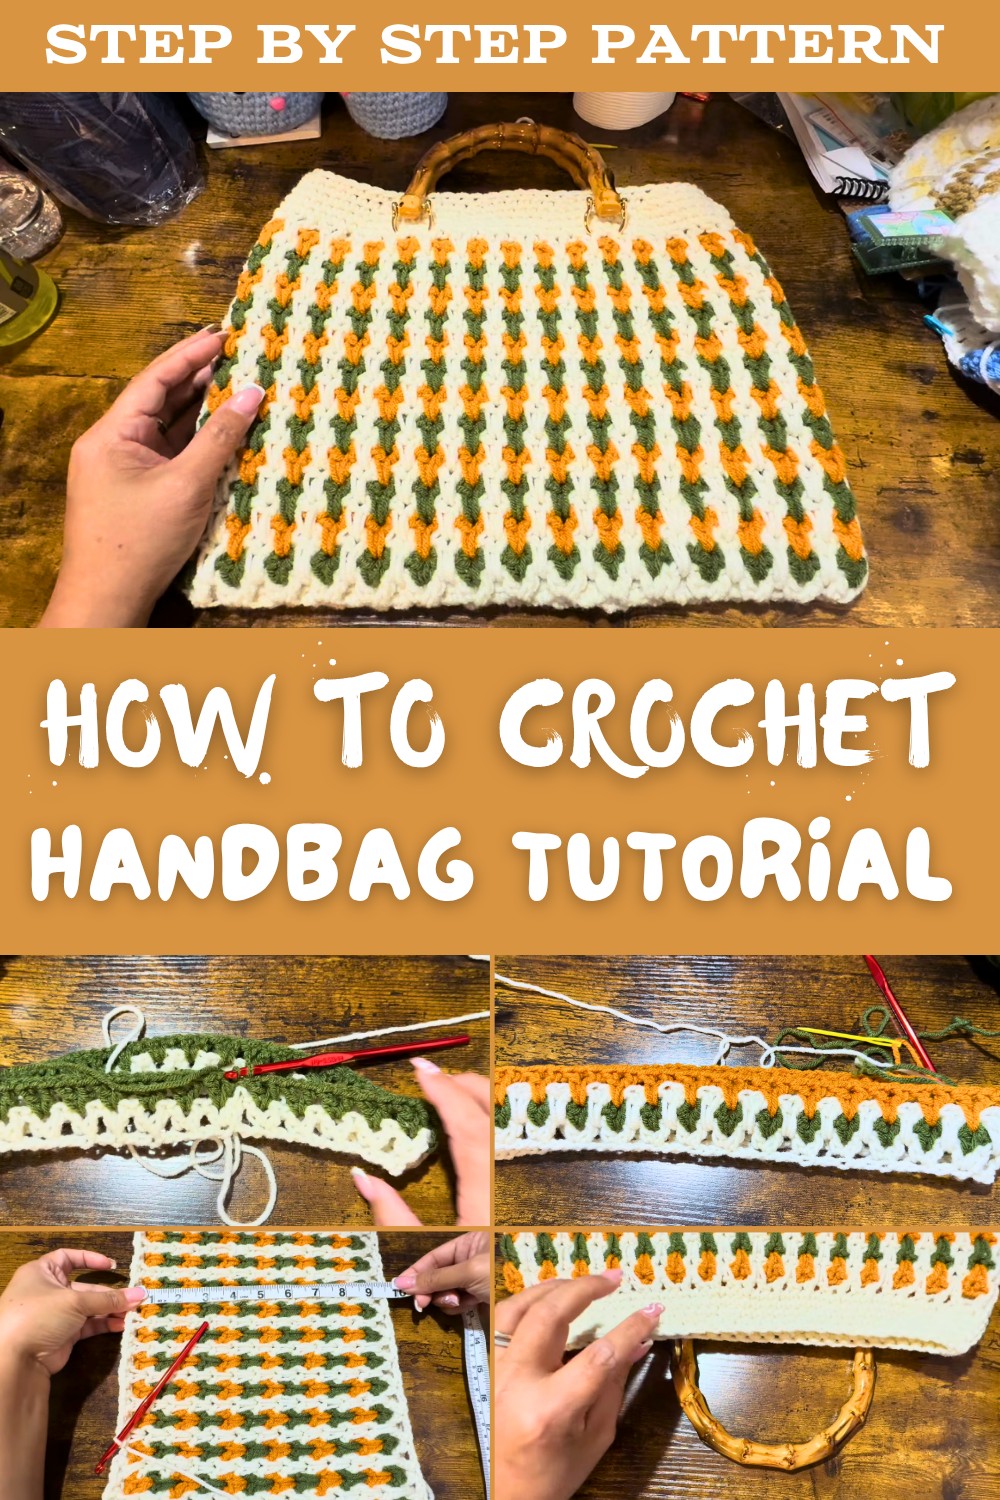
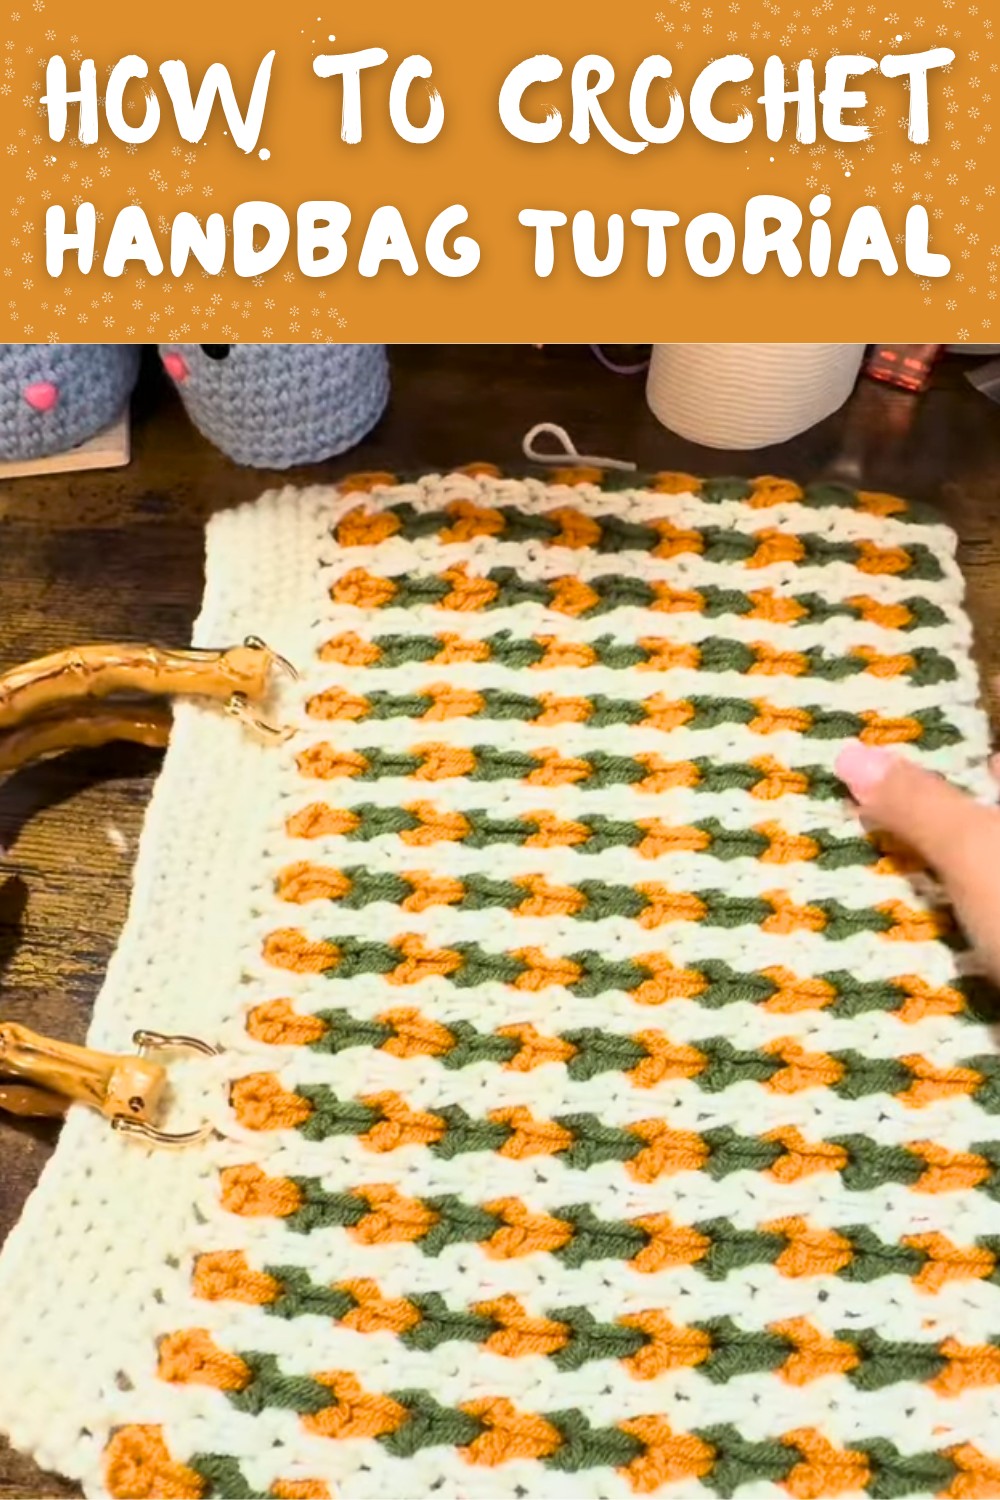
Modern Crochet Handbag Pattern for Your Essentials
Show off timeless charm with a crochet handbag that's stylish, functional, and perfect for expressing your creativity in unique and colorful ways.
Who says accessories can't be both stylish and handmade? A crochet granny square handbag pattern transforms timeless granny squares into a chic, functional bag you'll love to carry. It's the perfect mix of vintage charm and modern flair, letting you play with colors, textures, and layouts to suit your personal style. From bold color-blocked squares to soft, pastel tones, this project offers endless opportunities for creative expression.
Free Crochet Handbag Tutorial for Fashion on the Go
Small yet spacious, a granny square handbag is ideal for toting your essentials-think phone, keys, wallet-with just the right dose of personality. Plus, making this bag is pure joy for crocheters of all skill levels, combining the satisfaction of crafting something practical with the fun of experimenting with patterns. For a unique twist, add wooden handles, playful pom-poms, or even line it with a fabric that speaks to you. Whether you're gearing up for a casual outing or gifting something special, this project is as delightful as it is useful.

Crochet Handbag Pattern
Materials
Required Materials:
- Yarn: Loops and Threads Acrylic Yarn or any worsted weight yarn. Three colors were used in this project (Cream, Gold/Yellow, and Green). You can customize colors to suit your style.
- Hook Size: 5.5 mm crochet hook for the handbag body.
- Alternate Hook: 5.0 mm crochet hook for sewing the seam for a tighter finish.
- Wooden or Pre-made Handle: The tutorial demonstrates using a wooden handle for a classy touch. Other handles, such as leather straps, can be used for a different look.
- Scissors
- Yarn Needle: For sewing the bottom seam and weaving in loose ends.
- Optional: Small screwdriver (to attach wooden handles if they include screws).
Skill Level
Intermediate
While the stitches used are basic, this pattern requires knowledge of working with multiple colors, joining seams, decreasing stitches, and shaping a structured bag.
Abbreviations (US Terminology)
- ch = chain
- dc = double crochet
- sc = single crochet
- sl st = slip stitch
- st(s) = stitch(es)
- rep = repeat
- sk = skip
Special Notes & Tips:
- V-stitch: The primary stitch used is the V-stitch. A V-stitch consists of (1 double crochet, 1 chain, 1 double crochet) worked into the same stitch or space.
- Color Changes: The yarn colors are changed frequently. To maintain a clean look, carry the unused yarn up the inside of the bag rather than cutting it at every row.
- Handles: While the tutorial uses wooden handles, you can crochet your own handle or use other pre-made handles.
- Foundation Chain: Ensure the chain is not twisted when joining into a ring; otherwise, the bag will not form properly.
Pattern Instructions
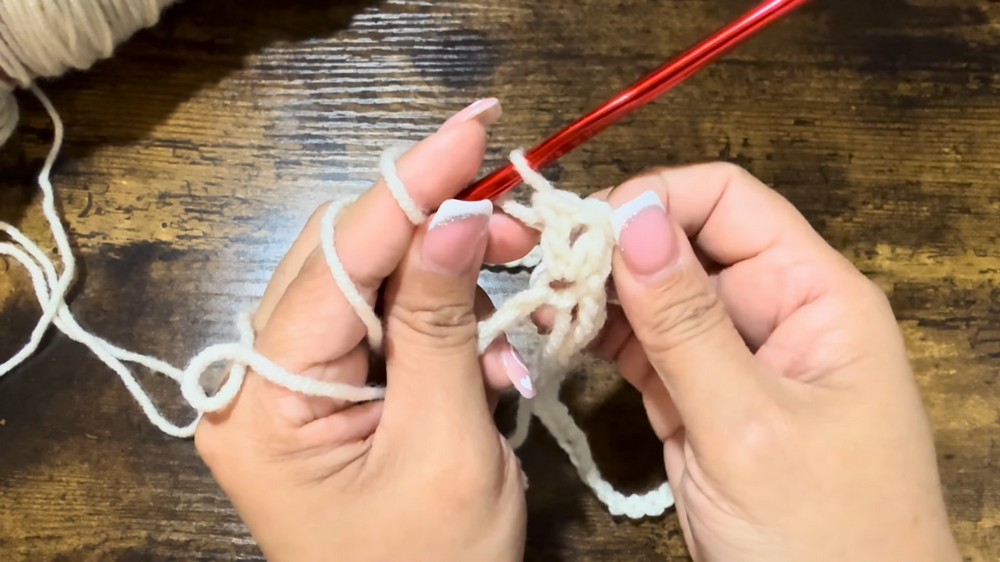
Step 1: Base Foundation (Round 1)
- Ch 90 (or any even number to suit your desired bag size).
- Large bag: Use a higher even-number chain.
- Smaller bag: Use a lower even-number chain.
- Join into a ring: Join to the first chain with a sl st, ensuring the chain is not twisted.
- Ch 1, then work the V-stitch into the first chain:
- V-stitch: Work (1 dc, ch 1, 1 dc) all into the same stitch.
- Skip 2 chains, then work another V-stitch into the next chain.
- Repeat: Continue working V-stitches into every 3rd chain around until two chains remain.
- End of Round 1: After the last V-stitch, sl st into the first dc of the first V-stitch.
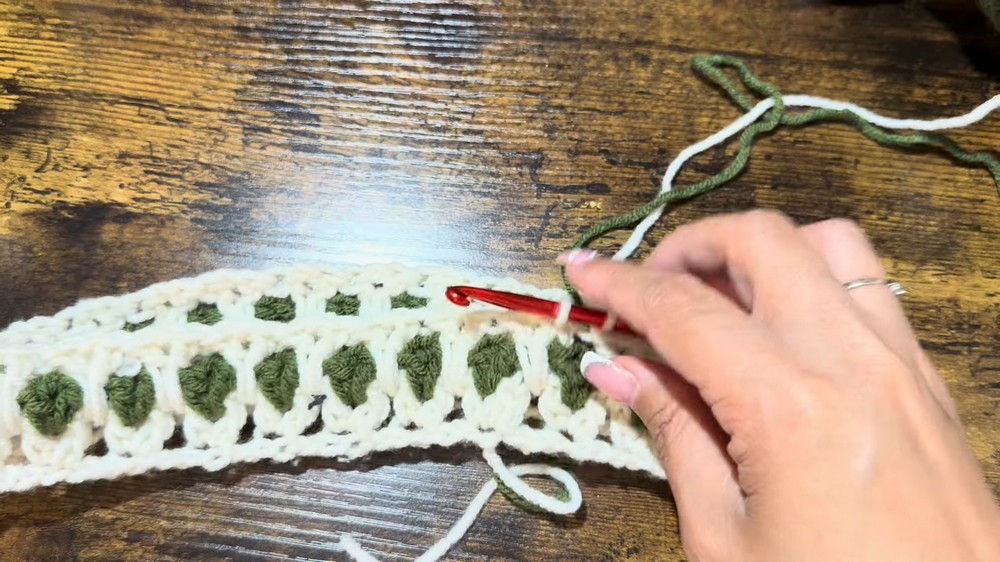
Step 2: Adding Color and Round 2
Changing to Green Yarn (Second Color)
- Do not cut the cream yarn. Instead, switch to the second color (Green).
- Tip: Carry the cream yarn on the inside of the bag.
- Attach Green Yarn: Sl st with green yarn into the first stitch, then ch 1.
- Work V-stitches into Round 1 spaces:
- Into the center ch 1 spaces of the V-stitches from Round 1, work a V-stitch: (1 dc, ch 1, 1 dc).
- Repeat: Continue around, working V-stitches into every ch 1 space from Round 1.
- At the end of the round, sl st into the first dc of the first V-stitch.
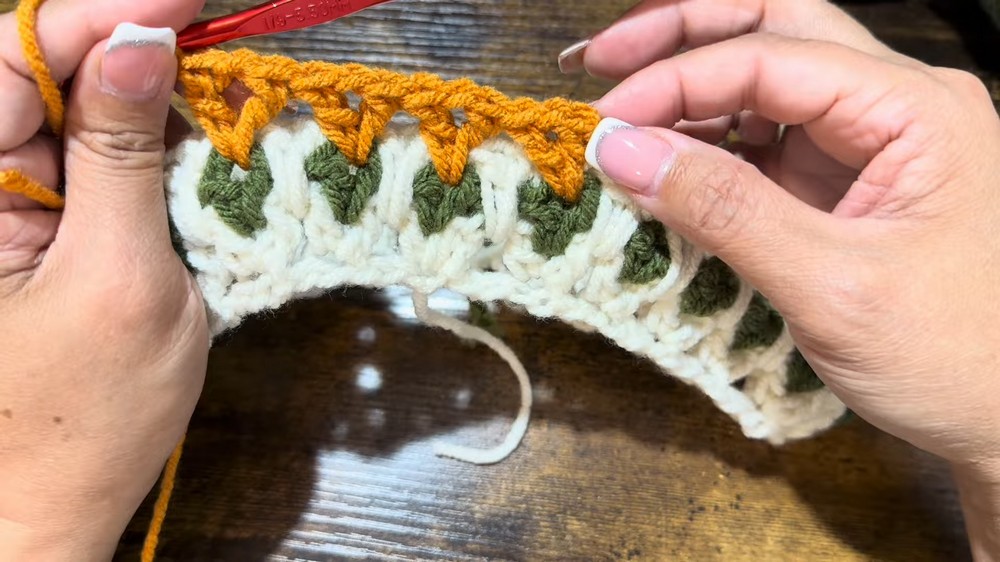
Step 3: Adding Cream Yarn and Round 3
- Instead of cutting the green yarn, switch back to the cream yarn.
- Work V-stitches overlapping Round 2:
- The cream yarn will now overlap the green rows.
- Work the V-stitch into the same places in Round 1 as you did in Round 2.
- Continue repeating the V-stitch pattern around, then sl st to join.
- Alternate between colors: Cream → Green → Yellow (or your 3rd color).
Step 4: Continue Building the Bag Body
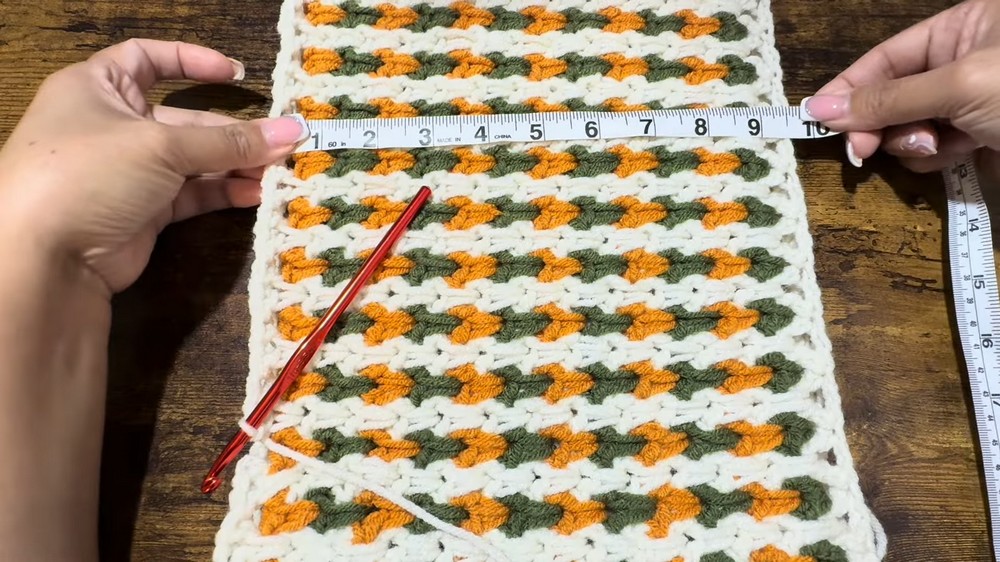
- Repeat the alternating color sequence for as many rounds as needed until the desired bag height is achieved.
- In the tutorial, 14 rounds were completed.
- Measure the height periodically to ensure your desired size is achieved.
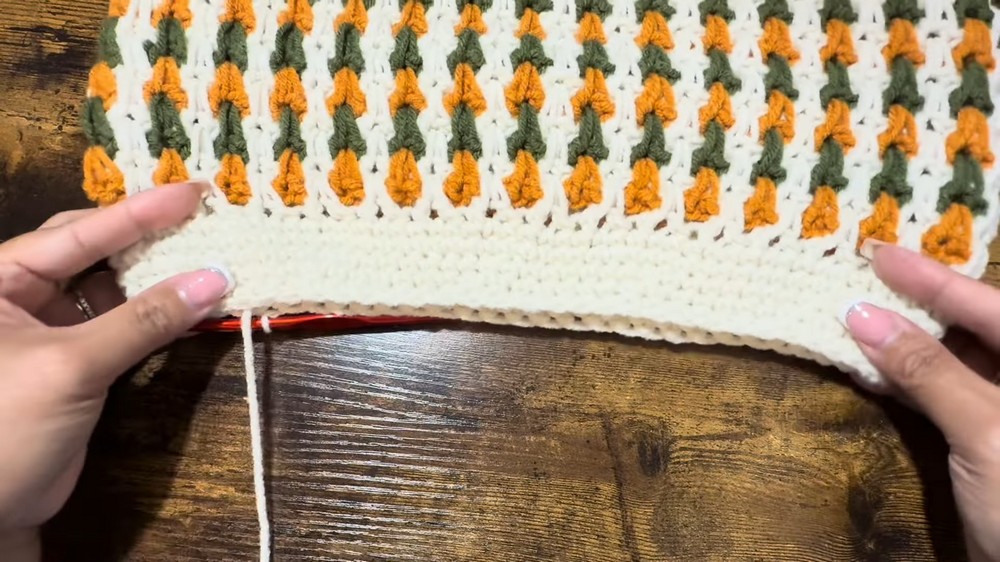
Step 5: Finishing the Top Edge (Single Crochet Rounds)
- After the final V-stitch round, prepare to tighten and finish the top edge of the bag:
- Round 1:
- Switch to a single color (cream in the video).
- Ch 1, then work 1 sc in every stitch and chain space around.
- Join with a sl st to the first sc.
- Round 2:
- Ch 1, then sc around again, ensuring to place 1 sc in each stitch for a uniform edge.
- Continue to repeat sc rounds as desired.
Step 6: Shaping the Base
Before attaching the handles, sew or crochet the bag's bottom to form a clean base:
- Flip the Bag Inside Out: Turn the bag so that the wrong side is facing outward.
- Align the Bottom Edges: Line up both sides of the bag's opening.
- Sew or Crochet the Seam:
- Use a 5.0 mm hook and sc across the aligned edges for a strong, flat seam. Alternately, sew using the whip stitch method with a yarn needle.
- Flip the Bag Right Side Out: The corner seams should appear neat and well-aligned.
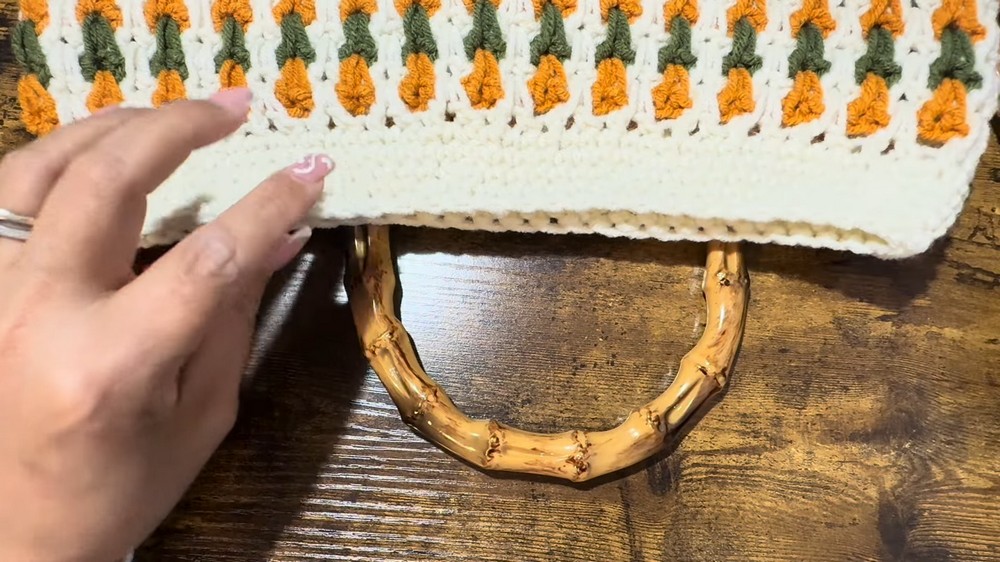
Step 7: Attaching the Handles
- Mark Handle Placement: Use a stitch marker to decide where to attach your handles for even positioning.
- Attach Wooden Handles: If using pre-made handles, follow the handle instructions. For wooden handles with screws, attach them securely using a screwdriver.
- Alternative Handles: If crocheting the handles, create simple chained straps or follow a specific handle pattern.
Conclusion
This pattern creates a beautiful and functional V-stitch handbag using simple stitches but structured design. The interplay of color changes adds character, while the tailored seam and wooden handles provide sophistication.
Pattern Correction
- Double-check the foundation chain (ensure proper tension and no twisting).
- Be precise when working V-stitches into the same spaces from earlier rounds to prevent uneven gaps or excess tension.
Tips for Success
- Carry Yarn Neatly: When switching between colors, carry and tuck unused yarn neatly on the inside of the bag.
- Unified Tension: Keep tension consistent, especially when working V-stitches and switching colors.
- Use Stitch Markers: Place markers at the beginning of each round and at critical points (like handle areas) to maintain symmetry.
- Handle Durability: For heavy usage, ensure handles are tightly secured to avoid stress on the stitches.