
Stylish Crochet Bag Pattern to Elevate Your Look
Enhance your style effortlessly with this free crochet bag pattern that offers a charming and practical solution for any casual occasion.
Creating your own accessory offers a wonderful way to express creativity while making something both beautiful and useful. Among the many projects you can try, a crochet bag pattern stands out as a favorite for both beginners and experienced crocheters. This bag is incredibly practical. It provides the perfect solution for carrying essentials like your phone, wallet, keys, or even small groceries. Because it is handmade from soft yarn, a crochet bag offers a unique comfort that commercial bags often lack. The natural stretch and flexibility of the fabric make it easy to carry and allow it to adapt to whatever you put inside without losing its shape.
Handmade Crochet Bag Designs You'll Love to Carry

A crochet bag can be designed in various styles, from delicate clutches to roomy totes, allowing you to choose one that suits your lifestyle and taste. Whether you need a small purse for a quick trip or a larger bag for shopping or the beach, there is a pattern to fit your needs. Plus, you can customize colors, sizes, and stitch styles, making your bag personal and one-of-a-kind. This wide variety means you can crochet a bag perfect for every season or occasion-using light and bright yarns for spring and summer or cozy, thicker threads for fall and winter.

This bag also stands out for its strength and durability. The yarn creates a sturdy fabric that holds together well, even when filled with heavier items. The handles or straps included in many crochet bag patterns are designed for comfort, reducing strain on your hands and shoulders. This feature makes a handmade bag not only stylish but highly functional for everyday use or travel.
Styling a crochet bag can be a delightful part of the process. Picking colors that match your wardrobe or adding decorative touches like tassels, beads, or appliqués can elevate your creation. A handmade crochet bag adds charm and warmth to your overall look, serving as a statement piece that is both practical and fashionable. All these benefits combine to make following a crochet bag pattern an enjoyable and rewarding project full of possibilities.
Versatile Crochet Phone Pouch Pattern
Create a practical and stylish crochet phone pouch that fits most standard smartphones perfectly. This beginner-friendly pattern guides you step-by-step to make a structured pouch using simple stitches, finished off with comfortable drawstring ropes. The pouch is quick to make, customizable in size, and great for gifting or personal use.
Essential Tips & Preparation Before You Begin
- Familiarize yourself with basic crochet skills: chain (ch), single crochet (sc), half double crochet (hdc), slip stitch (sl st), working in back loops, and turning your work (TYW).
- Use medium-weight cotton or acrylic yarn suitable for a 5 mm (US H/8) hook. Here, a hook size 5 mm was used.
- Yarn choice affects thickness and structure; cotton blend yarns offer durability and softness.
- Gather materials: crochet hook (5 mm), yarn, large tapestry needle for seaming, and scissors.
- Use stitch markers to mark rows or points if desired.
- Measure your phone or object to customize pouch dimensions accordingly before starting.
- Maintain consistent tension to ensure even stitch size and even edges.
- Take care when inserting your phone inside; stiffness may vary depending on yarn and tension.
Key Pattern Observations
- The pouch is crocheted as rectangular panels worked back and forth in rows.
- The base chain determines pouch width; chain count adjusts size (e.g., 16 chains for small, 64 for larger).
- Working mainly in single crochet, with half double crochets and slip stitches for decorative texture.
- Stitching is done by sewing edges together with a large needle rather than crocheted seams.
- Drawstring ropes are crocheted separately with single crochet stitches and sewn onto the pouch.
- The entire pouch is finished with multiple rounds of single crochet along edges for neatness and durability.
- Stitch counts remain constant throughout rows to avoid distortion.
- Back loop single crochet adds subtle texture to the sides.
Brief Overview of Construction Steps
- Work foundation chain according to desired width (16 for small, 64 for large).
- Crochet rectangular pieces in single crochet row upon row to reach desired height (~29-31 rows).
- Work rows alternating half double crochet and slip stitch in a brick-like pattern for accent panels.
- Seam three pieces side by side by sewing through chain spaces to form pouch body.
- Join edges with single crochet finishing round to give stability.
- Crochet two drawstring ropes (~30 cm long each) with single crochet stitches.
- Sew ropes securely to pouch at desired points for closure.
Intended Expertise Level
This pattern suits beginners familiar with basic stitches and ready to sew pieces and accessories together.

Finished Dimensions
- Small pouch: Approximately 14 cm width x 29 cm length (5.5" x 11.4")
- Large pouch: Approximately 24 cm width x 31 cm length (9.4" x 12.2")
- Rope length: Approximately 30 cm (12") each; customizable.
Tools & Materials List
- Medium-weight yarn (cotton or acrylic blend), color of choice
- Crochet hook size 5 mm (US H/8)
- Scissors
- Large tapestry needle for sewing
- Stitch markers (optional)
- Measuring tape
Dimensions & Sizing Instructions
- Foundation chain for small size: 16 chains (15 sc per row)
- Foundation chain for large size: 64 chains (63 sc per row)
- Height: approx. 29-31 rows of crochet stitches
- Rope length customizable; standard 30 cm recommended
- Adjust chain and row counts proportionally to fit other device sizes.
Stitch Gauge and Fabric Texture
- Single crochet gauge approximately 15 stitches x 31 rows = 10 x 12 inches (25 x 30 cm)
- Half double crochet and slip stitch rows create a subtle textured brick pattern within the panel.
Stitch Abbreviations
- ch = chain
- sc = single crochet
- hdc = half double crochet
- sl st = slip stitch
- st(s) = stitch(es)
- TYW = turn your work
Special Stitch Techniques
- Back loop single crochet: Insert hook only under the back loop of the stitch to create subtle ribbing on edges.
- Slip stitch: Pull yarn through stitch and loop on hook to create a flat finish line, used decoratively between hdc rows.
Detailed Crochet Instructions
Section 1: Creating the Rectangular Panels
Step 1 - Small Pouch Base:
- Chain 16.
- Row 1: Skip first chain from hook; single crochet (sc) across remaining chains (15 sc). Turn.
Step 2 - Large Pouch Base:
- Chain 64.
- Row 1: Skip first chain; sc across (63 sc). Turn.
You can make any number of panels depending on sizing preferences.

Section 2: Working the Body Rows
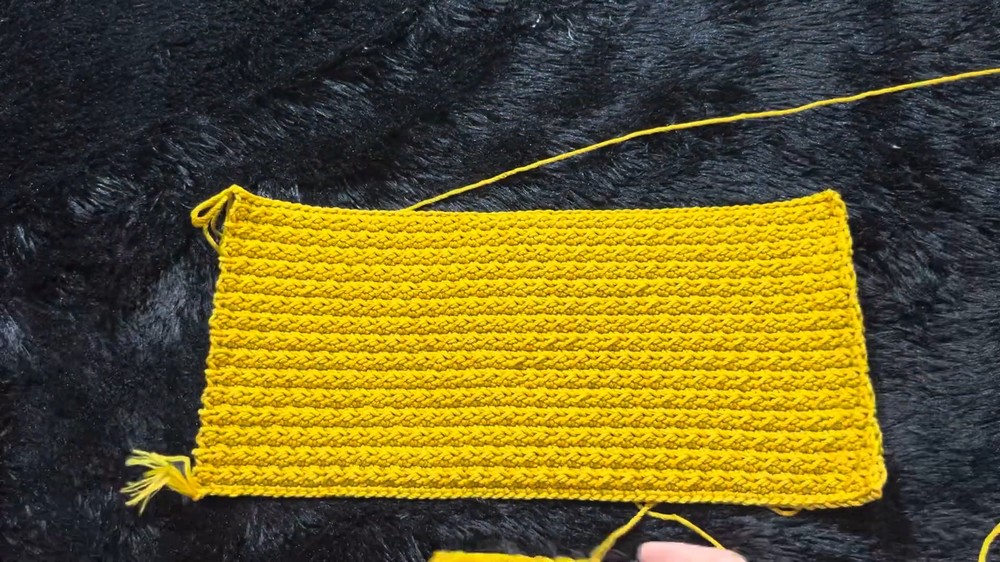
Rows 2 and 3 (Brick Texture Rows):
- Row 2: Chain 1, half double crochet (hdc) in first stitch, slip stitch (sl st) in next stitch; repeat across. Turn.
- Row 3: Chain 1, sc into back loops across entire row. Turn.
Rows 4 to 31:
- Repeat rows 2 and 3, alternating hdc and sl st row and back loop sc row until reach 31 rows total (or desired length).
The alternating slip stitch and half double crochet give a brick-like texture to the pouch fabric.
Section 3: Panel Assembly
- Prepare three panels identical in size (two small, one large or all large as needed).
- Using a large tapestry needle, sew the edges of panels side by side through chain spaces to join securely.
- Repeat on both sides to create a pouch shape.

Section 4: Finishing Edge with Single Crochet
- Join yarn at one corner edge.
- Work single crochet evenly around the entire edge of the pouch including sides and top openings for a neat finish.
- Optionally, work 6 rounds of sc for added stability and thickness.

Section 5: Crochet Drawstring Ropes
- Chain sufficient length, approximately 30 cm (about 30 chains depending on gauge and yarn thickness).
- Single crochet in each chain back across.
- Fasten off leaving long tail for sewing.
Section 6: Attaching Ropes
- Using tapestry needle and yarn tail, sew the ropes securely at pouch openings, ensuring one rope on each side for easy cinching closure.

Explanation for Beginners
This project is worked flat in rows to create panels; multiple panels are sewn side by side to assemble the pouch body. The alternating hdc and sl st rows build a textured fabric, while back loop single crochets soften edges. The ropes are simple single crochet chains sewn on to close the pouch. Counting stitches and rows is key to consistent size.
Final Assembly & Finishing Instructions
- Weave in all yarn ends carefully inside panels for a clean look.
- Securely sew all seams with a sturdy yarn and large needle.
- Attach ropes with strong stitching to withstand pulling stress.
- Optionally block the pouch for even edges and relaxed fabric.
- Trim yarn ends and burn synthetic yarn tips to prevent unraveling.

Common Issues & Simple Solutions
- Uneven stitch tension: Practice on a swatch; use a stitch marker to keep track of counts.
- Panels not aligning during sewing: Check row and stitch counts before assembly; seam with matching chain holes for straight joins.
- Drawstring ropes too short or loose: Adjust chain length and add extra sc rows for thickness and length.
- Difficulty inserting phone: Adjust yarn weight or tension for more flexibility; elongate pouch length for easier access.
Additional Crochet Project Ideas
- Crochet matching wristlets or coin pouches using similar stitch textures and assembly methods.
- Make a larger tablet pouch or tablet sleeve modifying chain and row length.
- Crochet smartphone wrist straps or lanyards as accessories.
- Create decorative panel bags using the brick stitch texture from the alternating hdc and slip stitch rows.
- Produce textured placemats or coasters applying the same stitch pattern technique.