Crochet Little Hen Pattern (Free & Beginner-Friendly)
Bring joy to your crochet projects with this easy and free little hen pattern, ideal for decorations, keepsakes, or as a personalized handmade gift.
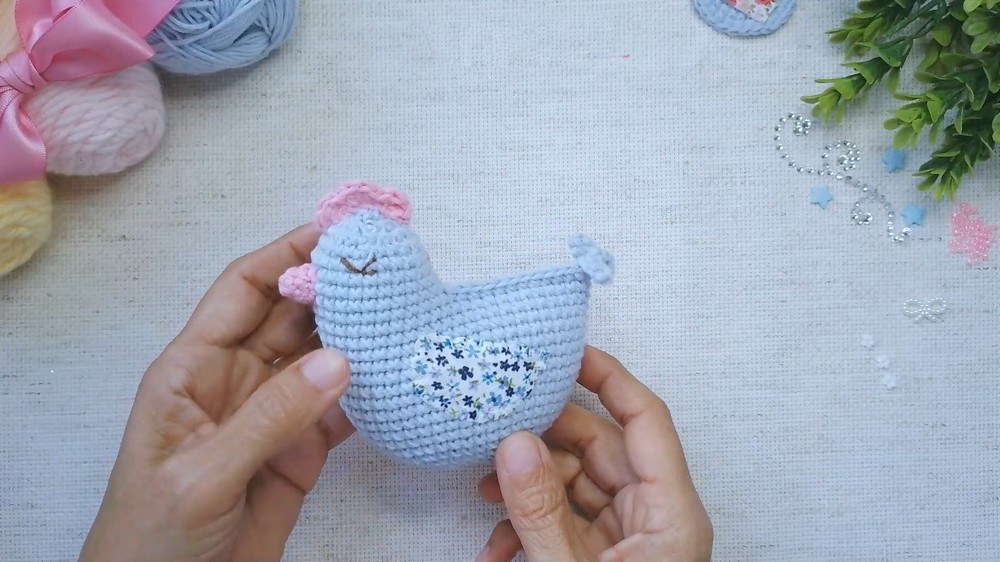
This tiny crochet hen is a true treasure for those who enjoy adorable and functional items. Featuring vibrant colors and intricate details, the Free Crochet Little Hen Pattern brings a lively charm to any space. Its small and lightweight design makes it perfect as a keychain, bag accessory, or a unique decorative piece for your home. It adds warmth to seasonal displays, whether placed on a spring table or included in festive setups like Easter.
Easy Crochet Little Hen Pattern You’ll Love

This little hen is both fun and practical, making it an ideal option for using leftover yarn. Its appearance can be easily customized with different colors to suit personal preferences. It’s also a thoughtful gift for loved ones, offering something personal and handmade that’s sure to make them smile.

Crochet Hen Keychain Pattern
Each stitch brings this charming hen to life, giving it personality and character. It’s the perfect choice for something quick and rewarding, suitable for beginners and experienced crocheters alike.
Whether it’s used for decoration, as a keepsake, or as a small token of affection, this little hen is sure to bring joy wherever it goes. Its charm lies in its simplicity yet delightful details, making it a favorite project for all ages.
Skill Level
Intermediate
Finished Size
Approximately 4.5–5 inches tall, depending on yarn and hook size used.
Materials Needed
- Yarn:
- Acrylic or cotton yarn in the following colors:
- Main Color (Body): Any neutral color (e.g., white, cream, or light brown).
- Accent Color (Comb & Beak): Red or orange.
- Eye Embroidery Color: Brown or black.
- Small scrap fabric for optional wings.
- Acrylic or cotton yarn in the following colors:
- Crochet Hook: 3 mm.
- Stitch Markers: Highly recommended for rounds.
- Tapestry Needle: For sewing and weaving in ends.
- Scissors: To trim yarn.
- Filling Material: Polyester fiberfill or similar for stuffing.
- Optional Decorations:
- Small flowers, beads, or bows.
- Glue (cold or hot).
- Sewing Needle & Thread: For attaching fabric wings (optional).
Gauge
Gauge is not critical for this pattern but should produce tight stitches when stuffed to ensure no gaps in the fabric.
Key Abbreviations
- ch: Chain
- sc: Single crochet
- inc: Increase (2 sc in the same stitch)
- dec: Decrease (sc 2 stitches together)
- st(s): Stitch(es)
- sl st: Slip stitch
- flo: Front loop only
- blo: Back loop only
- MR: Magic ring
Special Notes
- This pattern is worked in continuous rounds unless otherwise stated. Use a stitch marker to track the first stitch of each round.
- Maintain consistent tension throughout the project to ensure a neat finish.
- The tail and comb are crocheted directly onto the hen, with no additional sewing required.

Pattern Instructions
1. Hen’s Body
Base and Increasing Rounds
- Round 1: Begin with a MR. Work 6 sc into the ring. Tighten the ring. (6 sts)
- Round 2: Inc in each st around. (12 sts)
- Round 3: [1 sc, inc] around. (18 sts)
- Round 4: [2 sc, inc] around. (24 sts)
- Round 5: [3 sc, inc] around. (30 sts)
- Round 6: [4 sc, inc] around. (36 sts)
- Round 7: [5 sc, inc] around. (42 sts)
- Round 8: [6 sc, inc] around. (48 sts)


Body: Stable Rounds
- Rounds 9–20: Work 1 sc in each st around (no increases). (48 sts per round)
Once the 12 stable rounds are complete, do not fasten off. Continue immediately to chain loops for the tail.

2. Tail Feathers
- From the last sc of Round 20, ch 6, then join with a sl st in the same stitch to create the first loop.
- Repeat ch 6, sl st into the next st for a total of 3 loops.
- Work 1 sc into the next st after the last loop to close the tail section.
3. Closing the Body and Neck Opening
- Begin Round 21: Flatten the body and work sc through both layers (front and back stitches).
- 11 sc evenly across, leaving a neck opening of 24 sts in the center.
- Count the 24 sts around the neck opening to ensure accuracy before starting the head.

4. Hen’s Head
Setting Up the Base
- Round 1: Work 1 sc in each of the 24 neck opening sts. Mark the first st of the round.
- Rounds 2–5: Work 1 sc in each st around. (24 sts per round)
Decreasing the Top
- Round 6: [2 sc, dec] 6 times. (18 sts)
- Round 7: [1 sc, dec] 6 times. (12 sts)
- Round 8: 6 dec. (6 sts)

Finishing the Head
- Stuff the head firmly before closing.
- Fasten off, leaving a short tail. Use a tapestry needle to weave through the front loops of the remaining stitches, pull tight to close, and hide the tail inside the head.

5. Comb (Crest)
- In accent color (e.g., red), ch 6.
- Work the following in the chains:
- 3 hdc in the 2nd chain from the hook, sl st in the next chain.
- Repeat [3 hdc, sl st] in each chain across.
- Fasten off, leaving a 6-inch tail for sewing.
- Pin the comb onto the top of the head, centered above the face. Sew into place using the long tail.
6. Beak
- In accent color (e.g., orange), make a MR.
- Round 1: Work 5 sc into the MR. Tighten the ring. (5 sts)
- Round 2: [2 sc, inc] around. (6 sts)
- Round 3: Work 1 sc in each st around.

Fasten off, leaving a long tail for sewing. Position the beak at the center front of the face, approximately 4 rows down from the top of the head, and sew into place.
7. Eyes
- Use brown or black embroidery thread.
- Position the eyes diagonally, 2-3 rows apart, approximately 2-3 stitches away from the beak.
- Embroider each eye using small loops or backstitches.
8. Wings (Optional Fabric Decoration)
- Use small fabric scraps matching the color scheme.
- Cut two wing shapes, ensuring symmetry.
- Optionally, lightly singe the fabric edges with a flame to prevent fraying.
- Sew or glue the wings onto each side of the body.
9. Final Touches
- For the tail feathers:
- Add a dot of glue at the center of the three loops to shape and keep them slightly upright.
- Decorate the hen with small flowers or bows using fabric glue as desired.
Conclusion
Your adorable crochet hen keychain is complete! Its charming details highlight your creativity and skill, making it a perfect accessory or gift. Whether you opt for additional decorations or leave it simple, your creation is sure to spread delight.

Tips for Success
- Stitch Markers: Use a marker to track the beginning of your rounds when working in continuous rounds.
- Stuffing: Stuff firmly but evenly to maintain the hen's shape without distorting stitches.
- Check Alignment: Pin parts like the comb and beak before sewing to ensure proper placement.
Pattern Correction
- During the assembly, ensure that the head and neck transition align smoothly for a neat finish.