Crochet Skirt Free Pattern for Effortless Style
Refresh your wardrobe with this free crochet skirt pattern, that guides you through easy steps for a beautiful and stylish handmade outfit.
A skirt made with your own hands can bring a wonderful sense of joy and style to your wardrobe. Following a crochet skirt pattern is a simple way to make a skirt in any size or color, fitting just how you want without needing special skills. This pattern gives clear steps, making it easy for beginners or those who have never tried it before. You can use extra yarn from your home or pick out bright new colors to suit your taste.
Effortless Crochet Skirt Pattern - Free for Perfect Fit

A crochet skirt can be worn for special days or just for feeling comfortable around the house, and it is gentle on your skin too. With every stitch, you save money and make something special that is just for you. There is no need for sewing machines or lots of tools, so anyone can try and enjoy this relaxing and fun skill. Through a crochet skirt pattern, you gain confidence and happiness every time you finish a lovely skirt yourself.

Crochet Brick Stitch Skirt - Step-By-Step Pattern
Skill Level
Intermediate to Advanced: This pattern involves working in rows, designing increases, creating a ribbed waistband, and working a brick stitch. Experience with seaming and applying lining is beneficial but not required.
Materials Required
Yarn
- Type: Size 4 yarn with Tex 340 (~medium-weight yarn).
- Color: Recommended "tile" color, but any color of your choice will work.
- Amount: For size S:
- Approximately 2 skeins (~680 m) for 70-80 cm skirt height.
- Adjust yarn quantity for longer or larger designs.
Hook Size
- 3 mm crochet hook: Use this for working the skirt's stitches.
Optional Materials
- Elastic Band: Ideal for a secure and comfortable waistband. Use either round elastic or a flat band, depending on preference.
- Cord Drawstring: Substitute or combine with elastic for an adjustable waistband.
- Fabric for Lining:
- 100% polyamide fabric is recommended due to its elasticity and durability (often used for bikini linings).
- Sewing Materials:
- Sewing needle and thread: For sewing the elastic band and the lining fabric.
- Pins: To hold the fabric in place before sewing.
- Scissors: For cutting the yarn and trimming the fabric.
Special Techniques
- Back Loop Only (BLO): Working into just the back loop of a stitch to create a ribbed effect.
- Brick Stitch Sequence:
- A defined, repeating pattern of 7 double crochets (dc), 2 chains for space, 7 dc.
- Elastic Application: Sewing an elastic band to the waistband for adjustable and comfortable wear.
Key Abbreviations (US Terminology)
- ch: Chain
- sc: Single Crochet
- dc: Double Crochet
- sl st: Slip Stitch
- sp: Space
- rep: Repeat
- BLO: Back Loop Only
Finished Measurements
- Width: For size S: 80 cm width (adjust based on hip measurement).
- Height: For size S: 70-80 cm skirt length. Adjust based on personal preference (long, midi, or short skirt).
Pattern Instructions
Step 1: Waistband
The waistband is created first with ribbing for flexibility and a snug fit around the body.
- Foundation Chain:
- Start with a slip knot.
- Chain 7, including the initial knot. (For wider waistbands, increase the chain count.)
- Row 1 - Foundation Row:
- Ch 3 (counts as first dc).
- In the 5th chain from the hook, work 1 dc.
- Continue working dc in each chain until the end of the row. (7 total dc for size S.)
- Row 2-Desired Length - Ribbing:
- Ch 3, work 1 dc in BLO of each stitch, skipping the first chain. Continue to the end of the row.
- Turn and repeat this process for every row until your waistband measures your desired circumference.Sizing Note:
- To calculate the waistband size:
Hip Measurement - 20 cm (~8 inches). - Example: For a 100 cm (~39.4 inches) hip, the waistband should measure 80 cm (~31.5 inches).
- Ensure the total row count is a multiple of 3.
- To calculate the waistband size:
- Joining Ends:
- Fold the waistband, aligning the last row with the foundation row.
- Join with sl st by working through the BLO of the last row and the corresponding stitch on the base row. Ensure the join is seamless.


Step 2: Base Stitches for Skirt
- Row 1 - Setting the Base:
- Attach yarn at the base of the waistband seam.
- For each row of the ribbed fabric, work 3 sc evenly into the ends of the dc stitches.
- Continue this all along the base of the waistband to form a uniform foundation row.
- Row 2 - Begin Brick Stitch Setup:
- Ch 3 (counts as first dc).
- Ch 2 for spacing, then skip 2 stitches and work dc in the next stitch.
- Rep [ch 2, skip 2, dc in the next stitch] all the way around.
- Join with a sl st to the 3rd ch of the starting ch.

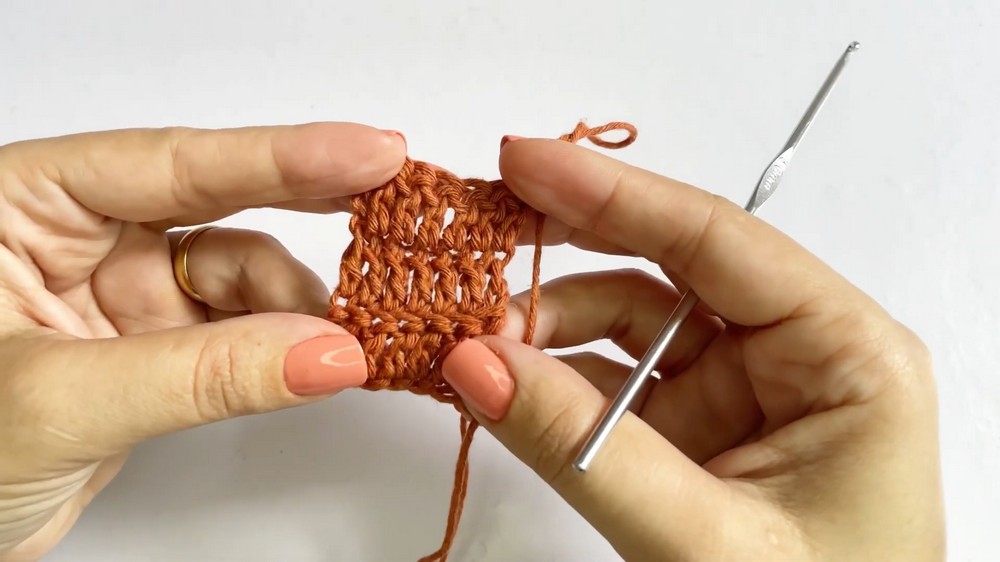
Step 3: Brick Stitch Pattern
The brick stitch pattern is a repeating sequence of 4 rows.
Row 1 - Base/Bricks Foundation:
- Begin with 3 ch, then in the next sp (ch-2 space), work 2 dc.
- Continue across the row:
- Work [dc, 2 dc in next ch-2 sp, dc in next st] across.
- After every 7 dc, ch 2, skip 2 ch sts, and rep the set across the row.

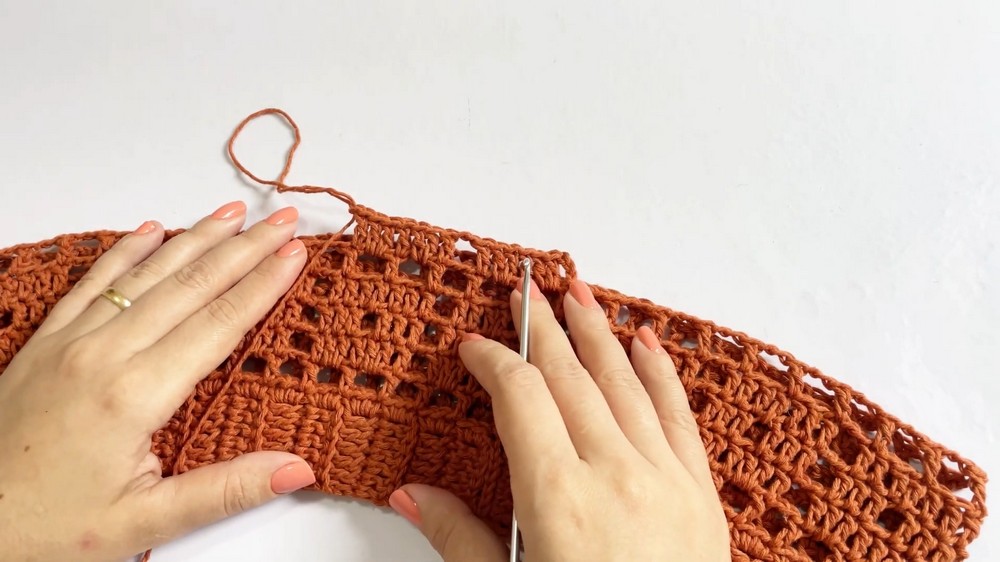
Row 2 - Brick Formation:
- Begin with 3 ch, work [dc, dc, dc], ch 1, skip the 4th dc from the previous set.
- Continue to finish the row using the same method, creating separation between clusters of dc.
Row 3 - Brick Top Row:
- Work 7 dc stitches across 2 squares, separated by 2 ch between clusters of 7 dc.
Row 4 - Row of Chain Spaces:
- Work [dc, ch 2, skip 2 stitches, dc] for the entire row.
Step 4: Optional Slit
- Begin the slit after completing the foundation row of dc + ch-2 repetitions.
- Work each row separately as described above, ensuring the slit remains open.
- Optionally sew lining along the slit for modesty.
Step 5: Finishing Rows
- Last 2 Rows:
- After completing the desired length, work 1 row of dc in each stitch of the previous row, followed by 1 row of sc in each stitch.
- This creates a clean, professional finish.
Step 6: Waistband Elastic Application (Optional)
- For a perfect fit, use an elastic band 10 cm (~4 inches) shorter than your waist measurement.
- Attach both elastic ends by sewing or knotting securely.
- Attach Elastic:
- Use sc, inserting your crochet hook into each base stitch and passing under the elastic band to secure it between the stitches.
Step 7: Optional Lining
- Cut Fabric: Position the fabric under the skirt and cut it to fit the sides of the skirt. Leave ~1-2 inches of seam allowance.
- Sewing the Lining:
- Sew the fabric along the sides and attach it to the skirt with a needle and thread.
- Position the fabric just below the waistband seam, pin, and sew with small stitches to secure.
Tips
- Customize Easily: Modify the skirt's length, width, and slit placement for a perfect custom fit.
- Lining Application: Baste the fabric carefully to avoid puckering. Fold edges to avoid visible fraying.
- Maintenance: Hand wash the skirt or use a delicate cycle for lined skirts. Always air dry to maintain the shape of the stitches.
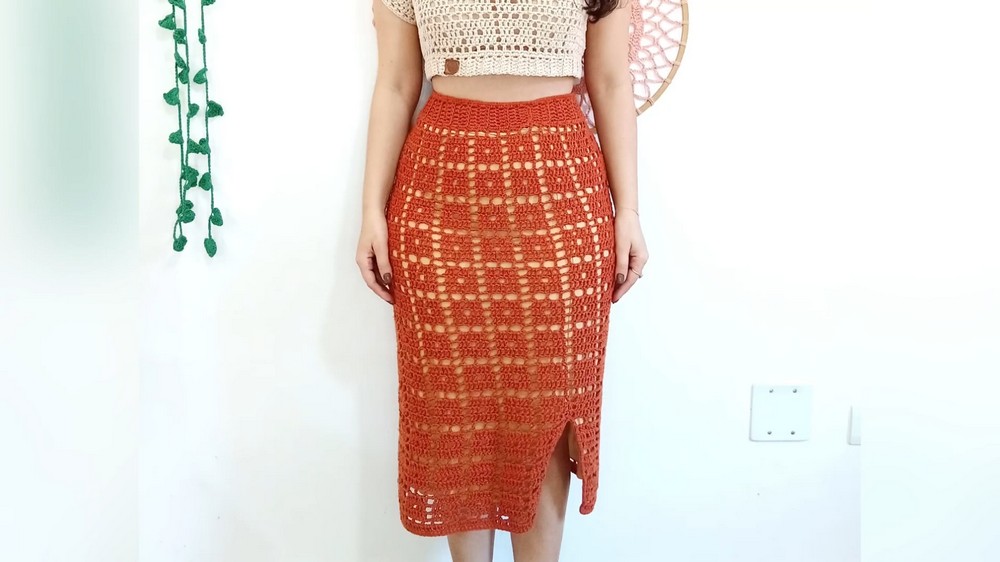
Conclusion
The crochet brick stitch skirt is versatile, elegant, and perfect for any occasion. Whether it's long, short, or midi, this skirt makes a wonderful addition to any wardrobe. Its ribbed waistband offers a comfortable and stylish finish, while the intricate brick stitch design adds texture and beauty. Pair the skirt with matching crochet pieces or other wardrobe staples for a cohesive look.
