Free Crochet Lemon Net Bag Pattern for Eco-Friendly Style
Carry fresh produce in style with a Crochet Lemon Net Bag Pattern that combines charm and utility, adding a cheerful touch to your outings or thoughtful gifting.
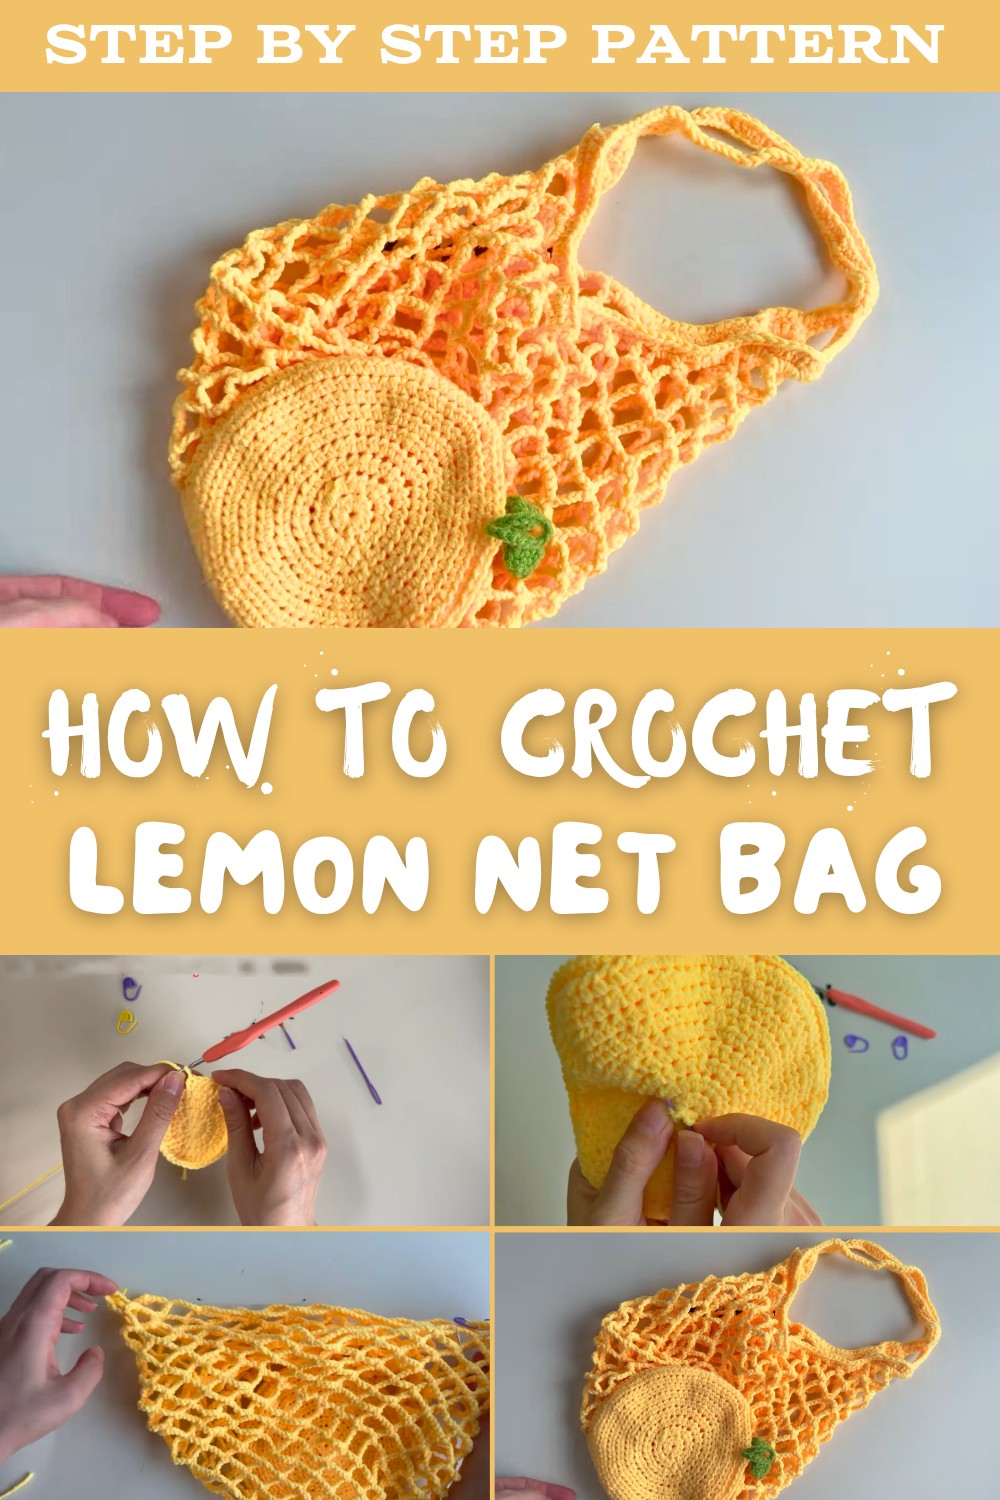
A lightweight and eco-friendly bag made with crochet techniques, the Lemon Net Bag is both practical and charming. This pattern is designed to create a reusable net-style tote, often adorned with a fresh, lemon-inspired aesthetic. Ideal for carrying groceries, fresh produce, or everyday essentials, it serves as a stylish way to reduce plastic bag usage while showcasing your crochet skills. The airy, breathable structure of the bag makes it perfect for trips to the farmers' market or as a casual accessory for sunny outings.
Crochet Lemon Net Bag Pattern for Lightweight Storage
What makes this project particularly enjoyable is its simplicity and adaptability-you can play with colors beyond just the classic yellow or even add small embellishments to personalize your bag. The open mesh-style design keeps the project light and quick to complete, making it a great choice for beginners or those wanting a satisfying weekend project.
Beyond being functional, the Lemon Net Bag adds a cheerful touch wherever you take it, proving that small, handmade items can be both beautiful and purposeful. Whether you make it for yourself or as a thoughtful gift, it's a delightful way to combine creativity with sustainability.

Lemon Net Bag Crochet Pattern
Materials
- Yarn: Five ply cotton yarn, yellow recommended for authentic lemon look (approx. 1 skein)
- Hook: 2.5 mm crochet hook
- Darning needle (for sewing and weaving in ends)
- Stitch markers (optional but highly recommended)
- Scissors
Optional:
- Kit: Pre-selected kit with exact materials (see video description for links)
Skill Level
Intermediate to Advanced
Experience with working in the round, continuous increases, mesh/net patterns, and shaping is recommended.
Key Abbreviations (US Terms)
- ch - Chain
- sc - Single crochet
- hdc - Half double crochet
- dc - Double crochet
- tr - Treble crochet
- sl st - Slip stitch
- inc - Increase (two stitches in one stitch)
- rep - Repeat
Special Notes
- Use US crochet terminology throughout.
- Make sure to count stitches at the end of each round.
- Use stitch markers to mark the beginning and end of rounds.
- Patterns uses both mesh netting and shaped increases.
- The "magic ring" method is used to start the base.
Pattern Instructions
1. Base Discs (Make 2)
Magic Ring Foundation
- Wrap yarn around your fingers to create a magic ring.
- Round 1: Ch 2 (does not count as st). Work 10 hdc into the ring.
- Place a stitch marker in the first hdc.
- Pull tail to close the ring.
- Sl st to join.
Round 2:
- Ch 2.
- Work 2 hdc in each st around (hdc inc). (20 hdc)
- Place stitch marker in first stitch.
- Sl st to join.
Round 3:
- Ch 2.
- 1 hdc in next st, 2 hdc in next st; rep from * to * around. (30 hdc)
- Place marker, sl st to join.

Round 4:
- Ch 2.
- 1 hdc in next st, 2 hdc in next st, 1 hdc in next st; rep. (40 hdc)
- Place marker, sl st to join.
Round 5:
- Ch 2.
- 3 hdc, 2 hdc in next st; rep. (50 hdc)
- Place marker, sl st to join.
Round 6:
- Ch 2.
- 2 hdc, 2 hdc in next st, 2 hdc; rep. (60 hdc)
- Place marker, sl st to join.

Round 7:
- Ch 2.
- 5 hdc, inc; rep. (70 hdc)
- Place marker, sl st to join.
Round 8:
- Ch 2.
- 3 hdc, 2 hdc in next st, 3 hdc; rep. (80 hdc)
- Place marker, sl st to join.
Round 9:
- Ch 2.
- 7 hdc, inc; rep. (90 hdc)
- Place marker, sl st to join.
- Fasten off first disc, but keep yarn attached for second disc.
2. Joining Discs
- Place discs RS together, WS out.
- Insert hook into last st of top disc and first st of bottom disc.
- Work sc through both layers all the way around (80 sc), leaving 10 sts unworked (these will become openings for the mesh sides).
3. Mesh Net Sides
Round 1 (Net Setup):
- Ch 1.
- Sc in next st of front disc only, ch 8, skip 3 sts, sc in 4th st; rep 21 times.
- For last section: ch 4, tr in 4th st.
- Place stitch marker, fasten off.
Rounds 2-17 (Mesh):
- Ch 1.
- (Sc in next mesh space, ch 8); rep 21 times.
- At end: sc in next mesh space, ch 4, tr in first st.
- Place marker. Rep this sequence through round 17.

4. Net Closure (Sides)
- After round 17, ch 4, tr in first st to finish mesh on one side.
- Repeat rounds 18 & 19 symmetrically for the opposite side:
- Round 18: Ch 1, sc in next mesh space, ch 8, sc in next mesh space (repeat twice), ch 4, tr in next mesh space.
- Round 19: Ch 1, sc in next mesh space, ch 8, sc in next mesh space, ch 8, sl st in next mesh space, ch 1 to finish.
5. Handle Attachment (Both Sides)
- Handle round 1:
- Work 6 sc in first chain space (next to mesh opening).
- In next chain space: 3 sc, ch 2.
- Next 7 chain spaces: 2 sc, ch 2 in each.
- Next chain space: 3 sc.
- Next two chain spaces: 6 sc in each.
- Ch 50 (handle).
- Return to chain space adjacent to start point, 6 sc to anchor.
- Sl st to first st to complete handle.
- Handle round 2:
- Ch 2, work hdc in each stitch around handle.
- Place marker, sl st to join.
- Fasten off, weave ends.

6. Leaf Decoration
- Ch 8.
- Skip first ch, sl st in next, sc in next, hdc in next, dc in next, hdc, sc, sl st in last.
- Turn, work back along leaf (mirror stitches). Fasten off, weave ends in.
- For larger leaves, chain more or add rows as desired.
- Ch 16 for leaf stem, attach leaf or stem to bag as desired.
Conclusion
You have completed the Lemon Net Bag, a fun and functional accessory with mesh sides and decorative leaves perfect for gifting or everyday use. Handles are sturdy and comfortable for carrying.

Pattern Corrections and Tips
- Correction:
If the mesh count doesn't line up at the end of Rounds 2-19, recount your mesh holes and ensure you have 21 repetitions per round. - Tip:
Use plenty of stitch markers to help keep your round count accurate, especially for increases and mesh repeats. - Tip:
Seamless joining: When working mesh rounds, always insert into mesh spaces rather than stitch tops for easier working.