Fun Free Crochet Summer Top Pattern to Stay Cool in Style
Try this lightweight and stylish Free Crochet Summer Top Pattern for comfort and versatility, perfect for casual outings, beach days, or everyday wear.
On warm summer days, lightweight clothing that's both stylish and functional is always a favorite. A Free Crochet Summer Top pattern suits this perfectly, offering breathable comfort for outdoor events, beach days, or casual afternoons. Whether worn over a swimsuit or paired with jeans or shorts, its versatility makes it suitable for a variety of occasions. Its open, airy texture is ideal for staying cool while showcasing modern crochet techniques.
Easy Free Crochet Summer Top Pattern for Any Outfit
Choosing handmade pieces like this allows for customization in color, fit, and style to truly suit your wardrobe preferences. The top is practical, timeless, and a sustainable choice for those who enjoy unique, wearable garments. Whether you're looking for something simple yet chic for summer outings or a standout piece to layer, this crochet summer top combines comfort with effortless style.

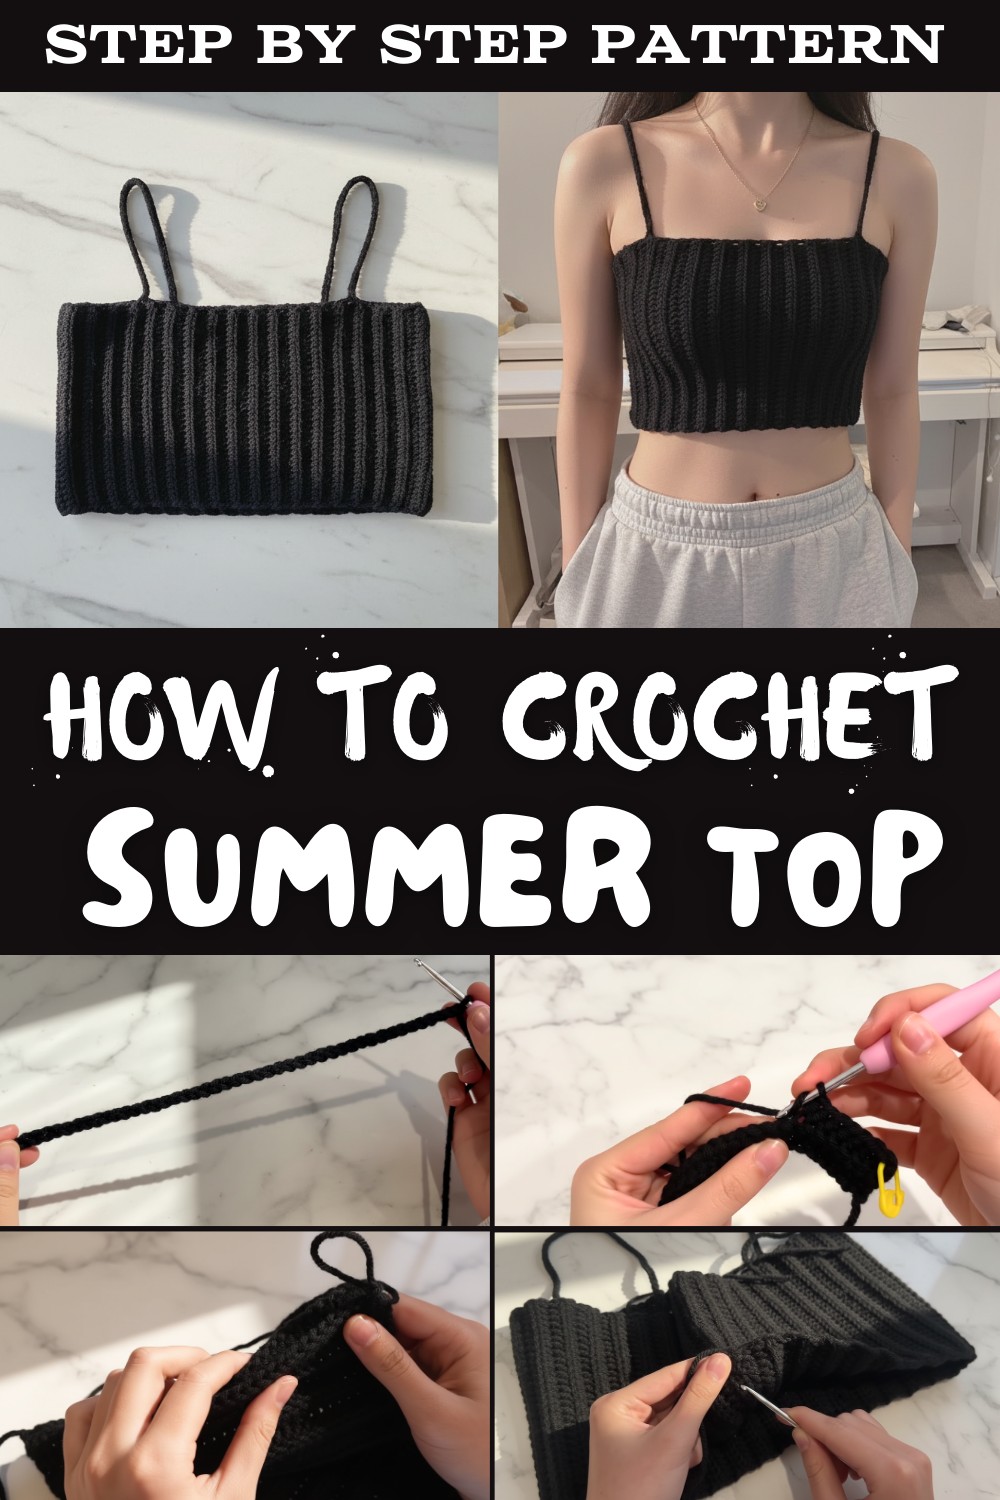
Crochet Summer Spaghetti Strap Top Pattern
Finished Size
- The dimensions of the top will depend on individual measurements.
- The foundation chain determines the length of the top, and the number of rows determines the width for wrapping around the body.
Materials Needed
- Yarn:
- Acrylic Yarn, worsted weight (Category 4).
- Approximately 200g (depending on size).
- Hook Size:
- 4 mm crochet hook.
- Notions:
- Darning needle for weaving in ends.
- Stitch markers for marking strap placements.
- Scissors for trimming yarn.
- Optional:
- Measuring tape for ensuring accurate dimensions.
Skill Level
Beginner to Intermediate.
Gauge
Gauge is not critical, as you will be measuring the piece directly on your body to determine the fit.
Key Abbreviations (US Terminology)
- ch: chain.
- hdc: half double crochet.
- sl st: slip stitch.
- rep: repeat.
- st: stitch.
- y/o: yarn over.
Special Notes
- Measurement Customization:
- The foundation chain determines the length of the top. Chain as long as desired, then measure the piece stretched across your body.
- The number of rows determines the width; crochet rows until the piece fully wraps around your body.
- Back Loop Technique:
- Insert your hook into the back loop only of each stitch for ribbing texture and elasticity.
- Marking Straps:
- Use stitch markers to mark strap placements before attaching straps to ensure symmetry.
Pattern Instructions
Step 1: Foundation Chain
- Create a slip knot:
- Hold the yarn, wrap it around two fingers, and pull the tail through to create a knot. Adjust the loop to fit snugly on your hook.
- Chain desired length:
- Yarn over and pull through the loop on your hook to create chains.
- Measure the chain by placing it across your body to ensure the length matches your desired top length. Example: Chain 46 for a cropped top.
- Add 2 extra chains (Height Chains):
- These chains provide the height for the first row of hdc, but they do not count as part of the foundation chain.

Step 2: Row 1 - Half Double Crochet
- Work in the third chain from hook:
- Yarn over.
- Insert your hook into the third chain from the hook. Pull up a loop, yarn over, and pull through all 3 loops on the hook.
- This counts as 1 hdc.
- Continue across the foundation chain:
- Work 1 hdc into each chain, ensuring even and consistent stitches.
- Example: For a foundation chain of 46, you will have 46 hdc at the end.
- Mark the first stitch:
- Once the first hdc is complete, place a stitch marker to ensure it is not skipped in future rows.

Step 3: Row 2 - Back Loop Half Double Crochet
- Chain 2:
- These chains give height to the next row.
- Note that these chains are not counted as a stitch.
- Turn your work:
- Rotate the piece so you can crochet into the next row.
- Work in the back loop only:
- Identify the front loop and back loop of the stitches. Insert your hook into the back loop only.
- Work 1 hdc into each back loop. This creates a ribbing texture.
- Continue across the row:
- Example: For 46 stitches in Row 1, maintain 46 hdc (back loop only) in Row 2.
- Mark the first stitch:
- At the end of this row, remember to mark the first stitch for consistency.

Step 4: Repeat Rows
- Repeating Row 2:
- Start each row with a chain of 2, turn your work, and continue with hdc in the back loop only for each stitch across.
- Continue until the top is wide enough to wrap around your body:
- Example: Work 72 rows of back loop hdc to create the width for an average adult size.

Step 5: Joining to Form a Tube
- Fold the piece in half:
- Align the final row with the foundation chain to form a tube.
- Slip stitch to join:
- Insert your hook into the back loop of the last row and into the corresponding chain from the foundation row.
- Yarn over, pull through both loops, then pull through the loop on your hook (sl st).
- Repeat across the row to join the two edges securely.
- Fasten off:
- After joining, chain 1, pull up a long loop, and cut the yarn.

Step 6: Adding Straps
Mark Strap Placement:
- Position markers on the front and back:
- Use a stitch marker to identify where the straps will attach on the front and back of the top.
- Ensure spacing is symmetrical.

Strap Creation:
- Attach yarn to the back side:
- Insert your hook into the marked stitch on the back side and attach your yarn with a slip knot.
- Chain for strap length (e.g., 13 inches):
- Yarn over, pull through to create chains until the strap measures 13 inches (or your desired length).
- Attach strap to the front:
- Use a slip stitch to join the strap to the corresponding stitch marker on the front of the top.
Fasten Off:
- Secure the yarn:
- Chain 1, pull up a long loop, and cut the yarn. Pull tight to secure.
- Repeat for the second strap:
- Follow the same process for the other strap.
Step 7: Finishing
- Weave in Ends:
- Use a darning needle to hide yarn tails inside the stitches on the wrong side of the top.
- Thread the needle through loops in one direction, then reverse direction and pull tight before trimming excess yarn.

Row Highlights with Numbers and Key Stitches
- Foundation Chain: Chain 46 + 2 height chains (adjust as needed).
- Row 1: Work 46 hdc, starting in the 3rd chain.
- Row 2: Work 46 hdc (back loop only).
- Row 3+: Repeat Row 2, ensuring consistent stitch counts. Example: Total 72 rows for an adult medium size.
- Final Row (Row 72): Slip stitch to join the first and last rows into a tube.
Customization Ideas
- Length Adjustment:
- Add or remove chains for a longer or shorter crop top.
- Wide Straps or Racerback:
- Create wider or crisscross straps by stitching longer chain connections.
- Color Variety:
- Add stripes, color blocks, or gradient effects.
Tips for Success
- Count Your Stitches:
- Consistent stitch counts ensure straight edges and an even shape.
- Try On While Crocheting:
- Continuously test the fit to make sure the top suits your body and preference.
- Check Strap Placement:
- Symmetrical placement of straps will improve the overall look.
Conclusion
Congratulations! You've completed your crochet spaghetti strap summer top. This simple and versatile piece is a staple in any summer wardrobe. With the stretchy ribbed texture, adjustable strap placement, and customizable fit, this project is both functional and stylish.