Free Crochet Flower Mini Charm Pattern for Any Project
Create colorful piece with Crochet Flower Mini Charm that's easy to make and for jazzing up your bags, clothes, or gifts with a playful twist.
Tiny and colorful flowers made with yarn can bring joy and charm to many everyday items. A Free Crochet Flower Mini Charm Pattern provides simple instructions to make small, delicate blooms with your hands. These little flowers are beautiful and can be used in many ways, such as decorating bags, hair accessories, greeting cards, and even clothes. Their small size makes them easy to carry and quick to make, making them a favorite choice for both beginners and experienced crochet lovers.
Free Mini Flower Crochet Pattern to Personalize Your Projects

Made with soft yarn and bright colors, these flowers stand out with their neat design and lovely appearance. The process involves using basic crochet stitches, making them perfect for learning and practicing skills. These mini charms are not just decorations; they are thoughtful gifts and bring a touch of happiness wherever they are placed. From decorating school projects to adding a personal touch to gifts, these crochet flowers are full of possibilities and creativity.

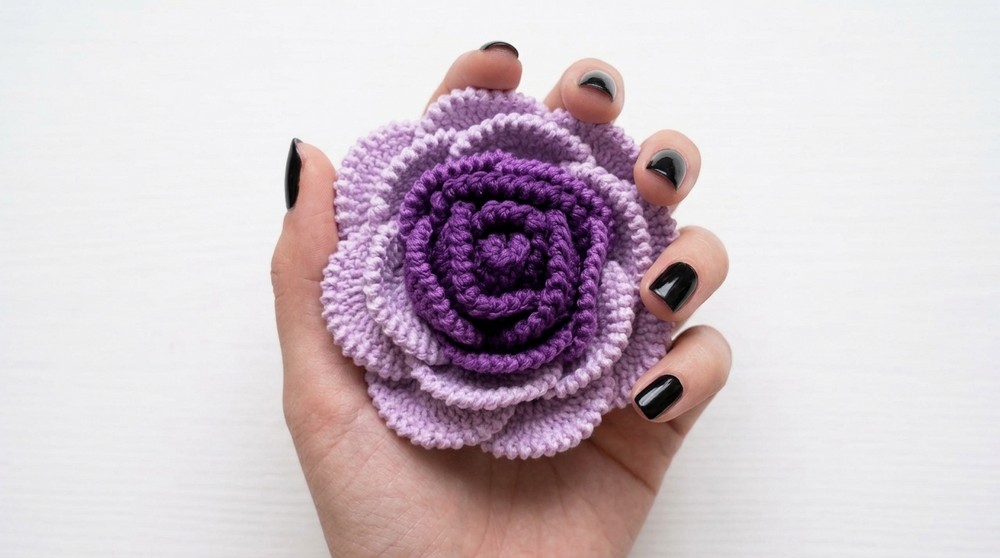
3D Mini Rose Pouch Crochet Pattern
Materials
- Yarn:
- Fine or sport weight cotton/acrylic (recommended: PolyCherry or similar)
- Color A: Dark Purple (petal center)
- Color B: Medium Purple (petal mid)
- Color C: Light Purple (outer petals)
- Color D: Green (backing)
- Crochet Hooks:
- 2 mm (for motif & pouch, e.g., Rose brand)
- Other:
- Yarn needle
- Scissors
- Stitch markers (optional)
- Small fragrant sachet or gift (optional, for inside)
Special Techniques
- Magic Ring (Adjustable Ring)
- Working in a Circle
- Popcorn or 3D Petal Formation
- Reverse Single Crochet (Crab Stitch)
- Continuous/Seamless Join of Circles with sc
- Picot Edging

Pattern Instructions
A. Rose Motif (Pouch Front)
With Darkest Color (Color A):
- Make a magic ring.
- Ch 2 (do NOT count as dc throughout).
- Work 12 dc into ring.
- Pull tight to close ring. Join with sl st to first dc.

Round 2:
5. Ch 2 (not counted as dc).
- Working in back loops only (BLO), 2 dc in each st around (24 dc).
- Join with sl st.
Round 3:
8. Ch 2 (not counted).
- (Dc in next st, 2 dc in next) around for a dc increase, alternating single dc and increase (36 sts). Join with sl st.
- Continue this pattern up to Round 5, following a standard circular increase pattern (each round's increase separated by 1 more dc).
- Ex: Round 4: [dc in next 2, 2 dc in next] around
- Ex: Round 5: [dc in next 3, 2 dc in next] around
Color Change Tips:
Introduce lighter shades (Color B, then Color C) after each round to create a gradient.
B. Rose Petals (Front 3D Layering, worked over initial rounds)
First Layer:
- Join Color A (or magenta) in first stitch at petal starting point, ch 2 (not counted).
- In same hole: 3 dc.
- In next hole: 3 dc.
Repeat for 2 holes (you have 6 dc in row). - Ch 2, turn.
Work 2 dc in each st across (12 dc). - Skip 4 stitches of base circle, join with a sl st (petal anchor).
- Reverse single crochet (crab stitch) across petal top.

Petal Placement:
Skip 4 base stitches between petals, repeat for each, creating 2 petals in first layer.
Second Layer:
(Using Color B or C for gradient effect)
- Join yarn, ch 2, 9 dc across, ch 2, turn.
- 2 dc in each st across (18 dc).
- Skip 5 base stitches, sl st to anchor.
- Crab stitch (reverse sc) along top of petal.
- Skip 5 on base, continue for 3 petals around circle.
C. Repeat Petal Formation
- Each petal is worked as:
- [Row 1] 3 dc in next x stitches (base row), then turn.
- [Row 2] 2 dc in each st across (increase row), then sl st to base.
- Crab stitch along top, sl st to base, repeat for next petal.
- For each round of petals, leave more base stitches skipped as number of petals increases (per video, typically 4 or 5).
D. Pouch Back Circle
- With green yarn, repeat magic ring and dc circle motif for the back, working up to 5 rounds so both pieces match in diameter.

E. Assembly: Join the Two Circles
- Hold both circles (rose front & green back) wrong sides together.
- Join yarn with sc, working through both layers' edges. Leave an opening for pouch mouth as desired.
- After closing, continue sc along one circle's edge past opening, then sl st to corner to position for adding closure loop.
- For the closure:
- Ch 5, skip 3 sts on edge, sl st into 4th st (forms buttonhole or charm loop).
- Optionally, on other side, ch 65 for hanging loop or charm (as seen in video), sl st to base.
F. Edging & Lace/Picot Decor
- With yarn still attached, sc, ch 3, sl st in same st (picot).
- Sc in next st, (ch 3, sl st in same st), repeat around the pouch opening for a decorative lace effect.

G. Finishing
- Weave in all ends neatly with yarn needle.
- Block lightly if desired.
- Insert fragrance sachet, note, or trinket if using as an angpau or gift pouch.
Suggestions & Tips
- Gradient Rose: For a beautiful rose effect, alternate yarn shades from center out-dark to medium to light.
- Personalization: Use embroidery for initials, beadwork, or tiny buttons for closure.
- Size Adjustments: Add or remove rounds in the base circles for a larger/smaller pouch.
- Clean Edges: Reverse single crochet creates a crisp, rolled edge for petals.
- Hanging Loop: Make longer/shorter as needed for your purpose (charms, car, door).
Final Words
This delightful mini pouch combines 3D crochet flower techniques with practical construction, making it perfect for gifts, tokens, or daily use. It is a showcase of color gradients and petal texturing capped by a neat border and functional loop-reflecting thoughtful craftsmanship in a small, memorable form.
Tips to Maintain the Pattern
- Gently hand-wash if needed; shape while damp.
- Store flat to avoid crushing the petals.
- Insert new scented sachets to refresh fragrance anytime.