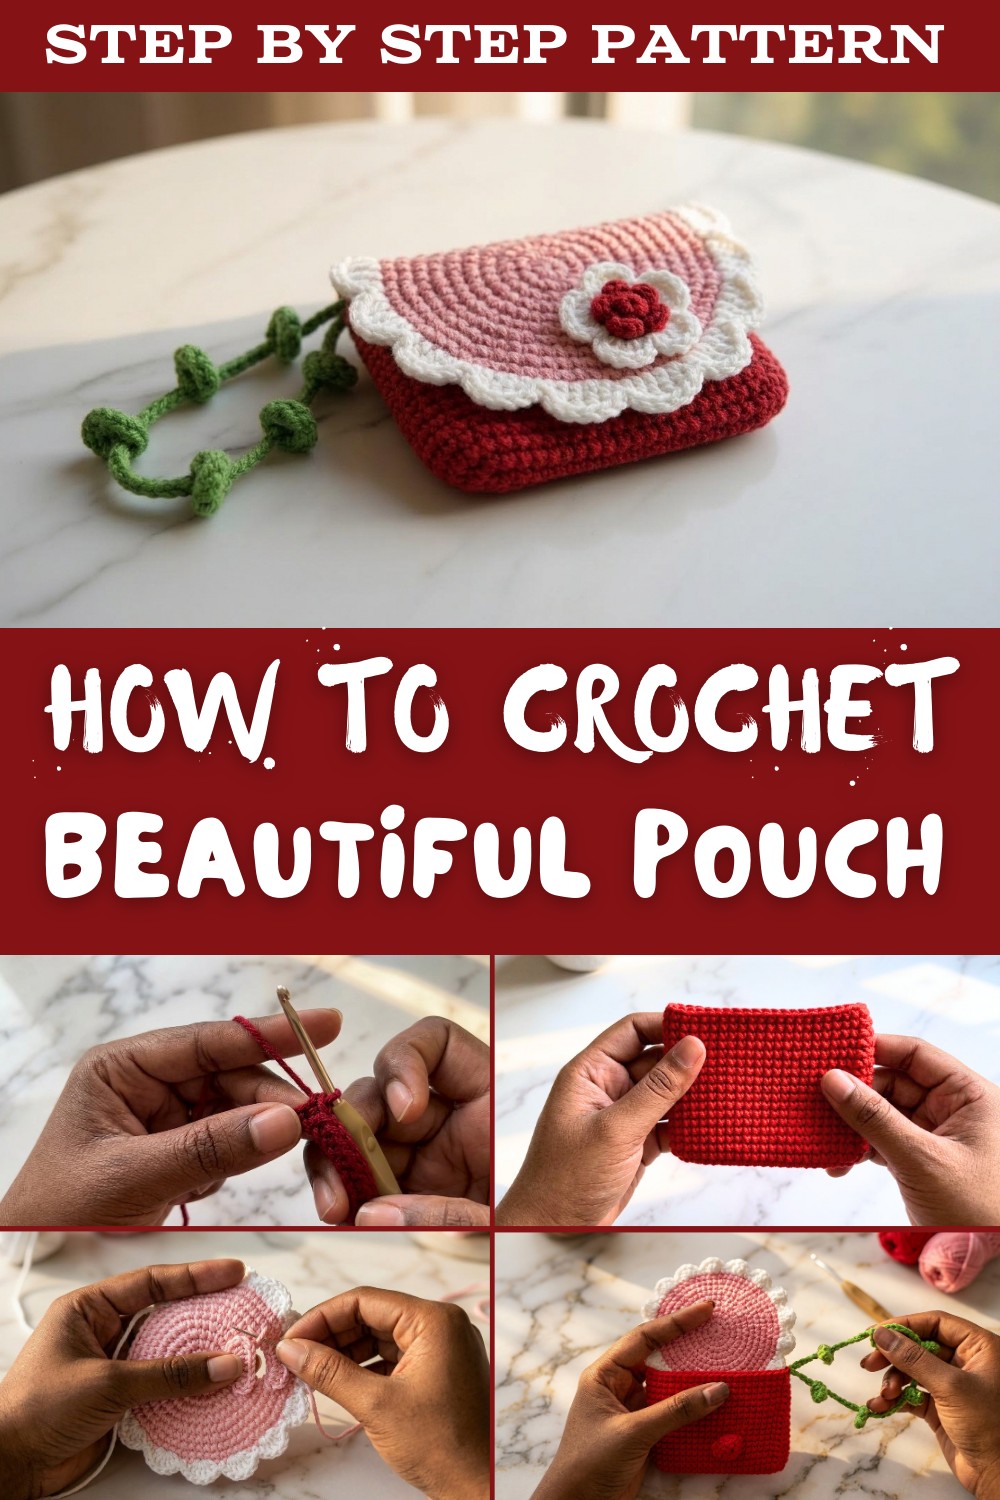
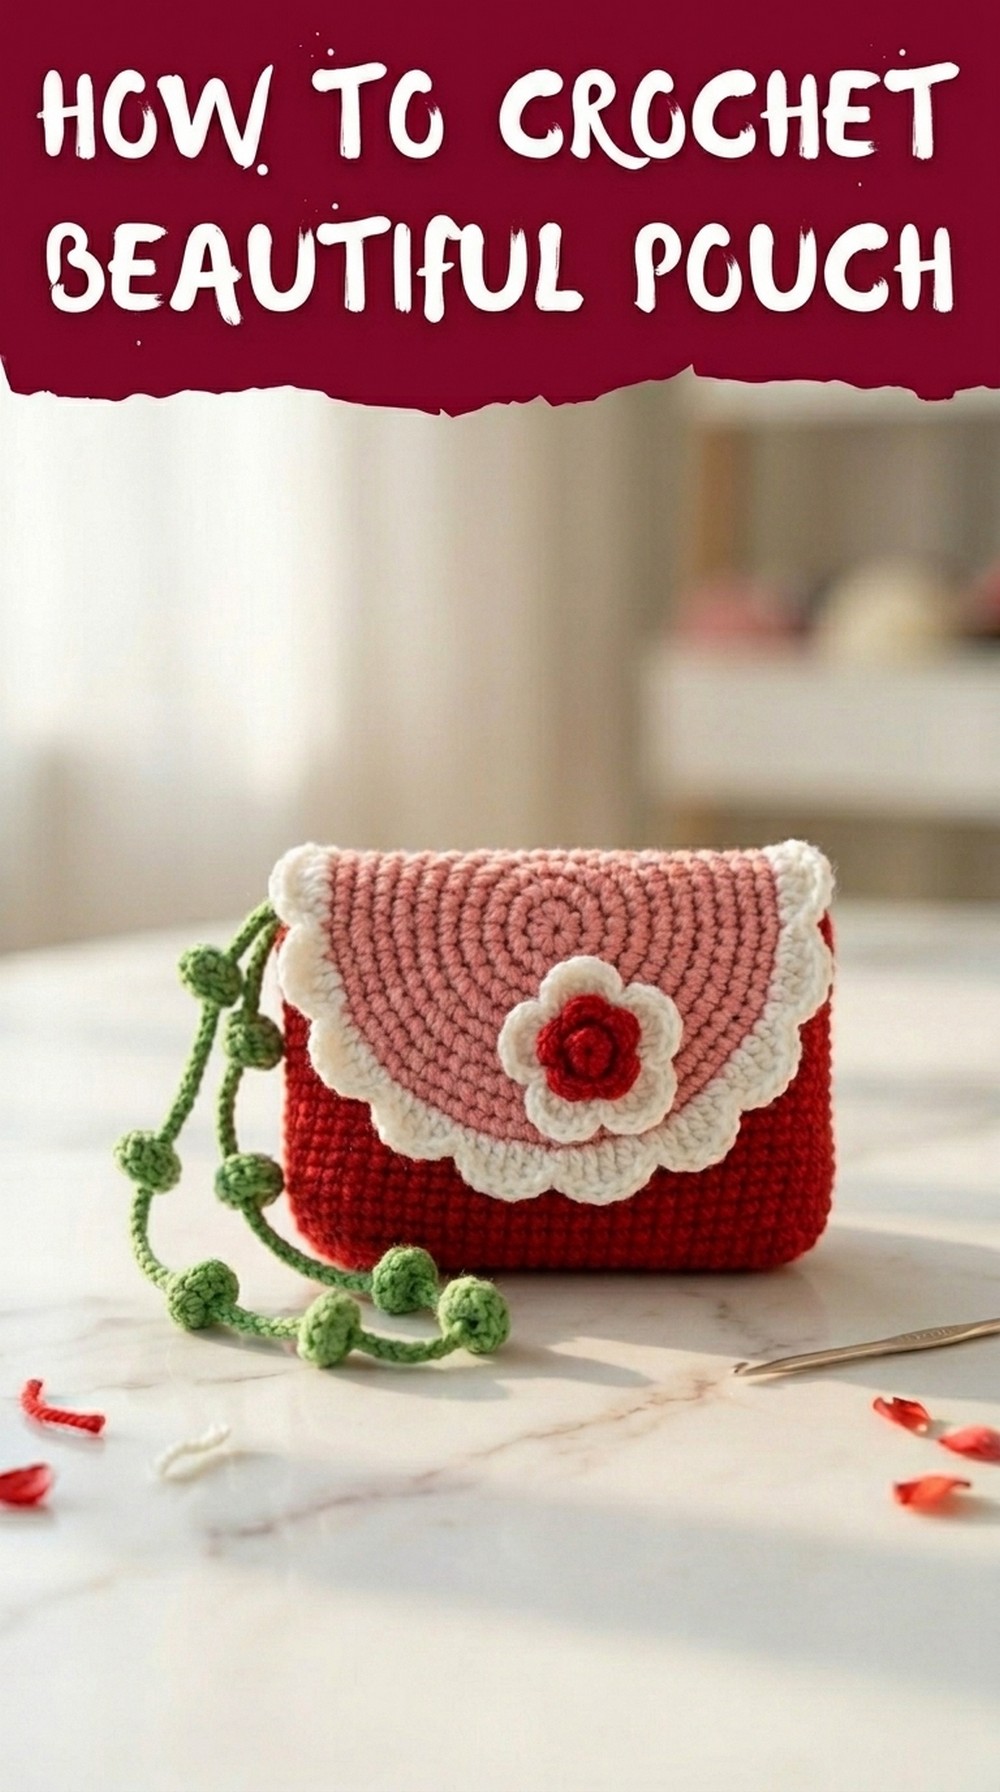
Chic Free Crochet Pouch Pattern Pattern for Everyday Use
Bring the charm of handmade crochet into your life with a stylish pouch that is practical yet creative and perfect for organizing essentials or gifting something special.
Perfect for storing little treasures or daily essentials, this project blends creativity and practicality in one neat design. A crochet pouch pattern is an exciting opportunity to play with colors, stitches, and textures, letting you craft a piece that's uniquely yours. From adding bold accents like fringe or embroidery to experimenting with quirky shapes, every detail can reflect your personal style.
Beginner-Friendly Crochet Pouch Pattern You Can Master Today
These pouches work wonderfully as thoughtful, handmade gifts or as functional accessories infused with charm and personality. Whether you're looking to organize, accessorize, or both, this fun project lets you explore endless possibilities while refining your crochet skills-one stitch at a time.
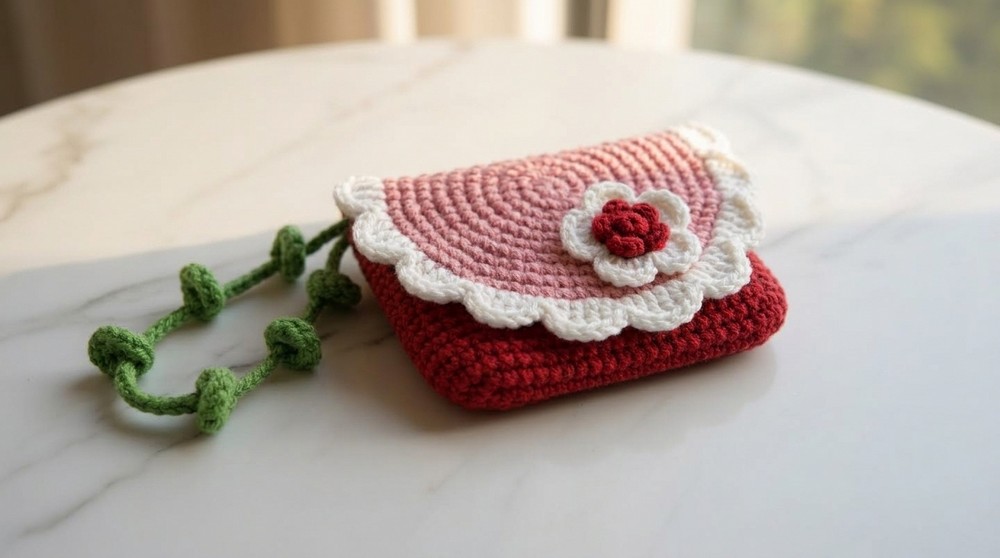
Crochet Flower and Butterfly Pouch Pattern
Materials Needed
Yarn:
- Main body and petals: Lightweight medium (milk cotton) yarn.
- Colors: Hot Red(main body), Red (flower center), pink (Flower), green (for optional leaves), white (for border and lower flower).
Hook:
- 3mm crochet hook (or size suitable for your yarn weight).
Notions:
- Stitch markers for marking starting points and rounding.
- Scissors.
- Tapestry needle for sewing and weaving in ends.
Special Techniques
- Magic Ring: A starting technique to create a tightly closed center for circular designs.
- Cluster Stitch: Making multiple partial double or triple crochets, keeping the last loop of each st, and pulling through all loops together.
- Increase: Crocheting two stitches into one base stitch to expand the fabric.
- Decrease: Joining two stitches to form one, achieved by crocheting through the front loops of two stitches together.
Abbreviations
- ch: chain
- sl st: slip stitch
- sc: single crochet
- dc: double crochet
- tr: triple (or treble) crochet
- hdc: half double crochet
- inc: increase (two sc in the same stitch)
- dec: decrease (crocheting two stitches together)
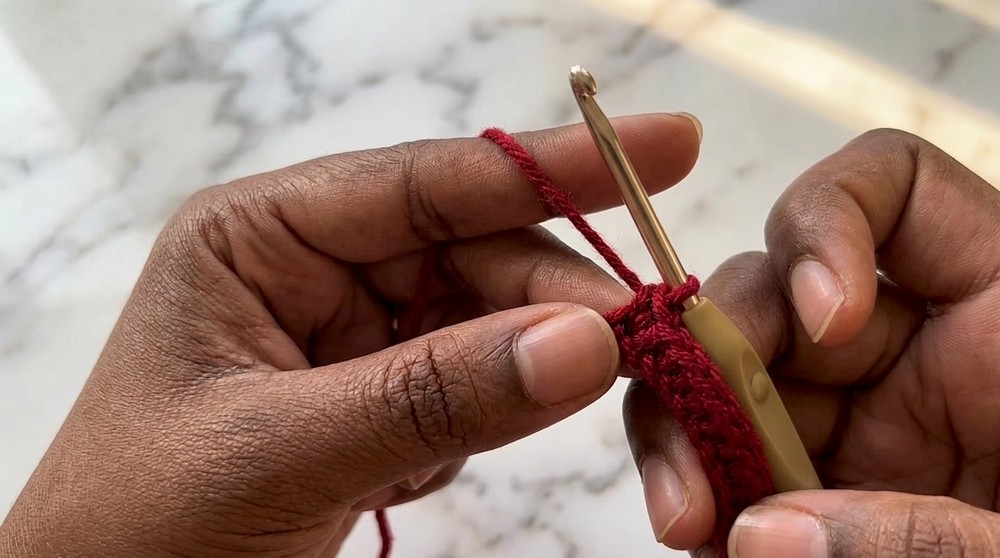
Pouch Body
- Begin with hot pink yarn.
- Foundation Chain: Make a slip knot and chain 21.
Round 1:
- Starting from the 2nd chain from the hook, make 19 single crochets (sc).
- Into the last chain, make 3 sc to turn the corner.
- Work 18 sc along the other side of the foundation chain, working in the unused loops.
- Make 3 sc into the last stitch to turn the corner.
- Join with a slip stitch (sl st) to the first sc. Chain 1. (Total: 42 sc).
Round 2:
- Single crochet in each of the first 19 sts.
- Make 1 inc (2 sc in the same st) in each of the 3 corner stitches.
- Make 18 sc along the other side.
- Make 3 increases (1 in each of the 3 corner sts). Join with sl st to the first sc, skipping the sl st and chain from the previous round. (Total: 49 sc).
Round 3-19:
- Begin each round with 1 sc in the same st as the sl st.
- Work 1 sc in each st around for a total of 49 sts.
- End each round with a sl st to the first sc, followed by chaining 1.
Finishing Round 19:
- After the final sl st, cut the yarn, leaving a tail for weaving in.
- Attach the yarn tail to a tapestry needle. Insert at the first st of the final round (skip sl st and chain). Weave neatly to secure.

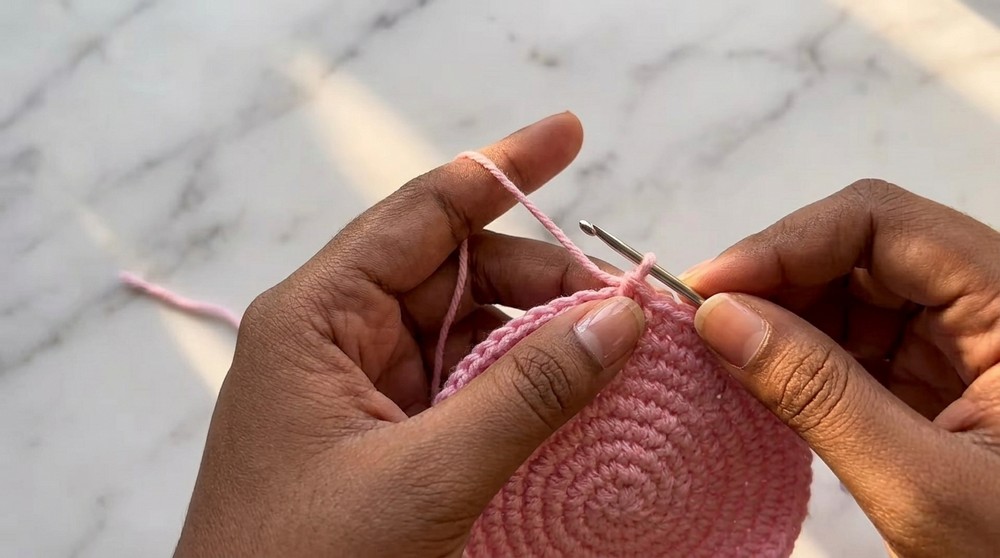
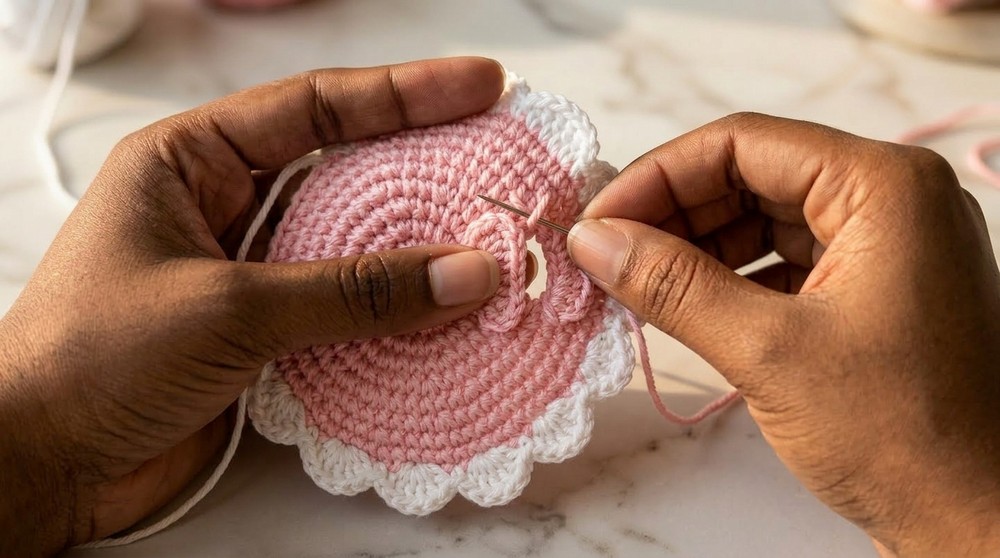
Flap (Flower Center)
- Start with yellow yarn and make a magic ring.
Round 1:
- In the magic ring, crochet 8 sc. Mark the first stitch.
- Pull the yarn tail to close the ring. Sl st to the first sc, chain 1.
Round 2:
- Begin from the same st as the sl st, make an inc (2 sc in the same st).
- Repeat 8 times for each stitch (16 sts).
- Sl st to the first sc, skipping the sl st and chain. Chain 1.
Round 3-7:
- Follow the increase pattern:
- Round 3: 1 sc, 1 inc in every st.
- Round 4: 1 sc, 1 inc, 1 sc.
- Round 5: 3 sc, 1 inc.
- Round 6: 2 sc, 1 inc, 2 sc.
- Round 7: 5 sc, 1 inc (for 5 repeats).
Creating the Hole for Wings (Round 7):
- After completing the increases in Round 7:
- Chain 5.
- Skip 5 sts and attach the chain with a sc.
Flower
- Use pink yarn.
Upper Flower:
- Using the skipped 5 sts in Round 7:
- Crochet in back loops only.
- In the first st, ch 3, dc into the same st, dc in the next, ch 3, sl st into the next st.
- Ch 2, hdc into the next st, hdc in the fifth st, ch 2, sl st back into the last st.
Repeat this for the second set of wings on the skipped chains.
Lower Flower:
- Attach to the 5 chains, starting from the first chain.
- Follow the wing pattern using the chain stitches for a smaller wing.
Flower Body (Closure)
- Magic Ring:
- Make a magic ring with hot pink yarn.
- Crochet 6 sc into the ring.
- Rounds 2-4:
- Round 2: 2 sc, 1 inc twice. (Total: 8 sts).
- Round 3: 1 sc in each st (8 sts).
- Round 4: 2 sc, 1 dec twice.
Finishing the Body:
- Leave a long tail for sewing.
- Use a tapestry needle and insert through the front loops of the remaining stitches, pulling tight to close.
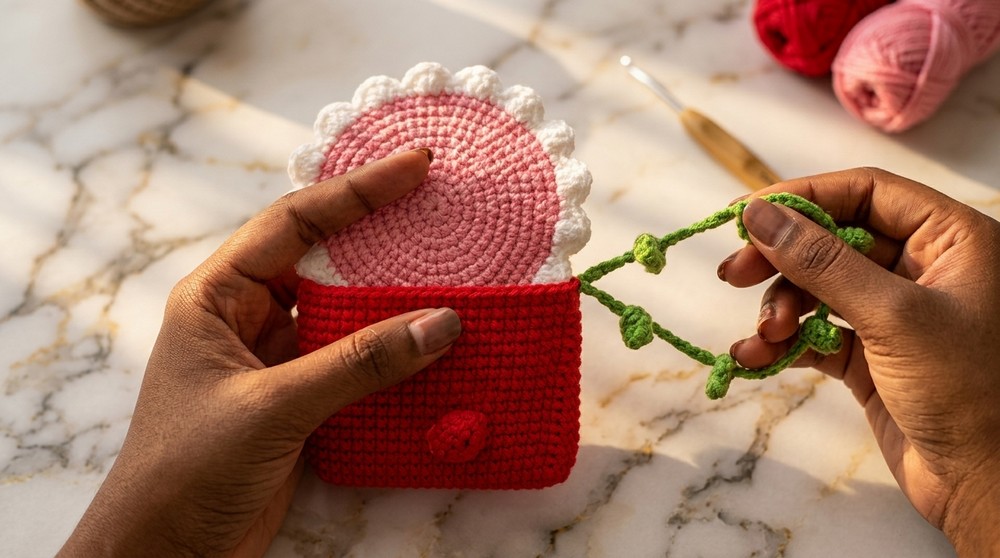
Sew Flower Body:
- Position the body on Round 8 of the pouch base.
- Use the long yarn tail to sew the body to the pouch. Secure tightly.
- Test the closure by aligning the butterfly's wings with the flap opening.
Optional: Leaves Chain
- Attach green yarn for creating leaves.
- Chain 7 for the stem of the leaf.
Leaf:
- Chain 5.
- Starting from the second chain:
- Sl st, sc, hdc, sc, sl st in the last st.
- Turn: Repeat in reverse order back down the chain for the other side of the leaf.
Repeat the leaf chain pattern for six leaves, attaching to the pouch's corners using a tapestry needle.
Finishing
- Weave in all ends securely.
- Attach any additional decorative elements if desired.
- Use the butterfly's body to toggle the pouch open and closed for practical use.
Final Words and Maintenance Tips
- To keep the pouch clean, hand wash in cold water using mild soap. Lay flat to dry.
- Use sturdy yarn to ensure longevity, particularly for the butterfly button mechanism.
- Customize colors to reflect the theme or mood you want the pouch to convey.
Your Spring-Inspired Flower and Butterfly Pouch is now ready. This unique and practical project makes a great handmade gift or a personal treat.