
Crochet Bow Openwork Stitch Free Pattern for Stylish Handmade Items
Create beautiful texture with this Free Crochet Bow Openwork Stitch Pattern and use it to make stylish blankets scarves tops and more.
Looking for a way to make your crochet projects more stylish and unique? This charming stitch pattern features a delicate and airy design that adds a beautiful touch to any creation. With its lovely bow like shapes and open spaces, the pattern is perfect for making light and elegant pieces, whether for summer wear or decorative items. The design stands out for its creativity and versatility. It's simple to create and works wonderfully for projects like scarves, shawls, table runners, or even handmade gifts.
Crochet a Delicate Bow Openwork Stitch Free Pattern

The bow shapes give it a playful yet sophisticated look, making it a delightful pattern to work with. You can use threads of any color to suit your style, but soft hues like pastels or lightweight yarns really emphasize its elegant appearance.
This pattern is easy to follow, using just basic stitches such as chains, single crochets, and double crochets. It's perfect for beginners who want to make something impressive without feeling overwhelmed. While it's simple, it still has a unique and thoughtful design that makes it stand apart from other stitch patterns.
Not only is it beautiful, but it's also highly functional. Whether you're crocheting accessories, home decorations, or clothing pieces, this stitch pattern lets you turn your ideas into lovely and eye catching creations. Its customizable nature allows you to alter the size and spacing, so it's ideal for a variety of projects. Dive into the crochet bow openwork stitch pattern and discover how simple it is to add elegance and charm to your projects.
Crochet Bow Openwork Stitch Pattern with Detailed Instructions
Necessary Materials
Before we start, gather the following materials:
- Yarn: Omega thread or equivalent (preferably a lightweight yarn such as "Omega Cris").
- Hook: 2.25 mm crochet hook.
- Tapestry needle: A blunt tip tapestry needle for weaving in ends and sewing parts together.
- Scissors for cutting the yarn.
- Measuring tape to ensure accuracy.
- Liquid silicone glue or cold adhesive for added security during finishing (optional).
Gauge
Although gauge is not critical for this project, maintaining neat and consistent tension is recommended for a polished final result. Approximate gauge for this pattern:
- 4 double crochet stitches = ~1 inch.
Finished Size
The finished bow measures approximately:
- Main bow length: 20 cm (8 inches).
- Smaller bow (tails): Slightly shorter, at ~19 to 20 rows, depending on desired size.
Pattern Notes
- The bow is crocheted in two parts: the main bow body and the tails.
- Special techniques include slip knots, double crochets, and single crochets. Beginners can easily follow the instructions as no advanced techniques are required.
- Customize the size by adding or reducing the number of rows or chains.
Pattern Instructions
Part 1: Making the Main Bow Body
- Create the Foundation Chain:
- Begin with a slip knot.
- Chain 15 stitches to create the foundation.
- First Row Start:
- Chain 3 additional chains for height (counts as the first double crochet).
- Add 1 chain of separation for spacing.
- Skip 5 chains in the foundation chain and insert your hook into the 6th chain.
- Work a double crochet stitch (Pilar or vareta).
- Continue this pattern: 1 chain of separation, skip 1 chain, 1 double crochet into the next chain until you reach the end of the row.
- Ending First Row:
- Finish the row with 1 chain of separation and a double crochet in the last chain.
- Chain 4 stitches and then turn your work.
- Subsequent Rows:
- Each row begins by chaining 4 stitches (3 for the double crochet height and 1 for separation).
- Work a double crochet stitch into the top of each double crochet from the previous row, separated by 1 chain of separation.
- Continue until you have completed 24 rows (or your desired length).
- Fasten Off:
- Once the rows are complete, secure your work by forming a loop, pulling tight, and cutting the yarn.
- Weave in the loose ends using your tapestry needle.


Part 2: Creating the Smaller Bow (Tails)
- Repeat Foundation Chains:
- Start another foundation chain of 15 stitches, just like in Part 1.
- Add 3 chains for height and 1 chain for separation.
- Repeat the Pattern:
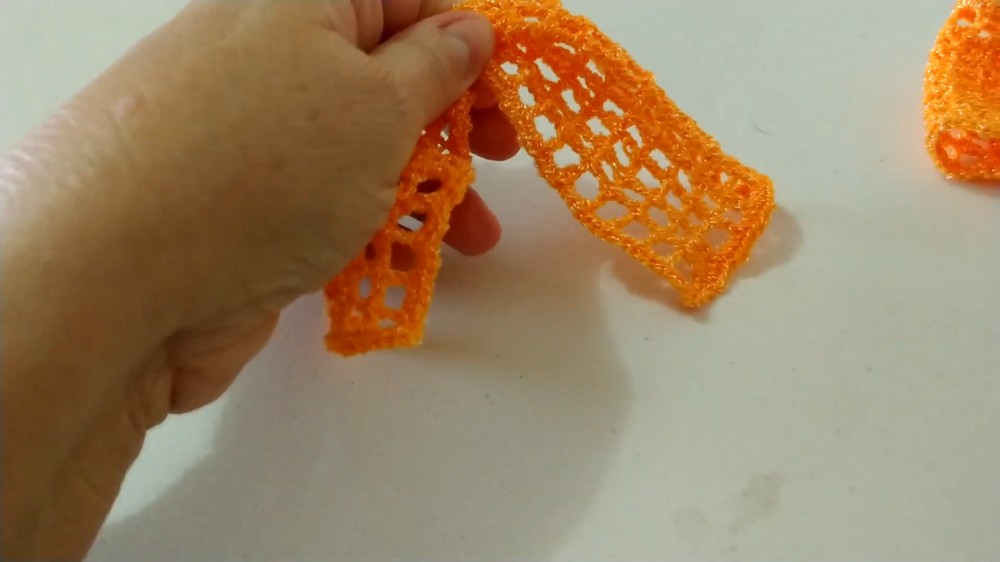
- Crochet the smaller bow exactly like the main bow, but this time stop at 20 rows (or slightly fewer rows than the main part) to make it shorter.
- Add a Border for Both Parts:
- After completing the main bow and tails, add a border for a polished edge.
- Attach yarn to any corner. Work 3 single crochet stitches in each space along the edge, forming an even border.
- When reaching a corner, make 3 single crochet stitches in the same corner space, 1 chain, then 3 more single crochet stitches to create a neat rounded edge.
- Continue around all edges for both pieces and fasten off.


Part 3: Assembly
- Fold the Main Bow:
- Take the larger rectangular piece and fold it accordion style from the center.
- Ensure it forms a bow shape by adjusting the sides equally for symmetry.
- Secure the Bow's Shape:
- Using your tapestry needle and a long strand of yarn, tightly wrap the center of the bow several times to secure the folds.
- Knot the yarn in place and cut off the excess.
- Add the Tails:
- Fold the smaller rectangle into a similar bow shape (or leave it flat for classic tails, depending on your preference).
- Attach the tails to the back of the main bow by sewing it securely at the center.
- Optional Adhesive Use:
- If adding the bow to a clip or hair accessory, use liquid silicone glue to attach the piece to your selected hardware. Let it dry completely for a firm hold.

Finishing Touch
- Wrap additional yarn around the bow's center to hide the seam where the bow and tails are joined. This step ensures a professional and clean appearance.
- Secure the wrapped yarn on the back of the bow using stitches or glue.

Special Tips for Crocheting the Bow
- Customization:
- Adjust the length and width of your bow by increasing or decreasing the starting chain stitches and the number of rows. Create a larger bow for home décor or a smaller one for baby accessories.
- Color Choices:
- You can experiment with dual colors for the bow and tails to add contrast. For example, use yellow for the bow body and white for the tails.
- Practical Usage:
- This bow can be used as a whimsical embellishment for clothing, bags, scarves, or gift wrapping. Attach it to bobby pins or elastic bands for children's hairstyles.
Conclusion
This crochet bow is an adorable crochet that brings charm and personality to any project. With its simple stitches and versatile use, it's a delightful project for beginners and experienced crocheters alike. From decorating a bag to making a cute hair accessory for your little one, this bow is truly multifaceted.
By following this detailed step by step guide, you'll have a polished and professional looking crochet bow in no time. Its cheerful design will surely brighten any accessory or outfit.

Important Remarks
- Ensure that your tension is even throughout the project for clean, uniform rows.
- If gifting, consider pairing the bow with a matching handmade item for a thoughtful touch.
- Share your creation on social media and inspire others by tagging it as your very own artwork.
We hope you enjoy creating this crochet bow as much as we enjoyed presenting this pattern.