
Crochet Granny Stitch Sweater Step-by-Step Free Pattern
Keep warm and stylish this season with a Free Crochet Granny Stitch Sweater Pattern, featuring vibrant textures, easy stitches, and a customizable cozy fit.
A beautifully made sweater can bring comfort and style to anyone, and this design is no exception. The Free Crochet Granny Stitch Sweater Pattern stands out with its timeless appeal and unique combination of colors and textures. It features the well-loved granny stitch, which is easy to follow and ideal for beginners. The sweater's beauty lies in its versatility-it can be made with vibrant, contrasting shades to give it a bold look or softer tones for a more elegant and cozy feel. Lightweight yet warm, it is perfect for layering on chilly days or just lounging at home in comfort.
Free Crochet Granny Stitch Sweater Pattern for Beginners

You can customize its size effortlessly to fit anyone, making it suitable for all ages and body types. Whether worn casually or as part of a seasonal outfit, it adds a handmade charm to your wardrobe. This pattern not only teaches a classic crochet technique but also inspires creativity, as you can experiment with colors and adjustments to personalize the sweater to your taste.
By learning this project, you'll be creating a gift for yourself or a loved one that is both stylish and meaningful, making this sweater a cherished piece for years to come.
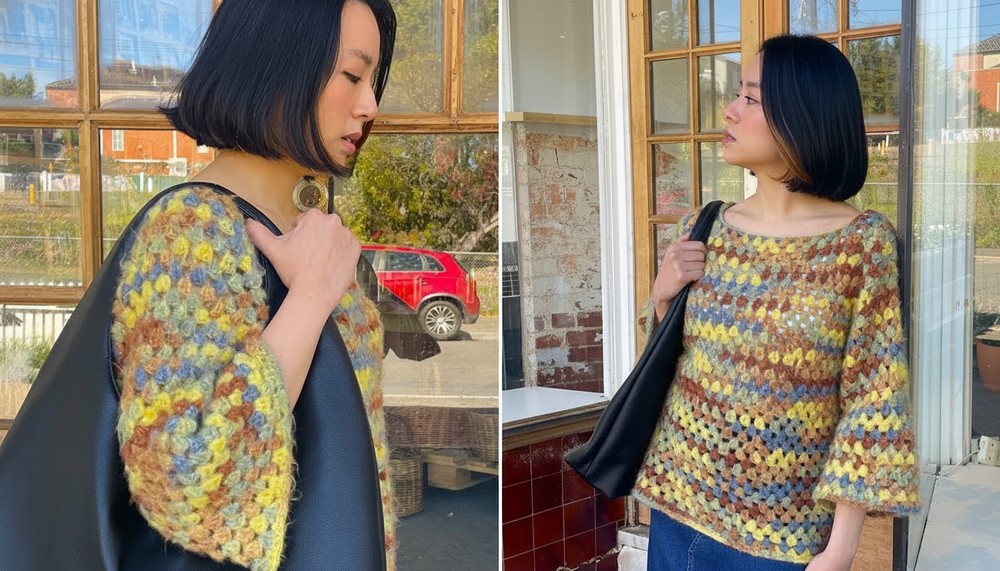
Detailed Crochet Pattern: Granny Stitch Sweater
Finished Size
- Adjustable: The number of foundation chains and shaping can be adjusted to match individual preferences.
Materials Required
- Yarn:
- Medium-weight yarn is recommended for a lightweight yet cozy sweater (approx. 400g, depending on size).
- Choose animal fibers like wool for stretch and blocking flexibility or acrylic for durability.
- Crochet Hook:
- 5 mm hook (if using medium-weight yarn). Adjust hook size according to your yarn's recommended gauge.
- Stitch Markers:
- Necessary to mark increase points in the yoke and sleeve splits.
- Scissors:
- For cutting your yarn.
- Tapestry Needle:
- To weave in loose ends securely.
Special Techniques
- Slip Knot:
- A foundational knot that begins the project.
- Chain Stitch (ch):
- Used for the foundation chain and cluster spacings.
- Single Crochet (sc):
- Creates the neckline and is used for finishing edges.
- Double Crochet Cluster:
- A decorative stitch consisting of three double crochets worked in the same space, separated by chain stitches.
- Raglan Increases:
- Methodically adds stitches at four marked points to create a smooth yoke and sleeves.
Pattern Instructions
Step 1: Creating the Foundation Chain
- Start with a slip knot and leave a 15 cm (6 inches) tail.
- Chain a multiple of three depending on your desired neckline size (e.g., 120 chains for an oversized neckline).
- Use stitch markers at intervals to keep track of chain count.
- Join into a Round:
- Ensure the chain isn't twisted.
- Insert your hook into the third loop of the first chain (for a stretchier neckline, though you can opt for top loops).
- Slip stitch to close the round.

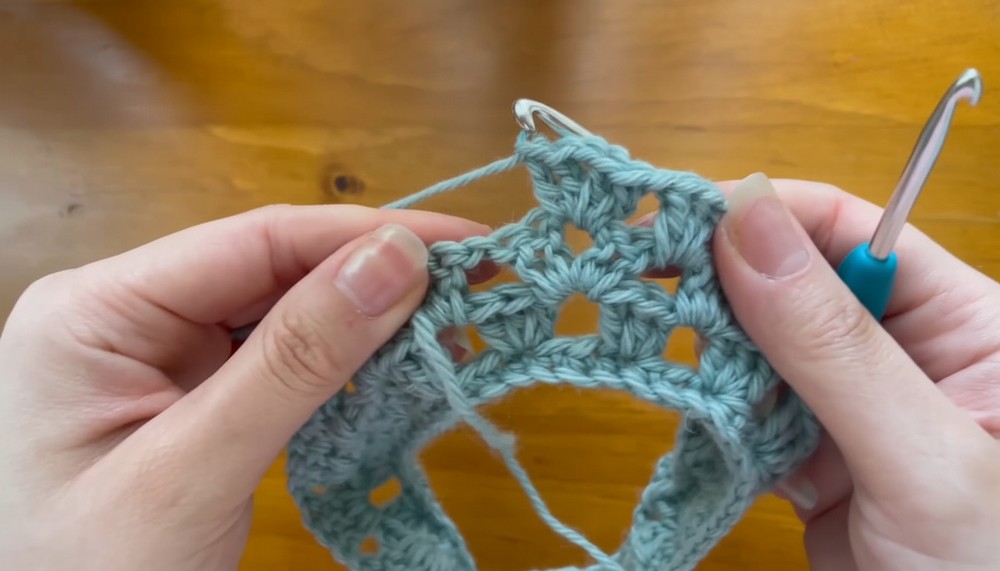
Step 2: Single Crochet Neckline
- Chain 1 and work a single crochet (sc) into the base of the same chain.
- Continue working single crochet stitches into the third loop of every chain in the round.
- Use a stitch marker to mark the first single crochet for reference when joining the round.
- At the end of the round, slip stitch into the first single crochet and ensure the chain isn't twisted.
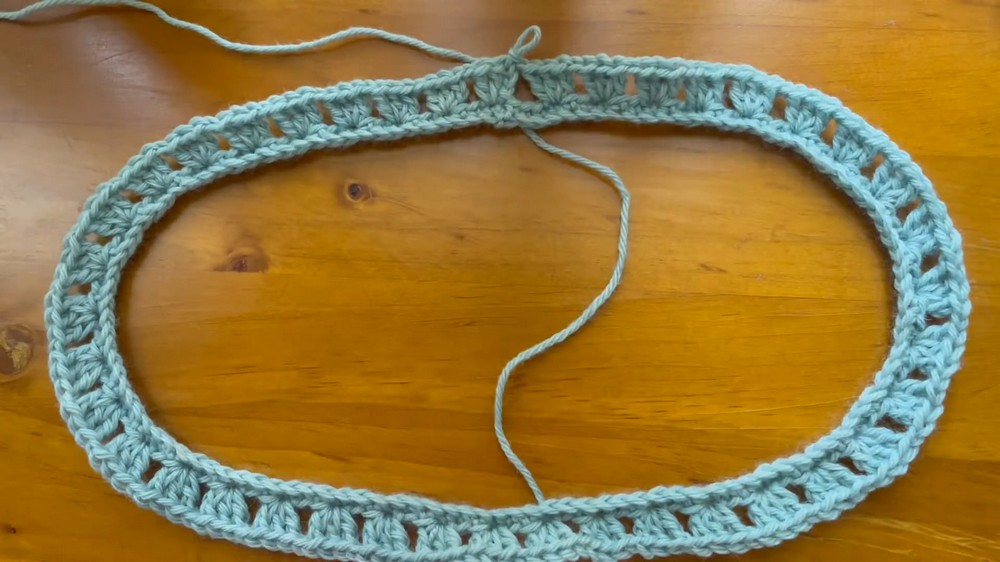
Step 3: Starting the Granny Stitch Yoke
- Round 1:
- Chain 3 (counts as a double crochet) at the start of the round.
- Work 2 double crochet stitches into the base of the same stitch.
- Chain 1, skip two stitches, and work another double crochet cluster (3 dc in one stitch, separated by 1 chain).
- Repeat the cluster pattern until the round is complete.
- Slip stitch into the third chain of the starting chain to close the round.
- Raglan Increases:
- To shape the yoke, increase at four points in a rectangle pattern.
- Use stitch markers to designate increase points, with 12 clusters on the wider edges (front and back) and 8 clusters on the shorter edges (sleeves).
Step 4: Shaping the Yoke
- Increase Points:
- At each marked chain space, work:
- 2 double crochet, chain 1, 2 double crochet (creates a "V" cluster).
- Continue this increase method on each round at the four marked points.
- At each marked chain space, work:
- Try the Yoke:
- As the yoke grows, try it on to ensure that it reaches close to the armpits.
- For reference, the yoke usually requires 9 rounds to fit most adult sizes.

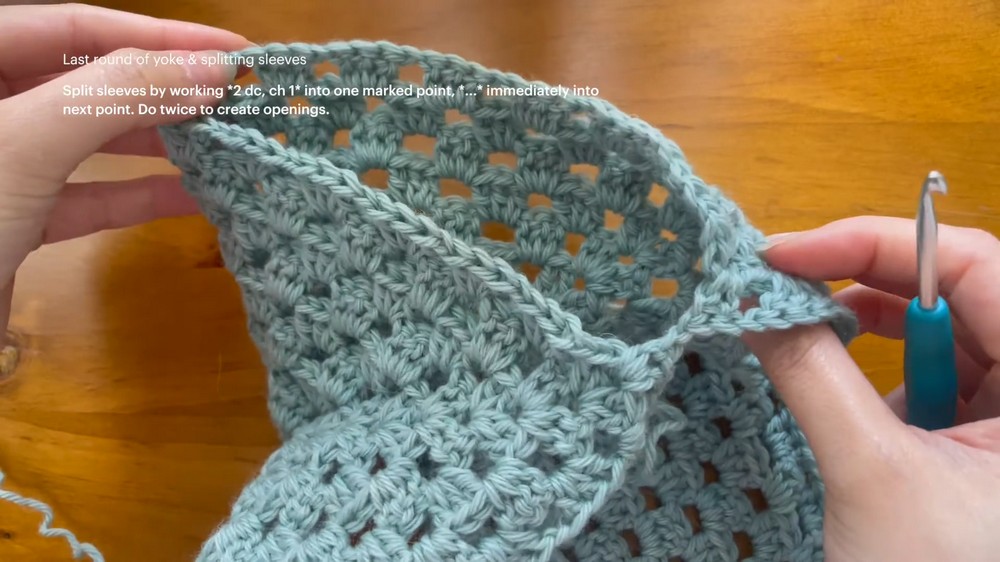
Step 5: Splitting the Sleeves
- Once the yoke is long enough to reach the armpits:
- Begin the next round as usual, working clusters until you reach an increase point.
- Joining the Sleeves:
- Remove the stitch marker at the increase point, work 2 double crochet and chain 1, then immediately work the same pattern into the next increase point without continuing down the sleeve edge.
- Repeat for the other sleeve opening.
- Continue working the double crochet clusters in the body, skipping over the sleeve openings.
Step 6: Crocheting the Body
- Work rounds of double crochet clusters, growing the body evenly.
- Optional Split Hem:
- If you wish to include a hem split, add a stitch marker midway between the front and back of the garment.
- Work rows instead of rounds starting from this midpoint on both sides to create the split hem.
- Continue until you reach your desired body length. For reference, you can work approximately 30 rounds for a standard sweater body length.
Step 7: Sleeves
- Join yarn near the armpit for less visible seams.
- Work double crochet clusters in rounds until the sleeves reach your desired length. For example, 28 rounds for long sleeves.
- Finishing:
- For edges, work a single crochet row to create a neat trim.

Step 8: Finishing Touches
- Work single crochet trim along all openings (neckline, hem, and sleeves).
- Weave in any loose ends using a tapestry needle.
- Steam Block: Lightly block the sweater to relax the fibers and enhance shape.

Suggestions and Customizations
- Color Variations: Use multicolored yarn or alternate colors for the clusters to create bold stripes.
- Fit Adjustments:
- For oversized designs, increase the yoke rounds and foundation chain.
- For a cropped fit, reduce body and sleeve rounds.
- Split Hem: Makes the sweater trendy and provides ease of movement.
Final Words and Maintenance Tips
Your Granny Stitch Sweater is now complete! This timeless design blends comfort and style, allowing endless customization. Wear it layered over essential garments or as an accent piece for cooler days.
Maintenance Tips:
- Animal Fiber Sweater: Hand wash in lukewarm water with a wool-safe detergent and lay flat to dry.
- Acrylic Fiber Sweater: Machine wash on a gentle cycle and tumble dry on low heat.