
Crochet Mini Straw Bag Free Pattern for Unique Gifts
Stitch a charming Crochet Mini Straw Bag Pattern with ease and style, perfect for holding essentials and showcasing your unique creative flair effortlessly.
There's something undeniably charming about crocheting your own accessories, and a delightful example is a crochet mini straw bag pattern. Designed to resemble the rustic elegance of traditional woven straw bags, this pattern uses lightweight yarn and clever crochet techniques to achieve a stylish, textured look. A crochet mini straw bag is not only a versatile accessory for casual outings or quick errands but also makes a great gift for fashion-forward friends.
Crochet Mini Straw Bag Pattern to Elevate Your Summer Look

The petite size is perfect for carrying essentials like keys, a phone, or even some lip balm, while the fun creative process allows you to experiment with colors, handles, and embellishments like tassels or beads. What makes this project especially enjoyable is its simplicity, perfect for beginners while still offering room for customization to keep seasoned crocheters intrigued.
Plus, unlike actual straw, your crocheted version is soft, durable, and easy to wash, making it just as practical as it is pretty. Whether you're creating one for yourself or as a fun, handmade gift, this project is sure to bring heaps of satisfaction and style.
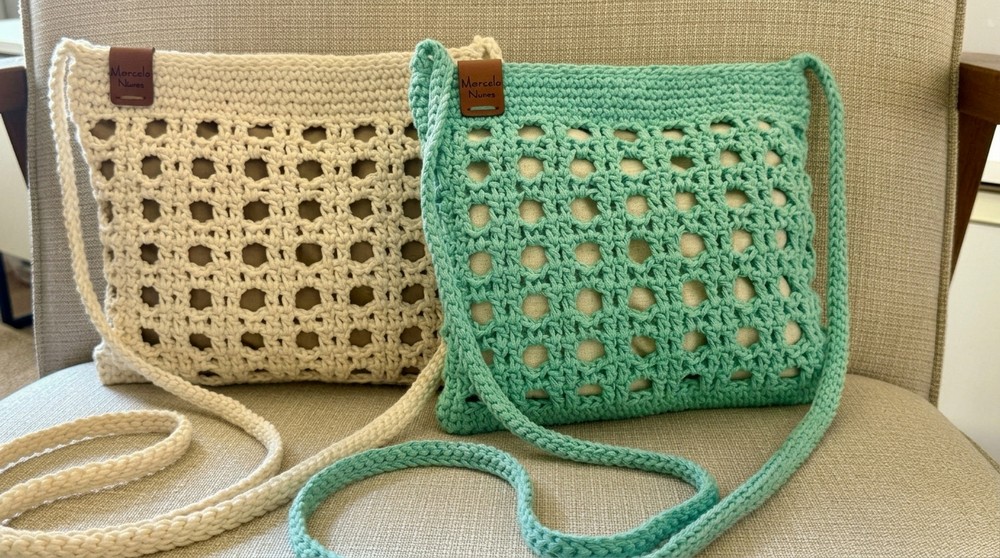
Mini Straw-Effect Crochet Bag by Marcelo Nunes
Materials Needed
- Yarn: Euromosoft yarn, Size 6, "Verde Água Claro" (or any size 6 straw-effect yarn), approx. 140g
- Crochet Hook: 3.5 mm aluminum crochet hook
- Notions:
- Yarn needle for weaving in ends
- Stitch markers
- Scissors
- Magnetic button or snap for closure
- Optional: Matching fabric for lining, sewing thread & hand-sewing needle
- Optional: Fabric glue (for finishing ends)
- Optional: Personalized label or tag
Finished Dimensions
- Approx. 22 cm wide × 21 cm high

Pattern Notes & Special Techniques
- Working on the "wrong side of the chain": For the initial row, insert the hook into the back bump of the foundation chain, resulting in a neat, professional base.
- Turning the base into rounds: After working along one side of the chain, you'll work the second side, forming an oval base that grows upwards without seams.
- Blocks and Chains: Main body is worked in a 2-dc block/chain mesh pattern, alternating with rows of single crochet.
- Handles: Formed as a long crocheted chain and reinforced with slip stitches for strength.
- Lining & finishing: Lining instructions are included for a professional result.
Step-By-Step Pattern Instructions
1. Foundation Chain
- Determine Bag Width: Decide the desired width of your bag. The pattern is worked in multiples of 4 chains + 3.
- For a bag of approx. 22 cm, chain 35 (4 x 8 = 32 + 3 = 35).
- Avoid pulling the starting chain too tight.
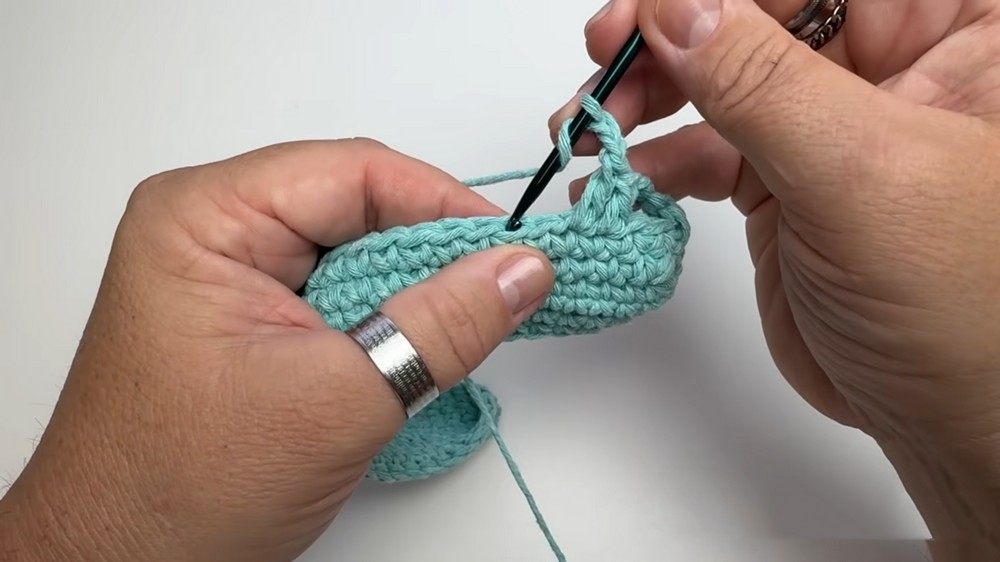
2. First Single Crochet Round (Bag Base)
- Skip the first chain from the hook.
- Begin in the second ch from the hook; working into the back bump of the chain, sc in each chain up to the second-to-last chain.
(Use a marker to track the first sc.) - In the last ch, work 2 sc in the same chain (creates the curve for the bag base).
- Turn your work to crochet along the other side of the chains.
- Working along the opposite side, sc in each chain, tucking the starting yarn tail inside as you go.
- When you reach the last/first chain, again work 2 sc in the same stitch (as you did for the previous curve).
- Place a stitch marker in this first stitch to keep track of each round's beginning.
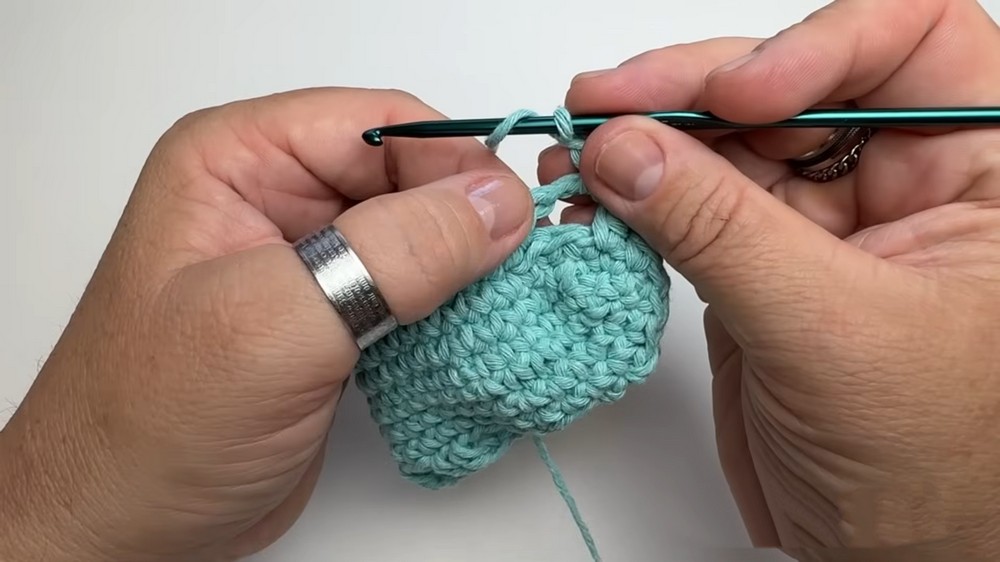
3. Building the Base and Sides
- Continue working rounds of single crochet (sc in each st, including the increasing points at each curve).
- Each round, at the curved ends, always work 2 sc in the same stitch to maintain the oval shape for a few rounds until it naturally starts to become a cylinder.
- After a few rounds (usually 2-3) without further increases, you will have the base and can build the body upwards by working in a spiral-with no increases.
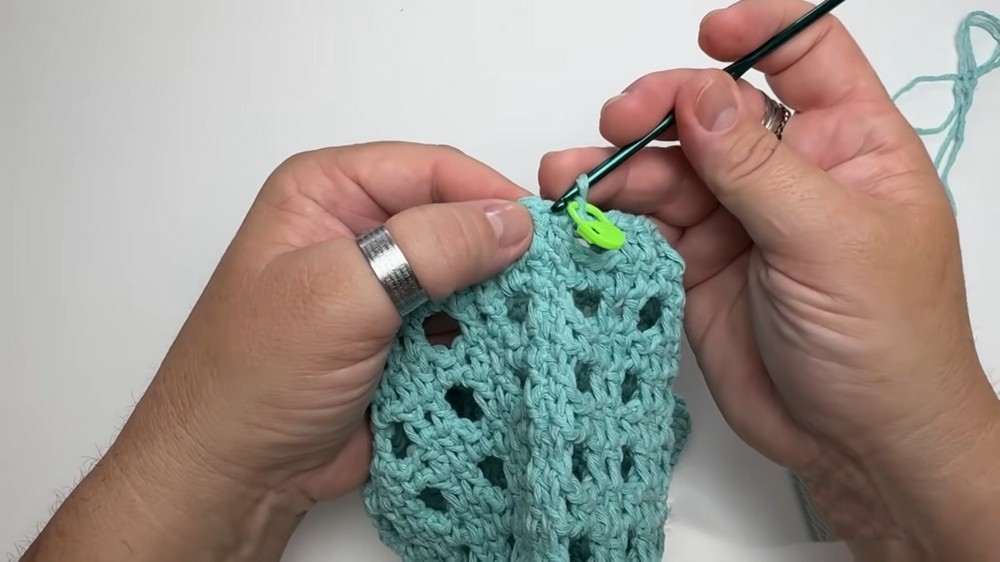
4. Establishing the Mesh Pattern (Bag Body)
Set Up for Blocks
- At the end of the final single crochet round, join with a slip stitch to the back loop only of the next stitch.
- Start the mesh pattern:
- In the same st (back loop only), work 1 sc.
- Ch 1 (acts as the first "block" separator).
- In next two sts, dc in each - forming a block of 2 dc.
- Ch 2, skip 2 sts, then dc in next 2 sts.
- Repeat ch2, skip 2, 1 dc in next 2 sts around.
- Complete round, join with a slip stitch to top of beginning chain (worked into the back bump for consistency).
Mesh Pattern Continued
- Alternate Rows:
- Next round:
- Turn to the right side of the chain, sc in the chain space.
- Ch 1.
- Dc in each st of dc block, using the "centered double crochet" technique (insert your hook under both legs of the "V" under the dc for a pleasing texture).
- Between blocks: Ch 1, sc in ch-space, ch 1, 1 dc in each dc, repeat.
- Next round:
- Continue alternating rounds:
- One round with blocks of (2 dc, ch 2),
- Next round with: (1 sc in ch-space, ch 1, 1 dc in each dc block),
- For desired height.
- Repeat rows until you have 13 rounds of mesh pattern (or until desired height is reached).
5. Upper Band in Single Crochet
- After completing final mesh round, work 1 round of single crochet:
- Where there's a dc, work sc in both loops; where there's a chain, work sc into back loop of chain.
- Place a marker as you continue, so you always know the round start.
- Work 5 rounds total of single crochet (worked in continuous spiral, moving your marker at the start of each round).

6. Reinforced Edge/Handle Foundation
- At the end of the 5th round, work 1 slip stitch into the back loop only at each stitch around (1 slip stitch per stitch, move your marker to track the beginning).
- Tip: Use a larger hook (e.g., 4mm) if the slip stitch round starts to tighten the edge.
7. Attach and Crochet the Handle
- After completing slip stitch round:
- At the edge, make 200 chains (for one long crossbody or shoulder strap - adjust as desired for fit).
- At the other edge (about 31 stitches away from the first, or wherever evenly opposite), slip stitch to attach the other end of the chain to the bag edge.
- To reinforce, work a slip stitch into each chain across the entire handle back to the starting point.
- Attach securely into two adjacent stitches at each base.
- Repeat this process to make the handle double thickness by adding another row of slip stitches along the chain.
- Finishing ends: Weave the ends inside the stitches, split the tail into two, tie securely with knots, and add a drop of glue for extra security.
8. Finishing - Optional Lining
- Cut a rectangle of fabric approximately the width and height of the bag, plus seam allowance.
- Fold fabric right sides together, sew the sides with a sewing machine or by hand, and leave an opening at the top.
- Fold the top edge down to form a finished top (about two fingers' width).
- Insert lining into the bag, matching the folds with the top edge.
- Hand sew the lining to the inside of the crochet bag, using a matching thread or yarn, catching only the lining and a discreet "horizontal" loop on the bag for invisibility.
- Secure ends with knots, bury tails.
9. Closure, Labels, & Final Touches
- Sew in a magnetic button or snap at the top center as desired.
- Sew in a personalized tag or label.
- Steam block lightly if needed for shape, but avoid direct contact if using synthetic straw yarn.

Suggestions & Adjustments
- Adjust Size: Foundation chain is a multiple of 4 + 3. For a clutch, make it smaller; for a tote, make it larger.
- Strap Variations: Adjust the length and thickness of handle. For a shoulder or handbag, use fewer chains.
- Decorative Accents: Add beads, tassels, or charms for personalization.
- Yarn Choices: Try "paper yarn" or raffia for a true straw effect.
- Color Blocking: Change color at any round for stripes.
- Closure Types: Use button, magnetic snap, or zipper as preferred.
Final Words & Tips
- Use a stitch marker faithfully to keep track of rounds and stitch count, especially as you work in a spiral.
- Insert your hook into the "center" of double crochets for a neater look and a more stable structure.
- Don't tighten slip stitches too much at the edges-switch to a larger hook if needed.
- Blocking: Lightly block finished item for best appearance, especially for lining.
- If using a lining, ensure it fits snugly but doesn't pull the bag out of shape.
- For longevity, reinforce handle joins securely on the inside.
- Always weave in and secure ends thoroughly, using glue if needed for synthetic yarns.
