
Crochet Pocket Shawl Free Pattern with Waffle Stitch Design
Add charm to your outfits with the Free Crochet Pocket Shawl Pattern, offering a cozy design with deep pockets and a soft drape for everyday comfort.
This shawl is a perfect mix of cozy warmth and stylish texture, making it a must-have for cooler days. The pattern creates a beautiful waffle stitch design that adds depth and texture, making it both visually appealing and soft to the touch. With clear and simple instructions, the Free Crochet Pocket Shawl pattern uses only basic crochet techniques like half-double crochet, double crochet, and single crochet, making it ideal for beginners and seasoned crocheters alike.
Cozy Free Crochet Pocket Shawl Pattern with Tassels

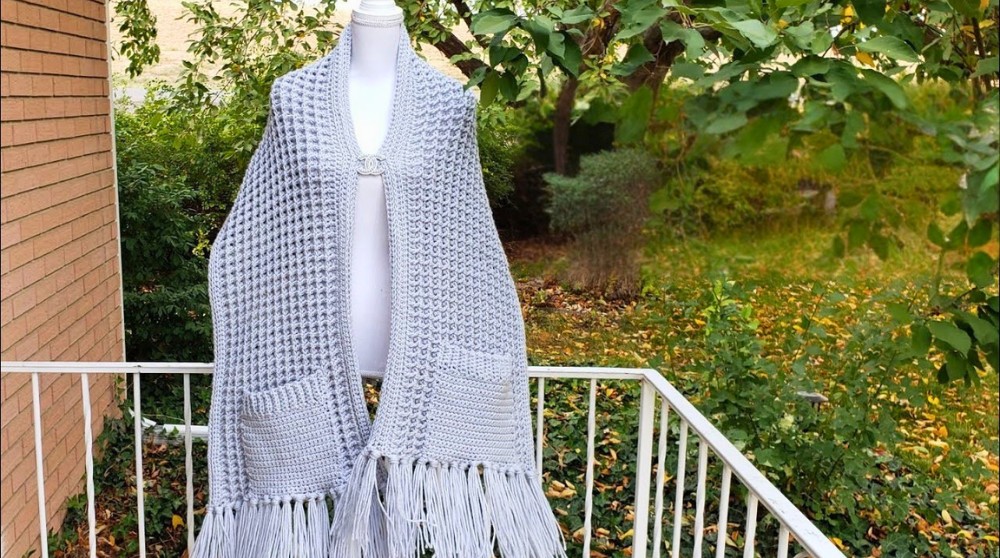
This pocket shawl works up quickly and has a practical design that includes spacious, ribbed pockets to keep your hands warm or hold essentials like your phone. The shawl is made with medium-weight yarn, and its generous size can be easily customized to suit individual preferences. Thanks to its lovely drape and neat tassels at the ends, it doubles as a statement accessory for casual outings or layering on chilly evenings.
Not only is it incredibly functional, but the refined pattern ensures it is elegant enough to complement any wardrobe. Whether you're looking to keep warm or add a stylish layer to your outfit, this pattern makes it easy to create something uniquely beautiful and practical.

Pocket Waffle Stitch Shawl - Written Pattern
1. Materials
- Yarn:
- Caron One Pound (by Yarnspirations) or similar worsted weight (category 4) yarn
- Color used in video: Fig
- Yardage: You will need more than one skein. Each skein is approx. 812 yards; the designer uses a bit over one skein and part of a second skein because the waffle stitch is yarn‑hungry.
- Hook:
- 6.0 mm (Size J) crochet hook
- Notions:
- Yarn needle (for weaving in ends and sewing pockets)
- Scissors
- Stitch markers or clips (for positioning pockets)
- A book or small board to help wrap yarn for tassels (optional)
2. Abbreviations (US Terms)
- ch = chain
- st(s) = stitch(es)
- sc = single crochet
- hdc = half double crochet
- dc = double crochet
- fpdc = front post double crochet
- sl st = slip stitch
- BLO = back loop only
- RS = right side
- WS = wrong side
3. Special Techniques
3.1. Half Double Crochet (hdc)
- Yarn over.
- Insert hook into stitch.
- Yarn over, pull up a loop (3 loops on hook).
- Yarn over, pull through all 3 loops.

3.2. Double Crochet (dc)
- Yarn over.
- Insert hook into stitch.
- Yarn over, pull up a loop (3 loops on hook).
- Yarn over, pull through 2 loops (2 loops on hook).
- Yarn over, pull through last 2 loops.

3.3. Front Post Double Crochet (fpdc)
Used to create the waffle texture.
- Yarn over.
- Insert your hook from front to back to front around the post of the dc from the previous row (instead of into the top "V").
- Yarn over, pull up a loop (3 loops on hook).
- Yarn over, pull through 2 loops.
- Yarn over, pull through last 2 loops.
3.4. Working into the Back Bump of the Foundation Chain (optional but recommended)
This is done in the first row of hdc to give a neat edge.
- Look at the underside of the foundation chain.
- You will see a ridge or small "bump" on the back of each chain.
- Insert your hook into that bump instead of the usual top loop(s).
- Work your hdc there.
This makes both long edges of the shawl display the "V" nicely.
3.5. Back Loop Only (BLO) Single Crochet
Used for the ribbed top of the pockets.
- Insert your hook only under the back loop (the loop farther from you) of the stitch.
- Complete a regular single crochet.
4. Shawl Instructions
4.1. Overall Construction
The shawl is worked lengthwise:
- Start with five rows of hdc at one end.
- Work one row of dc, then
- Work 14 rows of waffle stitch (dc + fpdc alternation) for the body.
- Finish with five rows of hdc on the other end to mirror the beginning.
- Pockets are made separately and sewn on.
- Tassels are added along each short end (optional).
The designer uses a starting chain of 200, plus one extra chain to begin.
4.2. Foundation Chain
- Make a slip knot.
- Ch 200, then ch 1 more for a turning chain.
- Total chains: 201.
- The designer notes that the length can be adjusted using a multiple of 2 + 1 (number of chains should be even, plus one extra).
4.3. Rows 1-5: Half Double Crochet Section (First End)
Row 1 (hdc across):
- Working into the back bump of the chain:
- Yarn over, insert hook into the 2nd chain from the hook.
- Work 1 hdc.
- Continue working 1 hdc in each chain across the row.
- You should have 200 hdc at the end of the row.
- Turn.
Row 2-5:
- Ch 1, turn.
- Work 1 hdc in each st across (200 hdc).
- Repeat until you have 5 rows of hdc total.
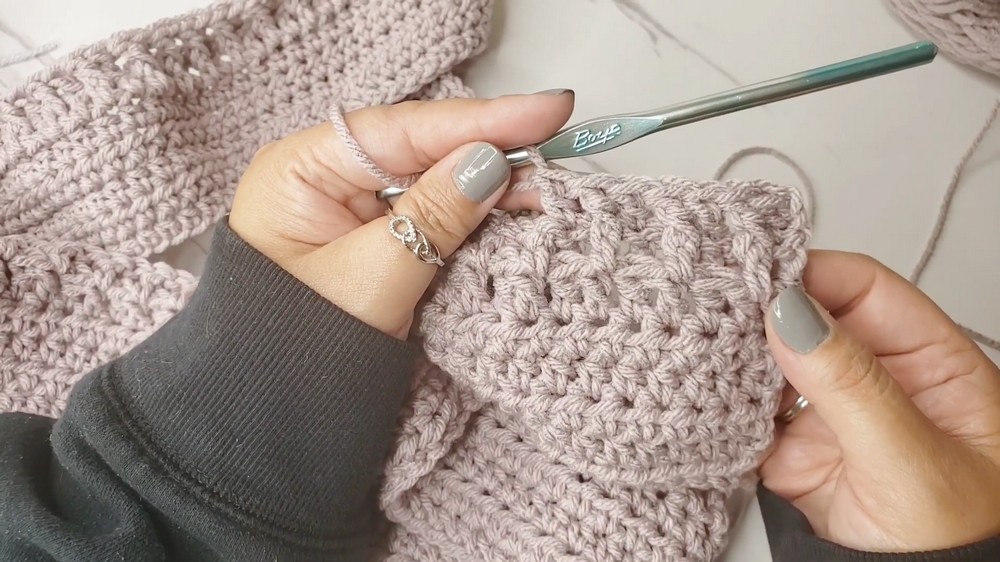
At the end of Row 5, you have a neat half-double-crochet band.
4.4. Row 6: First Double Crochet Row Before Waffle Stitch
Row 6 (dc across):
- Ch 2, turn.
- The ch‑2 does not count as a stitch.
- Work 1 dc in the first stitch and in each stitch across the row.
- You should have 200 dc.
- Turn.
This row creates the first row of posts for the waffle stitch.
4.5. Waffle Stitch Body
The waffle pattern, as used in the video, is:
- One regular dc in the top of a stitch.
- Next stitch: one fpdc around the post.
- Alternate dc, fpdc across the row, always starting with a regular dc after turning.
- Each subsequent row mimics the previous row: regular dc where there was a regular dc, fpdc where there was a fpdc.
Row 7: First Waffle Stitch Row
Row 7:
- Ch 2, turn.
- Dc in the first stitch.
- Next stitch: fpdc around the post of the dc from previous row.
- Next stitch: regular dc in the top of the stitch.
- Repeat: [1 dc in top of next st, 1 fpdc around next post] all the way across.
- You will end with a regular dc in the second‑to‑last stitch and a fpdc in the last dc post.
- Turn.
You now see a beginning of a raised, textured pattern.
Row 8 and Following Waffle Rows:
Row 8:
- Ch 2, turn.
- Dc in the first stitch.
- For each stitch across the row:
- Where the previous row had a regular dc, work a regular dc into the top of that stitch.
- Where the previous row had a fpdc, work a fpdc around that same post.
- Alternate in this manner (dc, fpdc, dc, fpdc…) across.
- End the row as in Row 7 (a regular dc toward the end and a fpdc as the final stitch).
- Turn.
The designer continues like this for the center "waffle" section.
Number of Waffle Stitch Rows
- The designer works a total of 14 waffle stitch rows.
- She mentions:
- At one point she has 23 total shawl rows = about 12 waffle rows.
- She then works 2 more waffle rows to reach 14 waffle stitch rows total.
So:
- Row 6 = dc row.
- Rows 7-20 roughly become the 14 rows of waffle stitch (depending on how you count).
- The important part is: work waffle stitch rows until your waffle section measures about 11-12 inches (as she describes "about 11 inches" wide of waffle texture, plus ~2 hdc bands on either side give a balanced look).
You may adjust this number to your taste, but to follow her version:
Work 14 rows in the dc/fpdc waffle pattern.

4.6. Final Half Double Crochet Section (Other End)
Immediately after finishing the last waffle stitch row:
Next Row (hdc across):
- Ch 1, turn.
- Work 1 hdc in each stitch across (200 hdc).
- Turn.
Then:
Work a total of 5 rows of hdc, exactly mirroring the beginning:
- Repeat: Ch 1, turn, 1 hdc in each st across (200 hdc)
- Continue until you have 5 rows of hdc on this end as well.
At the end of the final hdc row:
- Cut the yarn.
- Fasten off (pull tail through the last loop and tighten).
The main shawl is now complete and ready for pockets and tassels.
5. Pocket Pattern
Each pocket consists of:
- A ribbed "brim" at the top
- A plain single crochet body below it
You will make two identical pockets.
5.1. Pocket Brim (Ribbed Top)
Using the same 6.0 mm hook and same yarn:
- Make a slip knot.
- Ch 8.
Row 1:
- Sc in the 2nd ch from hook.
- Sc in each chain across.
- You should have 7 sc.
- Ch 1, turn.
Row 2 (and all brim rows):
- Sc in the first stitch through both loops.
- Sc in BLO of each of the next 5 stitches.
- Sc in last stitch through both loops.
- Ch 1, turn.

Working through both loops at the edges makes them cleaner and firmer, while BLO in the middle 5 stitches creates ribbing.
Repeat Row 2 until you have 24 rows in total.
- The ribbing will be running horizontally across the top of the pocket.
- The designer counts approximately: 2, 4, 6, … up to 24 rows.
At the end of Row 24:
- Do not cut the yarn.
- You will now begin working down the side edge of this ribbing to create the pocket body.
5.2. Pocket Body (Single Crochet Rectangle)
With the brim facing you (ridges running horizontal), you will now rotate the piece and work along one long side.
Foundation row along the side:
- Ch 1 (for turning).
- Turn your work so you can work along the long edge (side of the ribbing rows).
- Work 24 sc evenly along this side.
- Each "rib" row gives a place to insert a sc, so you will place about 1 sc per row, ending with 24 sc.
Now you have a row of 24 sc attached to the brim.
Pocket Body Rows:
You will now build up the pocket with rows of sc:
- Ch 1, turn.
- Sc in each of the 24 stitches across.
- Repeat for a total of 12 rows of sc (including the first one you just worked along the side).
Counting:
- Row 1 of body: the first 24 sc worked along the side edge.
- Then work 11 more rows of 24 sc each (so you have 12 rows total of single crochet for the body).
At the end of Row 12 of the pocket body:
- Fasten off: cut yarn, pull tail through last loop.
- Weave in the ends for a neat finish.
Repeat the entire pocket process above to create the second pocket.
6. Attaching the Pockets to the Shawl
- Lay the shawl flat, RS facing up.
- Choose one end of the shawl. This will be your "bottom" for the first pocket.
- Positioning:
- The designer "eyeballs" the placement, but gives these guides:
- She leaves approximately two waffle columns (two waffle "squares") from each side where the pocket is placed.
- The pocket sits at the end of the shawl, oriented so that the ribbed brim is at the top of the pocket opening.
- Use clips or stitch markers at the four corners of the pocket to hold it in place.
- The designer "eyeballs" the placement, but gives these guides:
- Sewing:
- Cut a long length of yarn.
- Thread your yarn needle.
- Starting at one corner of the pocket, sew around the two sides and bottom of the pocket, leaving the top edge open.
- Use any neat, secure sewing method you prefer (e.g., whip stitch or mattress stitch).
- Make sure you are sewing only through the shawl's fabric and pocket edge, not through the opening.
- When you reach the starting point, secure the yarn with a knot and weave in the tail.
- Repeat on the other end of the shawl for the second pocket, mirroring the placement so that both pockets are aligned symmetrically.

When finished, you should have two pockets, one on each end of the shawl.
7. Optional Tassels
Tassels are added along the short ends of the shawl.
7.1. Making Tassel Strands
- Take a book or any item that you can wrap yarn around.
- Wrap yarn around the book multiple times.
- Cut along one edge to create multiple strands of equal length.
The designer mentions:
- In a previous project she used 6 strands per tassel, but for this shawl she uses 5 strands per tassel because the yarn is thick.
7.2. Attaching Tassels
- Gather 5 strands together, align them, and fold them in half.
- Decide the spacing along the width of the shawl's short edge.
- In the video, she ends up using 18 tassels straight across one end.
- You can mimic her spacing or adjust to your taste.
- To attach a tassel:
- Insert your crochet hook into the edge stitch at the bottom row where you want the tassel.
- Place the folded middle of the yarn bundle over the hook.
- Pull the folded loop partially through to the front.
- Reach through this loop, grab the yarn ends, and pull them through to form a secure tassel knot.
- Repeat across the entire edge.
- When all tassels are attached, comb or straighten them with your fingers, then use sharp scissors to trim them into an even line.

Repeat for the other short end if desired.
8. Finishing
- Weave in all ends with a yarn needle:
- At the beginning and end of the shawl
- Around pocket seams
- Near tassel attachment points (if any tails remain)
- Block lightly if desired:
- Because this is acrylic yarn, do not use high heat.
- You may:
- Lightly steam at a distance, or
- Gently shape and smooth by hand and let it lie flat.
- Waffle stitch has a natural texture, so heavy blocking is not essential.
- Inspect pockets to ensure they are firmly attached and aligned.
- Check that tassels are even and secure.
The shawl is now ready to wear.

9. Suggestions and Tips
9.1. Pattern Adjustments
- Length:
- The starting chain is 200 (plus 1).
- To make the shawl shorter or longer, adjust the starting chain using a multiple of 2 + 1.
- Remember that adding length will require more yarn.
- Width:
- The waffle section is approximately 11-12 inches wide in the original.
- For a wider shawl, add more rows of waffle stitch before ending with the final hdc rows.
- Maintain symmetry by keeping the five hdc rows at each end.
- Pockets:
- You can adjust pocket size by changing:
- Initial chain 8 (for height of brim)
- Number of brim rows (24)
- Number of sc rows in the body (12)
- Larger pockets suit larger shawls; smaller pockets for petite versions.
- You can adjust pocket size by changing:
- Tassels:
- Optional; omit them for a simpler, cleaner edge.
- You may also add a border instead of tassels (e.g., single crochet edging around the entire shawl).
9.2. Working the Waffle Stitch
- The key is consistency:
- Regular dc into the top of regular dc.
- fpdc around previous fpdc posts.
- If you lose track, look at the texture:
- Raised posts = where fpdc should be.
- Recessed stitches = where regular dc should be.
9.3. Yarn Usage
- Waffle stitch is dense and uses a lot of yarn.
- Plan on more than 812 yards; the designer uses a second skein.
- If you are short on yarn:
- Decrease the number of waffle rows, or
- Use a different yarn for pockets and tassels.
9.4. Care and Maintenance
- This shawl is made from acrylic (Caron One Pound), so:
- Machine washable on gentle cycle in cool water, typically.
- Lay flat to dry if you want to preserve shape and texture.
- Avoid ironing directly; if needed, steam lightly at a distance.
- To keep it looking fresh:
- Store folded rather than hung (to avoid stretching).
- Occasionally fluff tassels and trim ends if they fray or become uneven.
10. Final Words
This Pocket Waffle Stitch Shawl combines simplicity and texture:
- The half double crochet bands give clean, structured edges.
- The waffle stitch center adds a rich, cozy texture and visual interest.
- The pockets provide both warmth and practicality, ideal for hands, phones, or small items.
- Optional tassels offer a decorative, finished look.