
Flower Hair-tie Crochet Pattern To Upgrade Hair Accessories
Boost your accessory collection with this Crochet Flower Hair-tie Pattern, offering a simple guide to create beautiful floral hair ties for any occasion.
Add charm to your style with this delightful crochet project that creates a soft and elegant floral accessory for your hair. This pattern for crochet flower hair ties is perfect for bringing a touch of beauty to any look, whether it's for special events or everyday wear. The tutorial showcases a simple technique to create gorgeous crochet flowers that wrap around the hair ties gracefully. With customizable colors and intricate designs, this project ensures a unique and lovely addition to your hairstyle.
Free Crochet Flower Hair-tie Pattern

The finished piece is lightweight and comfortable, featuring delicate textures that catch the eye effortlessly. Whether used to secure a ponytail or gifted to someone dear, this handmade creation stands out due to its enchanting look. You can unleash your creativity by making multiple designs to match every outfit, offering endless versatility.
From beginners taking their first steps in crochet to experienced crocheters, this pattern promises an enjoyable and rewarding process. This crochet flowers add personality, sophistication, and a handmade touch to your accessories while highlighting your creative flair. Step into this enjoyable crochet to create a practical yet stylish masterpiece that will add a bright and cheerful vibe to your everyday or event-ready look.
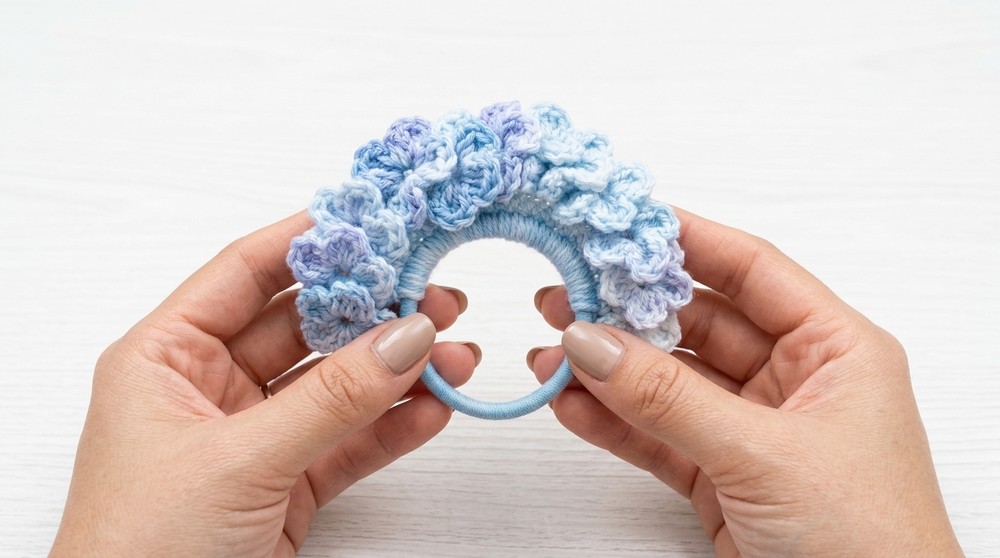
Crochet Flower Ponytail: Detailed Step-by-Step Pattern
Finished Size
- The size of the final project will vary depending on the thickness of your yarn and number of flowers created. However, the flowers will generally measure 1 to 1.5 inches across.
- If made on a standard elastic ponytail holder, the project will fit most hair bundled sizes.

Materials Needed
- Yarn: Acrylic yarn in a color of your choice. Lightweight (3) or medium (4) yarn is recommended for best results.
- Hook Size: 3 mm crochet hook.
- Elastic Ponytail Ring: Any standard-size ponytail holder.
- Yarn Needle: To weave in ends and secure stitches.
- Scissors: To snip your yarn when finishing.
Gauge
This project does not require an exact gauge as the goal is to create decorative flowers. However, for reference:
- Gauge Using 3 mm Hook and Medium (4) Yarn: 22 single crochets across = approximately 4 inches.
Abbreviations (US Terms)
- ch: Chain
- sc: Single Crochet
- dc: Double Crochet
- sl st: Slip Stitch
Pattern Instructions
Step 1: Preparation
- Gather all materials.
- Attach the yarn to your elastic ponytail holder by making a slip knot, securing it comfortably around the ponytail holder.
Step 2: Row 1 (Base Single Crochets Around the Ponytail Holder)
- Attach Yarn: Start with a slip knot on your hook around the ponytail holder.
- Single Crochet (sc): Create 23 single crochets evenly spaced around the ponytail ring.
- If you want, you can fully cover the entire ponytail holder with single crochets, but here, we work with 23 sc to partially cover it.
- Slip stitch into the first sc to form a neat base.

Step 3: Row 2 (Reinforcing the Base)
- Chain 1: Chain 1 and turn your work.
- Single Crochet (sc): Work 1 sc in each stitch across the row (23 sc total).
- This reinforces the base and provides a sturdy platform for your flower petals.
- Slip stitch into the first sc of this row, and you are ready to start creating the flower petals.

Step 4: Row 3 (Creating the Flower Petals)
To create the flowers:
- Start the Flower Blooms:
- (a) Chain 5 to begin a new flower.
- (b) Skip the first 3 chains. In the 4th chain from the hook, work:
- 2 double crochets
- Chain 2
- Slip stitch into the same chain to form the first petal.
- Continue Adding Petals (5 Petals Per Flower):
- In the same chain (4th chain), repeat the process:
- 2 double crochets, chain 2, slip stitch.
- Do this 4 more times for a total of 5 petals.
- In the same chain (4th chain), repeat the process:
- Secure the Flower: Once the flower is finished, slip stitch into the next stitch on the ponytail base, skipping the next 2 base stitches.
- This secures the flower to the ponytail holder.
- Repeat Flower Creation: Continue making flowers across the base using the same process:
- Chain 5.
- Create 5 petals following the steps above.
- Secure each flower by skipping 2 stitches and slip stitching into the next.

Step 5: Finalizing the Project
- End with a Flower or Slip Stitch: Once you complete the last flower, chain 1 and break off the yarn, leaving about a 4-6 inch tail.
- Weave in Ends: Using your yarn needle, weave in the tails to secure the ends and tidy up the project.

Tips and Customization Ideas
- Vary the Yarn Colors: Create a vibrant look by using multicolored yarns or alternating flower colors.
- Adjust the Stitch Count: Want fuller flowers? Add one or two more petals per flower by chaining 6 instead of 5 and repeating the steps for additional petals.
- Cover the Entire Ponytail Ring: For a more elaborate design, crochet the flowers all the way around the ponytail holder.
- Add Embellishments: Sew tiny beads or buttons into the center of each flower to add an extra decorative flair. Ensure they are securely attached for safety.
- Experiment With Yarn Weight: Try thinner yarn for delicately smaller flowers or thicker yarn for a bold statement piece.
Special Stitches and Techniques Used
- Slip Stitch for Joining: Keeps the flowers and base secure without adding bulk.
- Working Multiple Petals in One Chain: This technique allows the flower to stay compact and properly shaped.
- Skipping Base Stitches: Helps space the flowers evenly across the project.
Conclusion
Congratulations! You have successfully completed your crochet flower ponytail. This project combines utility and beauty, resulting in a personalized and stylish hair accessory that is both fun and functional. Whether you're gifting it or using it yourself, this crochet ponytail will surely impress.
Important Remarks
- Block the flowers lightly to enhance their shape and appearance, though it's optional.
- Be patient while working on the petals, as their repetitive nature can get tedious. However, the final outcome is worth the effort!
- Keep the flowers consistent for a polished look, or experiment with varying sizes and placements for a more dynamic effect.