
Free Crochet Children's Bag Pattern for Fun Storage Solutions
Hold the charm of creativity with a Crochet Children's Bag Pattern, perfect for crocheting fun, functional, and personalized accessories for little ones.
Creating whimsical accessories for little ones is always an exciting endeavor, and one such project is a crochet children's bag pattern. This charming design allows you to craft a playful yet practical bag tailored to a child's personality-from vibrant colors to fun shapes like animals or flowers. A crochet children's bag isn't just an accessory; it's a treasure trove for carrying toys, snacks, or school essentials in style.
Crochet Children's Bag Pattern for a Touch of Handmade Magic

The compact size and lightweight nature make it ideal for tiny hands, while its handmade aspect adds a personal and heartfelt touch. For those looking to get creative, you can incorporate additional features such as appliqués, button closures, or themed designs inspired by their favorite characters.
What sets this project apart is its ability to spark joy, both for the maker and the child who receives it. Whether you're crocheting for your own child or as a thoughtful gift for birthdays or special occasions, a crochet children's bag pattern lets you combine practicality with delightful artistry in every stitch.

Modern Rectangular Crochet Bag with Bow Detail
Materials Needed
- Yarn:
- Pink nautical (cord) yarn (for bag body, bow, handles)
- White yarn or cord (for decorative edge)
- Crochet Hook:
- 3.5 mm crochet hook (or hook size appropriate for your yarn)
- Notions & Tools:
- Sewing needle (for joining and sewing bow, handles)
- Transparent sewing thread or matching yarn
- Scissors
- Lighter or match (for carefully sealing cord ends, optional for synthetic cord)
- Bag clasp/closure or magnetic snap (either sew-on or attachable with pliers)
- Pliers (if using a non-sew snap)
- Measuring tape
Abbreviations (US Terms)
- ch = chain
- sc = single crochet
- sl st = slip stitch
- st(s) = stitch(es)
- rep = repeat
Step-by-Step Pattern
Bag Base and Body
1. Foundation Chain
- With pink cord/yarn and 3.5 mm hook, ch 28.
- This forms the length of your bag base.
2. Base Row (Single Crochet)
- Begin in second ch from hook, work 1 sc in each ch across. (27 sc)
- Ch 1, turn.
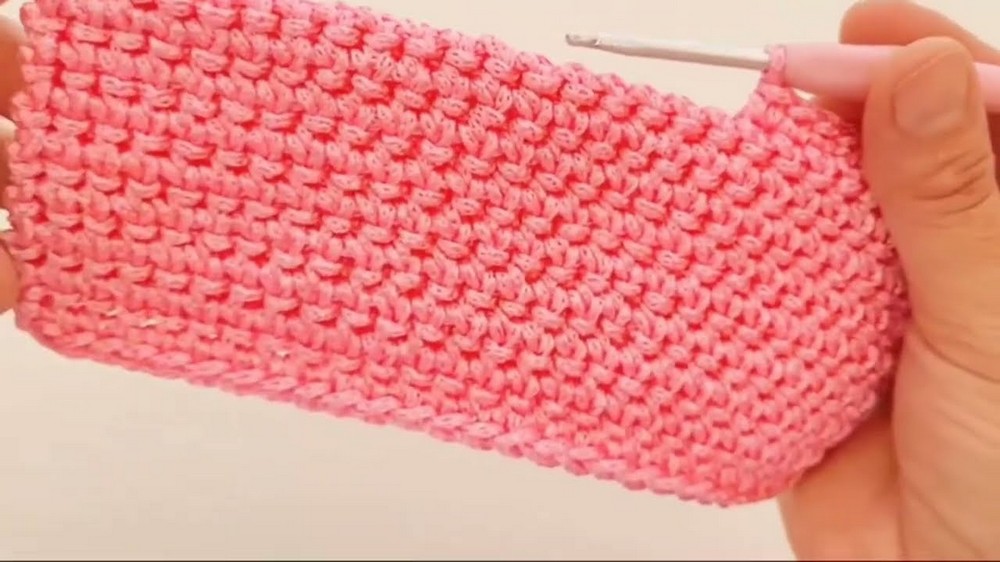
3. Body Rows ("Double" Single Crochet)
- Technique: For a textured effect, you will work sc by inserting your hook under both the top loop of the current row and the bottom "bar" of the previous stitch (the "doubled" low point technique).
- Rows 2-15:
- Insert the hook through both the top and bottom loops/straps of the stitch.
- Work 1 sc in each st across, ch 1, turn.
- Rep this row until you have 15 rows in total.
- At the end of Row 15, fasten off if you wish or continue directly.
4. Turn and Work Around the Perimeter
- With bag body flat in front of you, turn the work to begin working sc around the base of the rectangle, picking up stitches all the way around for the bag's depth.
- When working across the edges, insert the hook only into the front loop of each "edge stitch" for a crisp, defined round.
- Work 1 sc in each stitch across all sides, no increases in corners to maintain flatness.
- Continue until you return to starting point, join with a sl st.

5. Build the Sides in the Round
- Continue in spiral or join after each round:
- Work sc into each st around, but now under both loops.
- Continue around and around with sc, until piece measures about 15 cm high from the base (approximately matching the width of the base).
- Join the last round with a sl st.
6. Fasten Off & Secure Ends
- At proper height, finish with a sl st, cut yarn and weave tail through inside stitches.
- For synthetics, you may carefully melt the end to seal.
Decorative White Edge
- With white yarn (or alternate color), attach to the first round on the outside edge of the bag:
- Work 1 sc in each st around, inserting hook in front loop only for a defined edge.
- Join with sl st, ch 1.
- Rounds 2-7:
- Work 1 sc in each st around, through both loops.
- Complete for 7 rounds total.
- Fasten off, weave in and secure end.

Tip: Fold the white section outward for a decorative "collar."
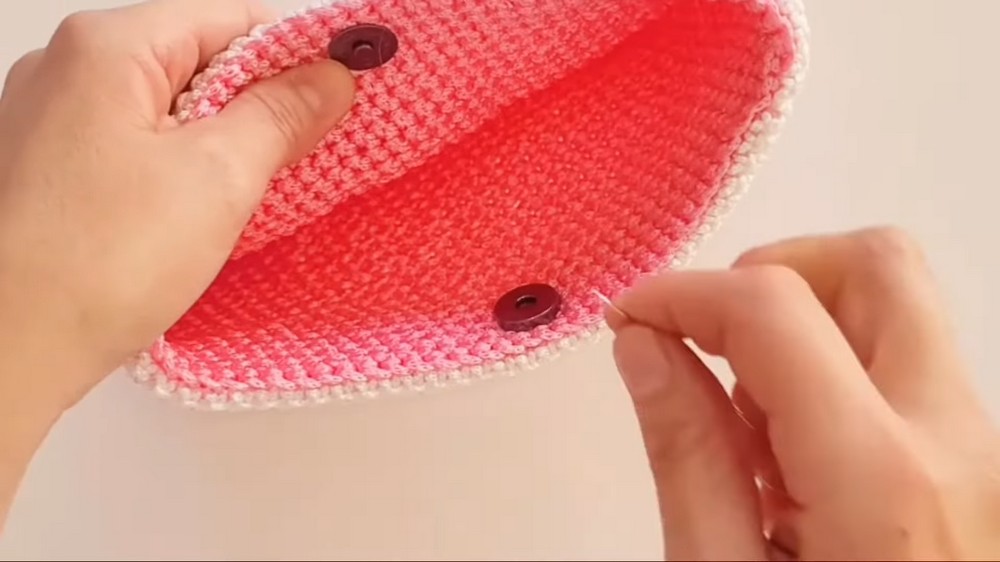
Adding the Clasp
- Center your chosen clasp or snap along the top edge.
- Sew, attach, or clamp according to manufacturer's instructions.
- Ensure it is securely affixed to both front and back of the opening for durability.
Bow Decoration
Large Bow Piece
- With pink yarn/cord: Ch 40.
- Row 1: 1 sc in 2nd ch from hook and each ch across (39 sc). Ch 1, turn.
- Rows 2-5: 1 sc in each st across, ch 1, turn.
- End with 5 rows total.
- Fasten off, leaving a tail for sewing.
- Finished piece should be about 27 cm long.
Small Center Bow Piece
- Ch 17.
- Work 5 rows of sc across (same as above).
- Fasten off, leaving a tail for sewing.

Bow Assembly
- Fold the larger rectangle in half (ends meet at center).
- Place the small rectangle at the center and wrap tightly around, cinching the bow. Stitch ends together or wrap securely with yarn.
- Fasten off and weave in ends. If using synthetic cord, ends can be sealed.
- Attach bow to bag:
- Sew the bow securely, centered below the white collar, using transparent thread or a bit of the same yarn for a sturdy attachment.
Handles/Straps (Make 2)
- With pink cord/yarn: Ch 40.
- Work 5 rows of single crochet, ch 1 and turn after each row.
- Each handle should measure about 28 cm in length.
- Fold each strip in half lengthwise and sew edges together to create a rounded, sturdy handle.
- Securely weave in ends and optionally seal.
Attaching Handles
- Center handle ends about 2 finger widths from bag edge.
- Sew firmly to inside of bag, using a sewing needle and transparent thread or matching yarn.
- Repeat for both handles, ensuring symmetry and strength.

Finishing Details
- Weave in all ends on the inside neatly.
- Check all joins are secure-especially where bag, bow, and handles meet.
- For synthetic cord, carefully melt ends to prevent fraying.
- Lightly block the bag if needed for shape.

Final Words & Tips
- Maintenance:
- Store flat or stuffed to retain shape when not in use.
- Spot-clean as needed according to yarn or cord care instructions.
- Customization Suggestions:
- Add a lining for extra structure.
- Use multiple colors for stripes or color blocks.
- Adjust the width/length of base for a larger or smaller bag.
- Mix novelty yarns with nautical cord for a boho effect.
- Embellish with beads, buttons, or charms on the bow or handles.
- Technique Tip:
- Work tightly with nautical cord to help bag hold its structure.
- Count stitches at the end of each row/round to prevent unevenness.
- Special Techniques:
- "Doubled" single crochet rows for texture.
- Working sc into front loops/edges for crisp design.
- Bow making and attachment.
- Attach hardware with sturdy, neat sewing.
Your Bag-A Finishing Touch
With its neat edges, charming bow, and clean structure, this bag is a standout accessory that's both trendy and practical. The pattern is easy to adapt, making it perfect for gifts, market sales, or personal use.