
Free Crochet Elastic Bow Hair Clip Pattern for Stylish Looks
Find your next favorite accessory with this Free Easy Crochet Elastic Bow Hair Clip Pattern full of playful style and sweet details.
Tangled yarn and a spark of creativity can only mean one thing, an adorable crochet bow hair clip is in the works. This Free Easy Crochet Elastic Bow Hair Clip Pattern offers a fun and stylish way to accessorize, with its neat loops and cinched center creating a perfectly balanced look. It's the type of project that feels simple yet turns heads with its charm, offering just the right touch of personality when paired with an outfit. The bow has a soft texture with a structured shape that makes it both practical and eye catching. Medium weight yarn works especially well for this project. The best part is its adaptability. You can use vibrant colors, gentle pastels, or even experiment with stripes or color gradients to make it truly unique.
Free Crochet Elastic Bow Hair Clip Pattern for a Fun Accessory

Sizing is highly customizable, making it easy to create a tiny bow for newborn headbands or a larger, standout bow for more dramatic styles. The process is simple to follow. Two loops form the base, single crochet stitches add stability, and the center wrap brings it all together. It's a straightforward method that beginners can enjoy and experienced crocheters can finish quickly.

This bow hair clip makes the perfect handmade gift for holidays. You could even use metallic yarn or embellishments for a festive look. Whether you choose to make one for yourself or surprise a loved one, this quick crochet project is a satisfying way to add a touch of handmade personality to your day. Play with colors, sizes, and accents to make each bow a one of a kind accessory.
Crochet Bow Hair Tie Pattern
Introduction
Today's pattern walks you through creating a bow hair tie. This pattern is simple, beginner friendly, and a joy to make. You'll need basic crochet skills and a few materials to bring this elegant bow to life. Let's begin.
Quick Overview of the Pattern
- Begin with chains to form loops for each bow side.
- Single crochet around the loops for a neat, dense stitch texture.
- Create two bows (small and large) in different colors.
- Wrap the bows together and attach your preferred hair accessory.
Notes
- This pattern works best with medium weight yarn for structure.
- Adjust the chain count for smaller or larger bows.
- Use multiple colors to create vibrant or subtle designs.

Skill Level
- Beginner to Intermediate
This pattern requires knowledge of basic stitches: chain (CH), single crochet (SC), and slip stitch (SS).
Materials
- Yarn: Medium weight yarn in two coordinating colors.
- Hook: 4.0mm to 4.5mm crochet hook (adjust hook based on yarn weight).
- Scissors
- Tapestry needle
- Elastic Band or Snap Clip (optional)
- Hot Glue Gun (optional, for assembly)
Measurements / Sizing
- Large Bow: Approximately 3-4 inches wide.
- Small Bow: Approximately 2-3 inches wide.
Sizing can be adjusted depending on the chain count used.
Gauge
Gauge is not critical for this project. However, ensure even stitching for a neat finish.
Stitch Abbreviations
- CH: Chain
- SC: Single crochet
- SS: Slip stitch
Special Techniques
- Slip Stitch into a Chain: Insert your hook into the desired stitch, yarn over, pull through both the stitch and the loop on your hook.
The Crochet Pattern
Step 1: Create the Large Bow
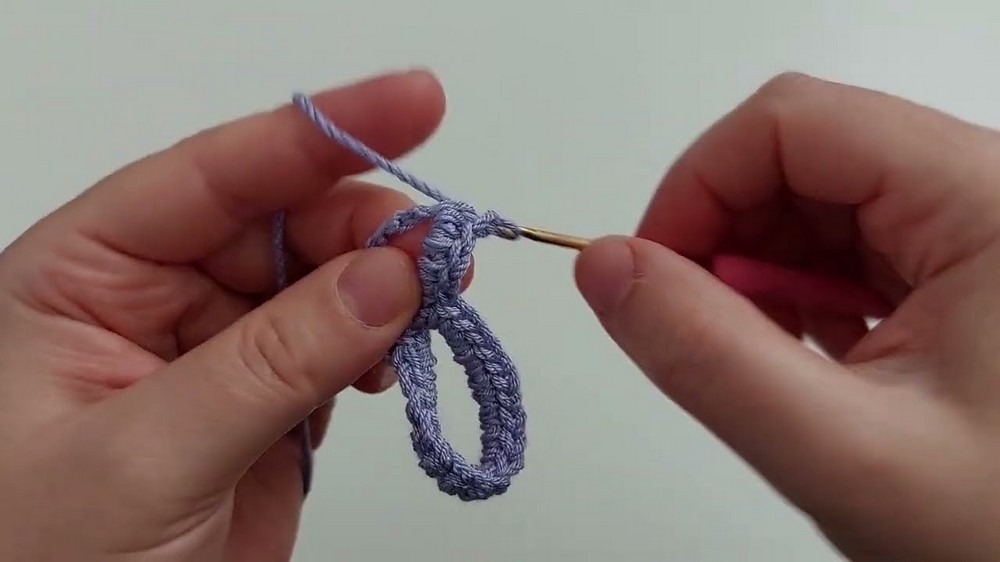
- Start with CH 16. Count each chain to ensure accuracy.
- Form the loop:
- Insert your hook into the first chain and make a SS to create a loop.
- Second loop: Repeat CH 16 to create a second loop.
- Crochet the first loop:
- Begin by working SC into the first loop, making 18 SC stitches around the loop.
- Space the stitches evenly to ensure smooth shaping.
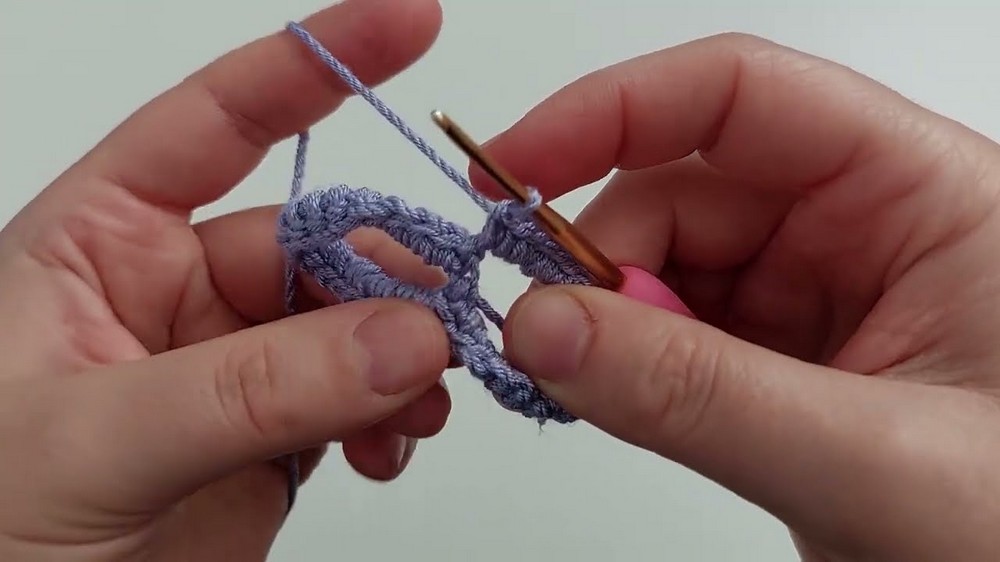
- Crochet the second loop:
- Repeat 18 SC stitches in the second loop.
- Join the second loop to the first with a SS in the middle point between the loops.
- Finish the large bow:
- After completing the SC stitches, pull up a loop and chain 1, then fasten off your yarn.
- Cut the yarn, leaving a tail to weave in the ends.


Step 2: Create the Small Bow
- Using your second yarn color, CH 13.
- Form the loop:
- Insert your hook into the first chain, creating a loop with a SS.
- Crochet in the first loop:
- Work 15 SC into the loop, evenly spacing the stitches around.
- Create the second loop:
- Repeat CH 13 and connect with another SS to form the second loop.
- Work 15 SC into the second loop as before.
- Join the loops:
- Use a SS to connect both loops at the center.
- Chain 1, fasten off, and cut the yarn.
- Use the tapestry needle to weave in the ends.

Step 3: Assemble the Bow
- Stack the small bow on top of the large bow, aligning them neatly.
- Take a small piece of yarn (from the large bow's color) to wrap around the center of both bows. Wrap tightly several times around the middle.
- Secure the wrap:
- Tie the yarn into a knot at the back.
- Use a tapestry needle to weave in the loose ends or trim if necessary.
- Attach the hair accessory:
- Use a hot glue gun to affix the bow to:
- An elastic hairband for a traditional look.
- A snap clip for a functional piece.
- Press firmly and allow the glue to dry completely.
- Use a hot glue gun to affix the bow to:


Assembly & Finished Size
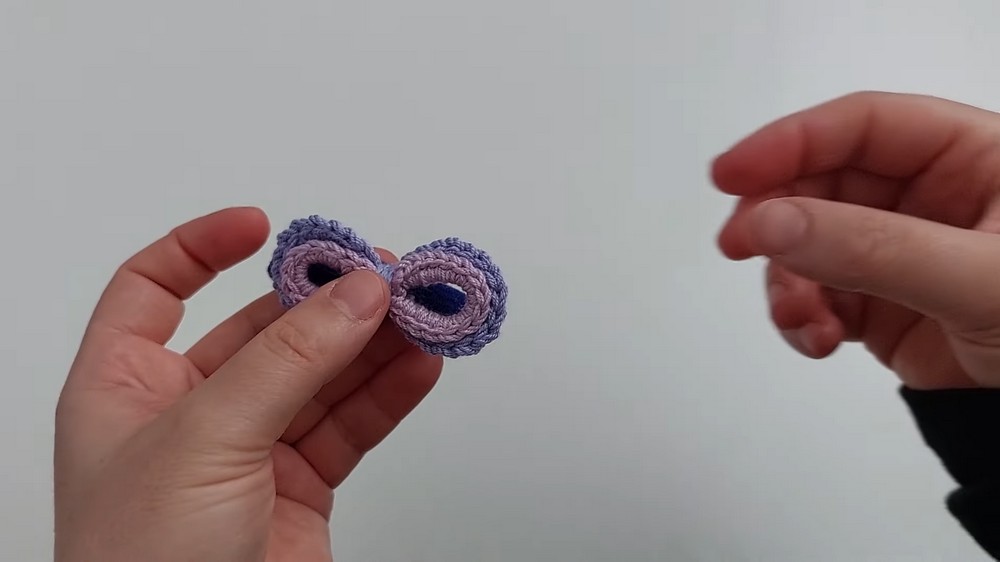
After completing both bows, the final product measures:
- Large Bow: 3-4 inches wide
- Small Bow: 2-3 inches wide
Assemble the bows together with a contrasting center wrap for a layered look.

Attach to a hair accessory such as hair ties, elastic bands, or clips. For infants, you can use stretchable headbands or delicate bands to create custom headpieces.
Customization Ideas
- Size Variations:
- For a larger bow, add more chains (e.g., increase CH 16 to CH 20).
- For a smaller bow, reduce the number of chains (e.g., decrease CH 16 to CH 10).
- Color Pairings:
- Customize colors depending on the occasion (e.g., pastel tones for newborn bandanas, bright colors for summer accessories).
- Additional Embellishments:
- Add beads, bows, or sequins for extra flair.
- Sew small appliqués or flowers for a unique look.
- Alternative Uses:
- Use the bow as a decoration on gift boxes, cards, or crochets.
- Create larger bows for bag charms or statement pieces.

Conclusion and Important Remarks
Congratulations, You've made a beautiful crochet bow hair tie that's versatile and stylish. Whether it's for your little one, a gift, or a personal accessory, this bow will add charm to any outfit. With endless customization options and the simplicity of the pattern, this design can be repeated for many projects.