
Free Crochet Granny Square Bag Pattern for Instant Style
Brighten your day with this free crochet granny square bag pattern, featuring colorful squares perfect for adding style to your outings and everyday fashion.
Turn heads with this gorgeous and colorful free crochet granny square bag pattern. It's the perfect mix of fun, creativity, and practicality. Using small, vibrant granny squares, you'll create a stunning bag that's as trendy as it is timeless. Each square bursts with color and charm, giving your bag a fresh and playful look that everyone will admire.
This bag isn't just beautiful-it's super useful too. It's spacious yet lightweight, perfect for carrying books, snacks, or daily essentials. The braided handles add a stylish and comfy touch, making it a bag you'll love to carry everywhere-from school to shopping trips or casual outings with friends.
Must-Have Free Pattern for the Perfect Crochet Granny Square Bag

The best part? It's so easy to make. Using just basic crochet stitches like chains and double crochets, even beginners or younger crocheters can follow along and create something amazing. Crochet 13 colorful squares, sew them together, and watch your masterpiece come to life. You can even line the inside with fabric for extra strength.
This granny square bag is more than just a project-it's a way to show off your creativity and unique style. Start crocheting today, and turn simple yarn into something truly magical.
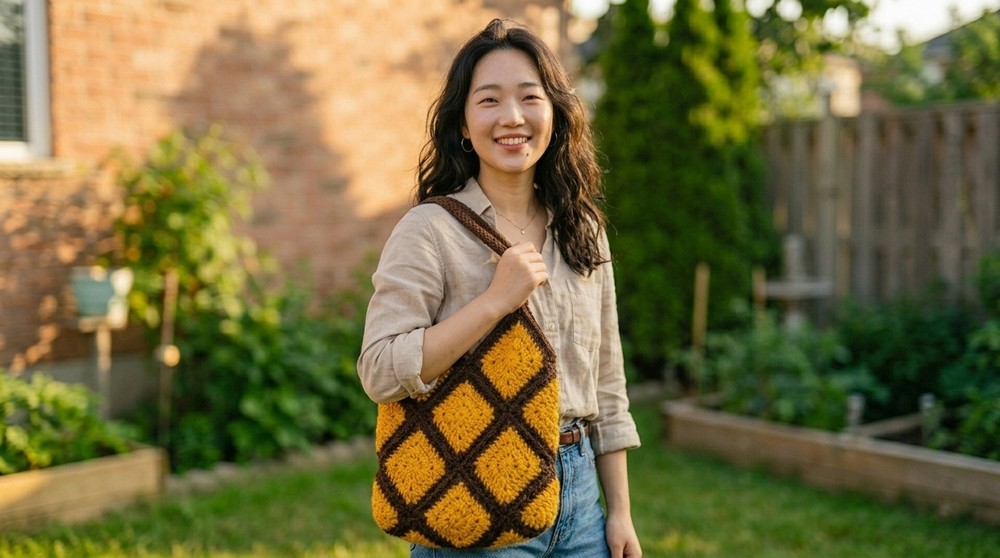
Crochet Granny Square Bag Pattern
Materials Required
- Yarn:
- Six different colors (matching shades recommended).
- Medium or worsted weight yarn is suggested.
- Leslie sourced her yarns from Joann Fabrics (Red Heart Super Saver brand) and a dollar store.
- Crochet Hook:
- Size 5mm crochet hook.
- Darning Needle:
- For joining squares and tucking yarn ends.
- Scissors:
- For cutting yarn at finishing stages.
Special Techniques Used
- Slip Knot and Chain Stitch: Basic stitches used for starting the project.
- Double Crochet: Used for creating the clusters and the granny square body.
- Slip Stitch: Used for seamless joining of rounds and squares.
- Braid Handles: A braided technique for crafting durable straps for the bag.
Granny Square Pattern
Step 1: Starting the Granny Square
- Make a slip knot: Wrap yarn over your finger, pull a loop through, and tighten.
- Chain 4: Insert your hook in the slip knot loop and yarn over, pulling through to form four chains.
- Form a circle: Slip stitch into the first chain to create a small ring.

Step 2: First Round
- Chain 5: This acts as the first stitch and corner chain space.
- Create first cluster:
- Work 3 double crochets into the center of the circle.
- Yarn over, insert hook into the circle, pull through, yarn over, pull through two loops, yarn over, pull through the final two loops. Repeat for two more double crochets.
- Chain 2: This creates the corner space.
- Repeat clusters:
- Work 3 double crochets, followed by chain 2, three more times (totaling 4 clusters).
- On the fourth cluster, do only 2 double crochets, then slip stitch into the third chain of the original chain 5 to close.


Step 3: Adding the Second Round
- Attach a new yarn color with a slip knot.
- Start at a corner space: Slip stitch to join the yarn, chain 3 (counts as the first double crochet).
- Work in the corner:
- Do 1 more double crochet, chain 2, and then 2 more double crochets into the same corner space.
- Work the side clusters:
- Double crochet into each stitch along the side.
- Repeat corner pattern: For each corner, do 2 double crochets, chain 2, and 2 double crochets.
- Close the round with a slip stitch into the third chain of the initial chain 3.
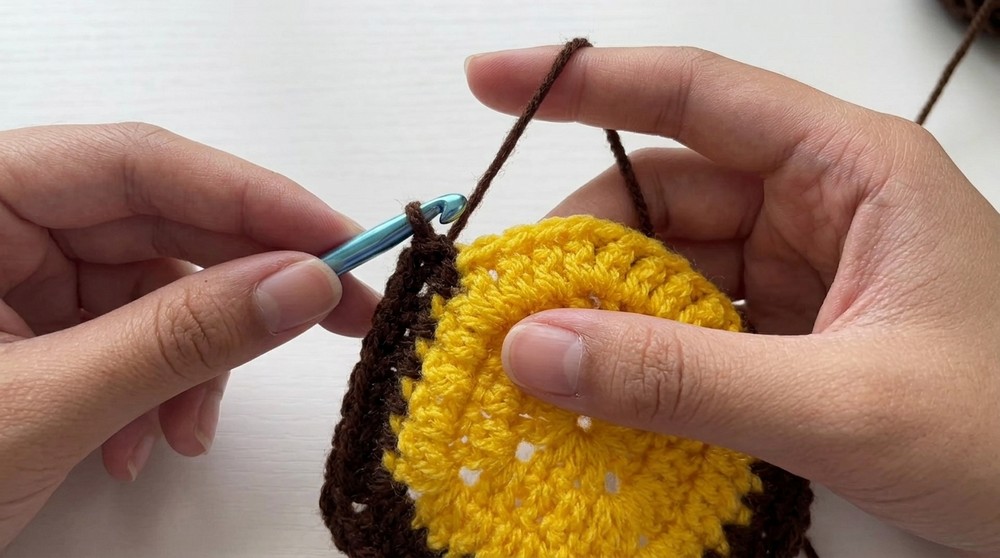
Step 4: Additional Rounds
Repeat the steps for the second round:
- Start the new round with a slip knot in one of the corners.
- Follow the same process (corners with 2 DCs, chain 2, 2 DCs; double crochet across sides).
- Continue for four total rounds.
Step 5: Making 13 Granny Squares
- Complete 13 granny squares following the steps above.
- Use a contrasting border color (e.g., dark brown) as the final round for all 13 squares.
- Tuck in Ends: Use a darning needle to weave in all yarn ends for a polished look.

Assembling the Bag
Step 1: Arranging the Squares
- Refer to the graphic provided in the tutorial or design your own arrangement.
- Place squares with the front side facing up and arrange them as follows:
- Four squares for the front.
- Four squares for the back.
- Five squares for the sides and base.
Step 2: Sewing the Squares Together
- Use the border yarn color and a darning needle.
- Place squares back sides facing out.
- Sew edges together securely using small weaving stitches to avoid gaps.
- Ensure that all squares are neatly joined.
Step 3: Forming the Bag Structure
- Fold the assembled layout into a bag shape.
- Sew the bottom edge to close the bag. Ensure the top edges remain open for access.
- Flip the bag inside out to reveal the clean front.
Adding Handles
Step 1: Preparing Yarn for Handles
- Measure and cut: Estimate the desired length (e.g., 35 inches) and cut 12 strands of yarn.
- Divide into two groups: 6 strands per handle.
Step 2: Attaching Handles
- Attach each strand to a corner of the bag using slip knots.
- Knot securely to avoid slippage and tuck loose ends afterward.

Step 3: Braiding Handles
- Divide the strands into three equal sections.
- Braid tightly and evenly.
- Secure the handle ends to the opposite corners of the bag with tight knots.
Finishing the Bag
- Ensure all yarn ends are tucked securely inside.
- Flip the bag right side out.
- Inspect the bag to ensure all seams are durable and handles are firmly attached.
Final Words
Congratulations on completing your Granny Square Bag! This bag is a stylish, functional, and timeless accessory that showcases your creativity and crochet skills.

Tips for Maintaining the Bag
- Washing: Handwash gently in lukewarm water with mild detergent. Avoid wringing.
- Drying: Lay flat to dry to prevent stretching.
- Repairing: If seams loosen, re sew with matching yarn for a neat repair.
- Customization: Add a fabric lining or embellishments such as tassels for extra charm.
Crafting this Granny Square Bag is not only a rewarding project but also a great way to expand your crochet skills.