
Free Crochet Heart Keychain Pattern That’s Perfect for Gifts
Wrap small gifts in big charm with this free crochet heart keychain pattern, an adorable project for accessories and heartfelt surprises.
A basket of colorful yarn sitting by the window was all it took to spark an idea-something small, cheerful, and perfect for sharing love with others. The Free Crochet Heart Keychain Pattern is a simple yet delightful project that turns bits of yarn into a soft, textured heart packed with personality. Its compact shape and charming design make it an ideal accessory for keys, bags, or even a playful decoration. This small heart is made using single crochet stitches, which give it a neat, timeless look. The process involves making two identical heart pieces and joining them together while adding just enough stuffing for a full, plush effect.
How to Make a Heart Keychain with Free Crochet Pattern
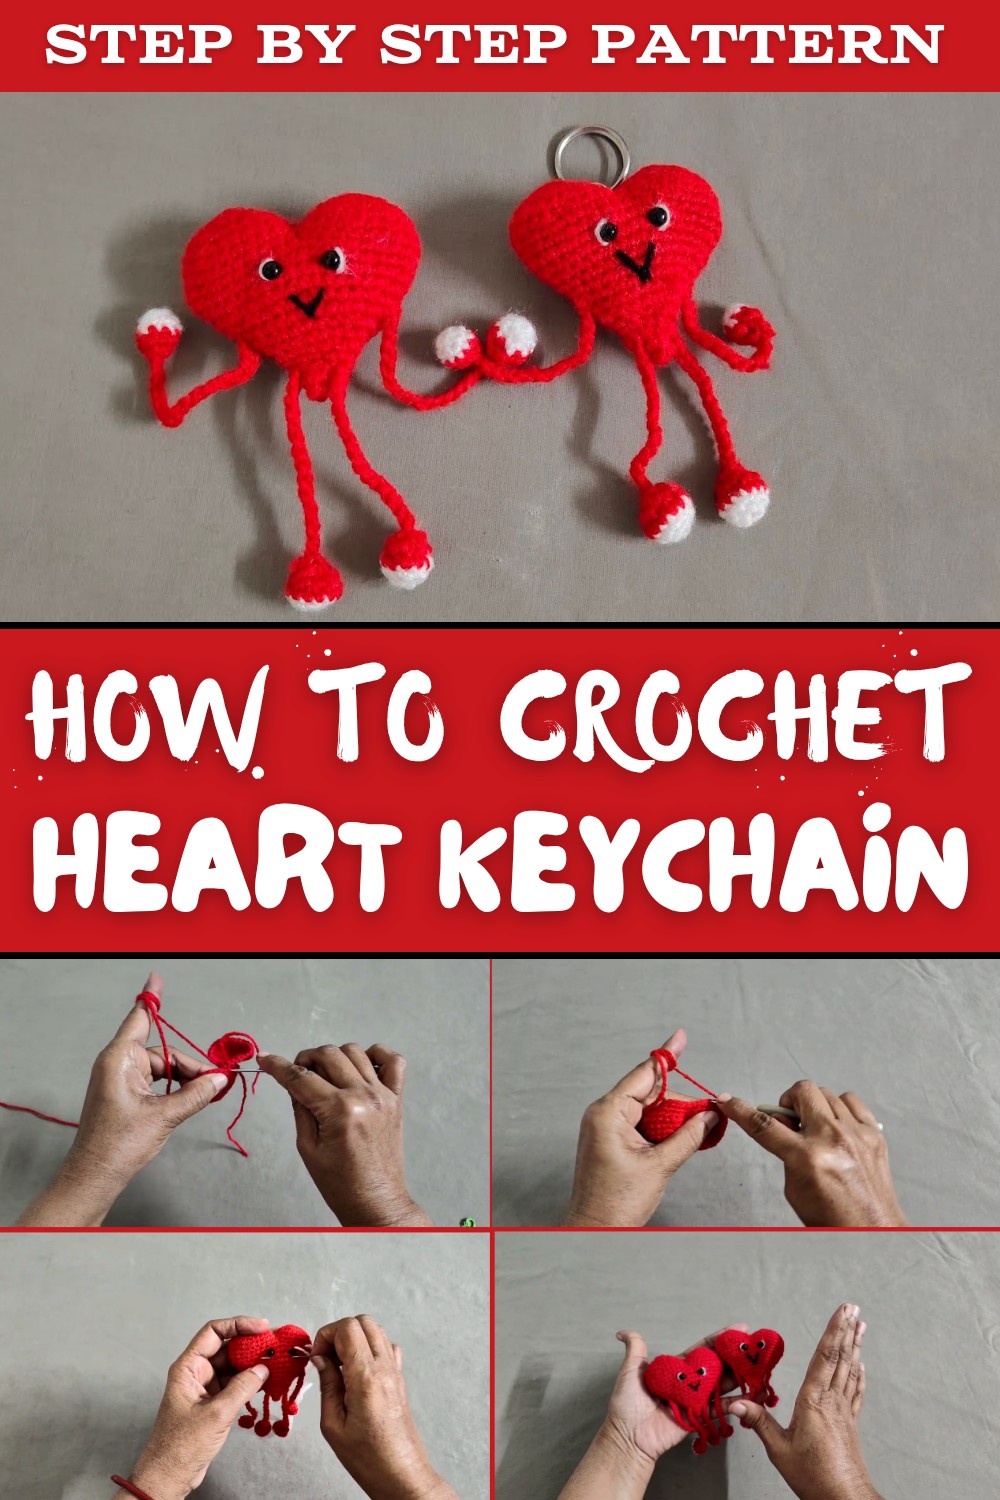
There's room to personalize each one with arms, legs, and decorative details such as embroidered expressions or shiny buttons. Helpful tips include maintaining even tension while stitching to keep the heart smooth and avoiding overstuffing so it retains its charming roundness. Cotton yarn works exceptionally well for showcasing each stitch clearly, while acrylic gives the heart a softer appeal. Adding a sturdy keychain ring is the perfect finishing touch, turning the project into a practical accessory or a heartfelt gift.
This crochet heart suits anyone looking for a thoughtful, handmade surprise-whether it's for celebrations like Valentine's Day or a token of appreciation for friends and family. From playful decorations to memorable gifts, these hearts offer endless opportunities for personalization, allowing the maker's unique style and sentiment to shine through the final piece. Each little heart truly carries more than its fair share of love.

Crochet Heart Keychain Pattern
This heart shaped keychain is an adorable and beginner friendly project that's perfect for using leftover yarn. You'll create two heart shaped pieces, join them, and add some simple decorations and accessories.
Quick Overview of the Pattern
- Create two identical heart shaped pieces.
- Work with single crochet (sc) to shape the heart and close it.
- Stuff the piece with cotton or fiberfill for a 3D look.
- Attach artificial eyes, buttons, or decorative features for added charm.
- Add arms, legs, and a keychain loop for a complete design.

Notes
- Use any leftover yarn to complete this project - no specific color required.
- Artificial eyes can be replaced with buttons, beads, or embroidery.
- Adjust hook size if you want a smaller or larger heart.
- Stuffing with fiberfill is optional but adds a lovely finish.
Skill Level
Beginner friendly. Basic knowledge of single crochet and simple increases/decreases is required.
Materials Required
- Yarn: Leftover cotton or acrylic yarn in any preferred color(s).
- Hook Size: 2.25 mm crochet hook.
- Accessories: Artificial eyes, buttons, or embroidery thread for decorations.
- Stuffing: Cotton or fiberfill.
- Keychain Ring: Metallic keychain connector or ring.
- Tapestry Needle: For sewing and assembly.
- Scissors: For cutting the yarn.
Gauge and Size
- Finished Size: Approximately 2.5-3 inches.
- Gauge is not critical for this project, but ensure your stitches are tight enough to prevent stuffing from showing through.
Stitch Key
- ch: Chain
- sc: Single Crochet
- sl st: Slip Stitch
- inc: Increase (2 sc in the same stitch)
- dec: Decrease (crochet two stitches together)
- mr: Magic Ring
Crochet Pattern
Creating the Base Pieces
Step 1: Make Two Identical Pieces
- Round 1: Create a magic ring, work 6 sc into the ring, and tighten it to close. (6 stitches)
- Round 2: Work 2 sc in each stitch around. (12 stitches)
- Round 3: 1 sc in the first stitch, increase (2 sc in next stitch). Repeat the pattern around. (18 stitches)
- Round 4: 1 sc, 1 sc, increase. Repeat the pattern around. (24 stitches)
- Rounds 5-6: Work 24 sc evenly around.
- Note: On the first piece, fasten off. For the second piece, do not cut the yarn. Leave a long tail for joining.


Joining the Two Pieces
- Align the Pieces: Stack the two pieces together, with the wrong sides facing inward.
- Joining Stitches: Work 21 sc around the edge of the first piece. Then, move onto the second piece and work 21 sc around the remaining stitches.
- Closing Gaps: Use a tapestry needle and the long tail from the first piece to sew any remaining gaps securely. Begin lightly stuffing your heart at this stage, and continue stuffing as you go, ensuring it holds its shape.

Shaping the Heart
Step by Step Instructions:
- Round 1: Work 1 sc in each stitch around. You'll now have 42 stitches total.
- Round 2: (8 sc, dec) repeat twice in this round, with 16 sc between the decreases.
- Round 3: (7 sc, dec) repeat twice in this round, with 14 sc between the decreases.
- Round 4: (6 sc, dec) repeat twice in this round, with 12 sc between the decreases.
- Round 5: (5 sc, dec) repeat twice in this round, with 10 sc between the decreases.
- Optional Step: If you're adding decorations such as eyes, buttons, or embroidery, now is the time to do so before the opening gets too small. Add additional stuffing as needed.
- Final Rounds: Continue decreasing by working (1 sc, dec) until the heart is fully closed. Fasten off securely.
Creating the Limbs
Legs (Make 2)
- Create a magic ring and work 6 sc into it. Tighten to close.
- Round 2: Work 2 sc in each stitch around. (12 stitches)
- Rounds 3-4: Work 1 sc in each stitch around. (12 stitches per round)
- Round 5: Work (1 sc, dec) around. (8 stitches)
- Finish off and leave a long tail for sewing.
Arms (Make 2)
- Create a magic ring and work 6 sc into it. Tighten to close.
- Round 2: Work (1 sc, inc) 3 times. (9 stitches)
- Rounds 3-4: Work 1 sc in each stitch around. (9 stitches per round)
- Finish off and leave a long tail for sewing.

Creating the Keychain Loop
- Chain 17: Using your 2.25 mm hook, create a chain of 17 stitches.
- Fasten off and secure the chain loop by sewing it onto the heart's top center with a tapestry needle.


Assembly
- Attach the Limbs:
- Use the yarn tails from the arms and legs to attach them securely to the heart.
- Position the arms approximately 6 stitches down from the heart's top center, ensuring they are evenly spaced.
- Attach the legs symmetrically to the bottom edge of the heart.
- Decorate the Heart:
- Secure artificial eyes, buttons, or beads for the "face." Position them symmetrically by counting approximately 4 stitches from the center top and placing them evenly.
- Use black yarn or embroidery thread to add a simple smile below the eyes.
- Attach the Keychain:
- Sew or attach the keychain loop to the top center of the heart. For metallic keyrings, simply insert the loop through the chain stitches to secure it in place.
- Final Touches:
- Check for any visible yarn tails and weave them into the body. Ensure all seams and attachments are tight and secure.

Conclusion
Congratulations on completing your crochet heart keychain. This versatile and beginner friendly project is not only fun to make but also perfect for personalizing and accessorizing. You can experiment with different yarn colors, embellishments, and creative ideas to make unique gifts or decorations.