
Free Crochet Heart Pillow Pattern You’ll Want to Cuddle All Day
Your favorite chair deserves the comfort of this Crochet Heart Pillow Pattern with its soft look and lovely handmade feel.
Crocheting is such a relaxing and rewarding crochet, and this heart shaped pillow is perfect for anyone who loves creating cozy, handmade treasures. Whether you're making it as a gift or simply for yourself, this soft and lovable design is fun to crochet and adds a cute, personal touch to any space. This Crochet Heart Pillow Pattern stands out with its sweet, rounded shape and soft, fluffy texture. Stuffed with polyfill to give it a lovely plumpness, the pillow is perfect for placing on your sofa, bed, or favorite chair.
Fluffy Crochet Heart Pillow Free Pattern - A Charming Home Accent

Its customizable style allows you to play with different colors and decorations, like crochet flowers, bows, or ribbons, so you can match it to any occasion or decor theme. Whether simple or full of embellishments, the heart pillow adds warmth and personality wherever it's displayed. This project is perfect for beginners, It mostly uses single crochet stitches (SC), which are easy to learn and work. The gradual increases and decreases in the pattern make crocheting the heart shape straightforward and fun, helping newer crocheters build confidence.
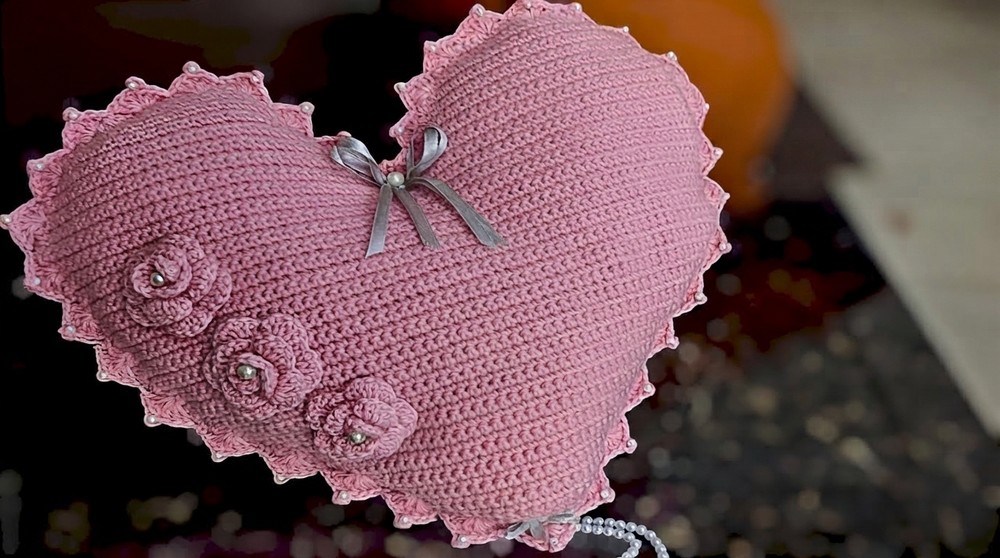
Whether you're crocheting a heartfelt gift or adding a handmade touch to your home, this project is a wonderful choice. It's quick, customizable, and satisfying to make-a beautiful way to share creativity and love.
Crochet Heart Pillow Pattern
Materials Needed:
- Yarn: 180 grams of faux acrylic yarn (any color of your choice).
- Polyfill: Approximately 30 grams to fill the cushion.
- Crochet Hook: 2.5 mm crochet hook.
- Tapestry needle: For stitching and sewing.
- Optional embellishments: Crochet roses, satin ribbons, lace, beads, etc.
Special Techniques Used:
- Slip Knot: The starting knot used to begin crocheting.
- Single Crochet (SC): A basic crochet stitch.
- Chain (CH): Loops created as a foundation for crochet stitches.
- Pico or Picot: A decorative loop using chains and slip stitches, often seen in borders.
- Decrease (Dec): To reduce the number of stitches by combining two or more stitches into one stitch.
- Increase (Inc): To add stitches by working multiple stitches into a single stitch space.

Pattern Instructions
Step 1: Create the Foundation
Start by making a slip knot. Create a foundation chain of two chains.
- In the first chain space, work three single crochets (SC) in the same stitch.
- Chain one and turn your work.
Step 2: Begin the Rows
You will start increasing the stitch count in each row:
- Row 2:
- In the first chain space, crochet two SC.
- In the second chain space, work one SC.
- In the third chain space, work two SC.
- Total stitches: 7 SC.
- Chain one, and turn your work.
- Row 3:
- In the first chain space, crochet two SC.
- Work one SC in each of the next three chain spaces.
- In the last chain space, crochet two SC.
- Total stitches: 9 SC.
- Chain one, and turn your work.
Continue adding one stitch to each side (increasing by two stitches per row) for every row until you complete 20 rows. By the end of the 20th row, you should have 41 stitches.
Step 3: Add Roundness to the Shape
From the 21st row, focus on giving the cushion a rounded shape.
- Chain one before turning your work.
- In the first chain space, crochet two SC.
- In the second chain space, also crochet two SC (this increases by one more stitch).
- Continue working one SC in each of the following chain spaces.
- When you reach the last two chain spaces, crochet two SC in each space to increase two stitches on the other side.
- Total stitches for this row: 45 SC. Chain one and turn your work.
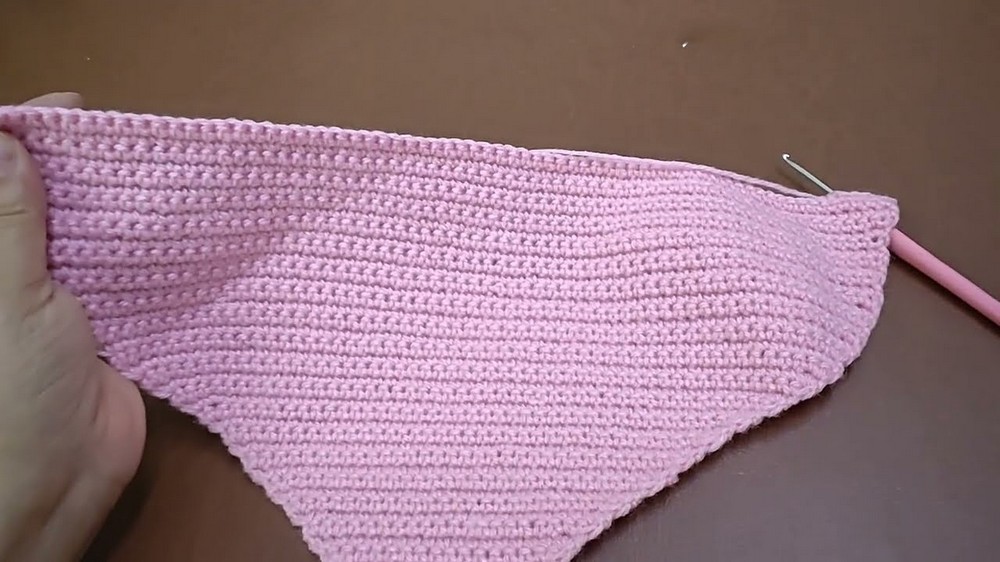
From row 22 to row 25, continue increasing one stitch on each side per row. By the end of row 25, you should have 55 stitches in total.
Step 4: Maintain Stitches
For rows 26 to 29, work one SC in each stitch across. No stitch increases; the total count will remain 55 stitches for these rows.

At row 30, one stitch will be increased on both sides. Work this row and continue increasing one stitch per side (at the beginning and end of the rows) for rows 31 and 33. By the end of row 33, you should have 63 single crochets.
Step 5: Shape the Top of the Heart
Now, divide the work into two equal sections. The total number of stitches at row 33 is 63 stitches. Divide them equally: 31 stitches on each side with one middle stitch (this will help to maintain symmetry).
You will now focus on creating and shaping the first side of the heart.
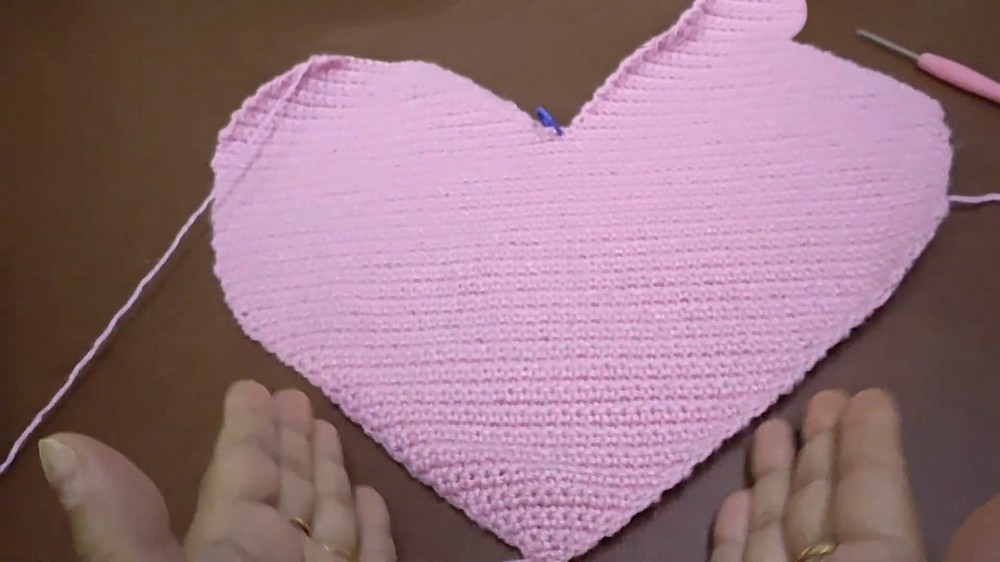
- Starting with 31 stitches:
- Skip the first chain space and work one SC in each of the remaining spaces.
- Chain one and turn your work.
- Decrease gradually by skipping one chain space at the beginning of each row. Continue to decrease one stitch per row until you reach row seven, where you should have 29 SC left.
- From row eight onward, decrease two stitches per row. Skip the first chain space, work one SC in each stitch until the last two chain spaces remain, and then work a decrease.
- By row 16, you should have 13 SC remaining, forming the perfect heart shape on one side.
At this point, finish off the yarn with a slip stitch to secure it.
Step 6: Create the Second Side of the Heart
Repeat the same process to create the second half of the heart:
- Join yarn at the stitch next to the middle stitch reserved earlier.
- Work one SC in each space across for the first row, creating 35 SC.
- Follow the same decrease pattern for 16 rows, starting with single decreases and moving to double decreases from row eight onward.
- Ensure the stitch count matches the first side of the heart.

At the end of row 16, finish off the yarn securely.
Step 7: Assembly
- Place the two completed heart shaped panels together. Make sure the wrong sides are facing inward, and the right sides are facing outward.
- Take the yarn end from one panel and start stitching the edges together with single crochet (SC).
- Work from the bottom point of the heart, stitching along the sides to create a clean join.
- Before completing the stitching, stuff the cushion with polyfill to the desired volume. Adjust to your preferred firmness.
- Continue stitching to close the cushion completely.
Step 8: Embellishments
Enhance your cushion with decorative elements, such as crochet roses, beads, or ribbons.
For this pattern, small crochet roses were made separately and attached using a needle and thread. If you'd like to learn to make these roses, consider following a dedicated pattern.

Finishing
- Secure all your yarn ends by weaving them carefully into the stitches.
- Block your cushion if necessary, to further perfect its heart shape. Lightly mist it with water and shape it by hand. Allow it to air dry.
Final Words
Congratulations on creating your heart shaped pillow. This pattern is beginner friendly yet results in an elegant, handmade project. The cushion not only makes for a cozy addition to your decor but also serves as a heartfelt gift for your loved ones.
Tips to Maintain the Pattern
- Use Consistent Tension: Ensure uniform tension by practicing even pull on the yarn with your hands.
- Measure Continuously: Frequently check your dimensions during the project to ensure accuracy.
- Work Both Panels Together: Avoid differences in size or tension by alternating between panels until both are completed.
- Experiment with Colors and Embellishments: Use contrasting colors or add intricate decoration to make your cushion unique.

Feel free to personalize the pattern with different colors, sizes, and decorations to suit your style. Should you have any further questions about specific techniques or embellishments, let me know, and I'll gladly assist.