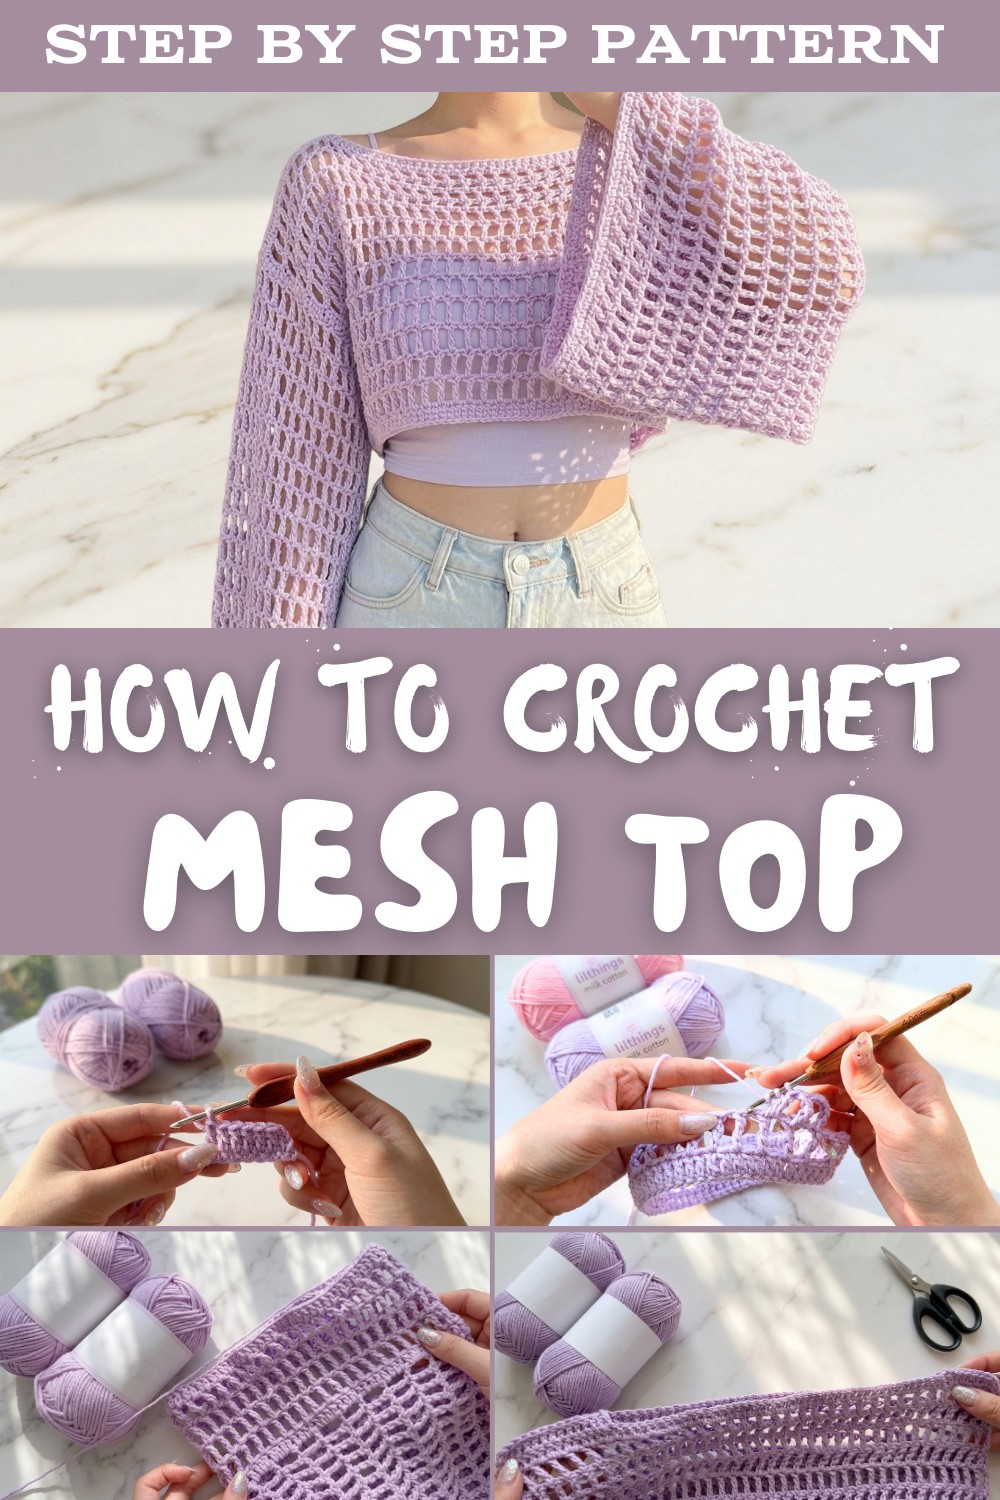
Crochet Mesh Top Pattern Using Simple Stitches Free
Create a cute and breezy crochet mesh top with this easy pattern, perfect for sunny adventures, relaxing days, or adding a cool vibe to any outfit you love.
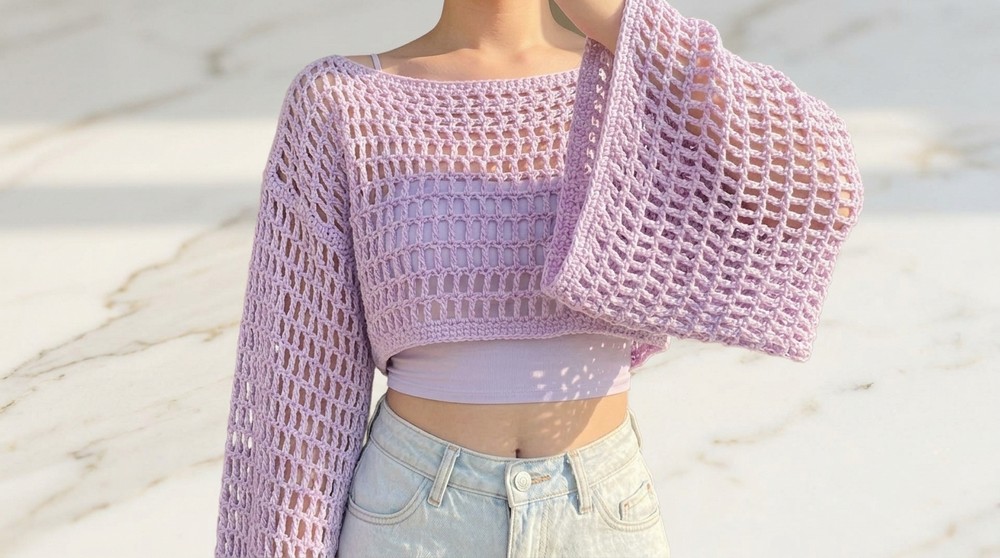
Wearing something light, airy, and perfect for warm sunny days. A crochet mesh top is stylish, breathable, and super easy to make. Its open, delicate design adds a touch of elegance to any outfit, whether you wear it over a tank top, bikini, or even as a layering piece to upgrade your wardrobe. The soft texture and sheer look make it both trendy and comfortable to wear anywhere-beach parties, casual outings, or even relaxing at home.
Free Crochet Mesh Top Pattern - Fashion for Any Occasion
What makes it truly special is how customizable it is; you can use your favorite colors, yarns, and sizes to make it uniquely yours. This pattern is simple to follow, suitable for all crochet lovers, and creates a top that looks modern yet handmade with love. It's not just a top-it's your new favorite piece.

Crochet Shrek-Inspired Mesh Shrug Pattern
Materials Required
- Yarn:
- 6 balls of 50g cotton yarn (approximately 300g total). Yarn weight can be adjusted as per preference.
- Yarn weight: Fingering or DK works best for this airy shrug pattern.
- Crochet Hook:
- Hook of your choice sized to match the yarn (e.g., 4mm-5mm for DK yarn).
- Additional Tools:
- Stitch markers to keep track of stitch counts.
- Darning or yarn needle for weaving in loose ends.
- Scissors.
Gauge
The gauge depends on your hook and yarn weight. The most important part is ensuring that Round 1 fits your body correctly. Adjust the hook size (smaller for tighter fits, larger for looser fits) or yarn weight to match your dimensions.
Finished Size
- Designed to fit bust sizes of 85cm to 100cm.
- Easily customizable by increasing or decreasing the foundation chain based on your desired proportions.
Pattern Notes
- Skill Level: Beginner to Intermediate.
- You should be familiar with basic crochet stitches (Chain, Slip Stitch, Double Crochet, and Triple Crochet).
- The tutorial will guide you through 'shorter triple crochet' decreases.
- This is a repeatable mesh stitch pattern designed to create squares of openwork.
- The mesh shrug consists of front and back panels joined at the shoulders and sleeves.
Abbreviations (US Terminology)
- ch: Chain
- st(s): Stitch(es)
- dc: Double Crochet
- tr: Triple Crochet
- sc: Single Crochet
- hdc: Half Double Crochet
- sl st: Slip Stitch
- yarn over (yo): Wrap the working yarn over the hook.
Step-By-Step Pattern Instructions
1. Foundation Chain and Base Round
- Create a slip knot and insert your hook.
- Chain 156 loosely. (Adjust chain length to fit your body as described below).
- For every 5cm increase or decrease, chain 8-10 extra or unravel 8-10 chains.
- Turn your chain into a circle by connecting the last chain to the first chain with a slip stitch. Ensure the chain is not twisted.

2. Round 1: Double Crochet
- Chain 3 (counts as the first double crochet).
- Double crochet (dc) into each chain around. Be careful to crochet into each chain. Bind off by slip stitching into the 3rd chain from the start. You should have 156 sts.
- Check that the piece fits around your shoulders or desired width before proceeding.

3. Round 2: Mesh Stitch with Triple Crochet
- Ch 6 to begin the first mesh round. (Counts as the first tr + ch 1)
- Skip 1 stitch, tr into the next st, ch 1. Repeat from to around.
- When approaching the end, finish with a tr + ch 1 and join with a sl st to the 5th chain of the starting chain 6.
Tip: Each mesh square will consist of a triple crochet and a chain space.

4. Repeating the Mesh Stitch (Rounds 3 and Beyond)
- Keep repeating Round 2, ensuring the total number of tr matches the previous round (78 triple crochet squares per round).
- Front panel division occurs around Round 6 where the number of stitches is halved to create individual front panels and the back.

5. Front Panel Construction
- Using approximately half the total stitches, create the front panel.
- Work in rows, chaining 6 at the start of each row.
- Incorporate gradual decreases in the center using shorter triple crochet to create a U-shaped neckline for the front.

Shorter Triple Crochet Stitch Instructions:
- Yo twice, insert hook into the indicated stitch, yo, draw up a loop. (4 loops on hook).
- Yo, pull through the first two loops.
- Yo, pull through all 3 loops left on your hook.
- After the decrease rows, continue working mesh in rows until the desired panel length (approximately 9-12 rows, depending on size).

6. Back Panel Construction
Follow a repetitive mesh pattern similar to the front panel but with no decreases.
- Total: Approximately 10 rows (or as needed).
7. Shoulder Seams
- Join the top edges of the front and back panels at the shoulders.
- Use slip stitches or your preferred method for seaming.
- The neckline is customizable based on how many stitches you seam together (16-18 stitches creates a wider neckline, adjust for desired fit).
Tip: Remember that the addition of sleeves might slightly widen the neckline due to added weight.
8. Finishing the Neckline
- Add a single or double crochet border around the neckline for structure.
- Begin at any point of the neckline with chain 3, and make multiple rounds of double crochet.
- Fasten off and weave in ends securely.
9. Sleeves
- Attach yarn to the sleeve opening. Work the first round in dc, ensuring smooth transitions at the underarm.
- Switch to the mesh pattern (like the body, with ch 6 starts and tr stitches).
- Crochet until you reach the desired sleeve length (approximately 19 mesh rounds).
- Finish with two rounds of dc for a clean edge.
Suggestions to Customize Sleeves: Experiment with flared, tapered, or bell-shaped designs by adjusting stitch counts.
10. Finishing Touches
- Securely weave in all remaining yarn tails.
- Block the shrug gently to shape it and even out stitches.

Final Words & Tips
- Customizations: You can adapt this shrug for different sizes by adding or subtracting stitches in the foundation chain, modifying the rounds for increased/decreased width, and adjusting sleeve length.
- Yarn Selection: While cotton works best for beginners, consider experimenting with wool or acrylic for different textures and warmth levels.
- Maintenance: Hand wash the shrug gently and lay it flat to dry to maintain its shape.
- Lightweight Comfort: This mesh shrug is perfect for layering and transitional seasons.
Conclusion
Congratulations on crafting your cozy Shrek-inspired crochet shrug! This fun and beginner-friendly project provides comfort and style while allowing considerable room for customization.