Free Crochet Bikini Coverup Dress Pattern That Keeps You Cool
Splash into summer with this Crochet Bikini Coverup Dress Pattern, blending breezy textures and playful details for a stylish, sun-ready look.
Hot sunny days need light and fun clothes that are easy to wear. A Crochet Bikini Coverup Dress Pattern lets you make a soft, breezy dress that you can wear over your swimsuit at the beach, pool, or on a summer walk. This project is fun because you can try different colors, yarn types, and simple designs while watching your dress grow.
Flirty Crochet Bikini Coverup Dress Pattern That Moves Beautifully

It is also useful because it is quick to put on and keeps you comfortable in the sun. You can make it even more playful by adding small tassels, a wavy hem, or bright, tropical colors. Each dress becomes a unique, handmade piece that shows off your style and creativity.

Crochet Beachwear Cover-Up Pattern
Materials Needed
- Yarn: Any lightweight cotton or acrylic yarn (size 3 or similar). The tutorial suggests Lion Brand “Basic Stitch.”
- Approximate yardage depends on the size and design length. For a medium-sized piece, ~400-500 yards should suffice.
- Hook: 3.5mm or 4mm crochet hook (adjust as needed for gauge).
- Measuring Tape: To check measurements during crafting.
- Darning Needle: To weave in ends and finish the project.
- Scissors: For cutting yarn and fringe.
Gauge
- Mesh Gauge: When stretched, a chain of 130 stitches (used in the sample pattern) measures approximately 43 inches with moderate tension.
- Fringe Gauge: Standard fringe is approximately 7 inches long, but you can adjust based on personal preference.
Finished Size
- Model Size: Approximately 43 inches when stretched around the hips (size Small to Medium).
- Adjust according to your own measurements.
Pattern Overview
This project is worked in rounds of mesh stitches and finished with rows of fringe detailing. The waistline is adjusted using a long chain threaded through the first mesh row.
Step-By-Step Instructions
Base Chain
- Begin with a slip knot on your hook.
- Chain 130 stitches (or a desired even number for your size—adjust for larger/smaller sizes).
- Ensure the chain length comfortably fits around your hips when stretched.
- For reference, 130 stitches stretch to about 43 inches for size Small/Medium.
- Make sure your chain is not twisted, then join it into a circle by slip-stitching into the first chain.

First Row: Mesh Foundation
- Chain 5 (counts as 1 double crochet + chain 2 space).
- Skip 1 chain from the base and double crochet into the next chain.
- Chain 2, skip the next chain, and double crochet into the following one.
- Repeat this sequence (chain 2, skip 1, double crochet) all the way around the circle.
- At the end of the row, skip the last chain, then slip stitch to the 3rd chain of the starting 5 chains.

Second Row and Beyond
- Chain 5 to begin the second row. Turn your work.
- Double crochet into the top of the next double crochet from the previous row.
- Chain 2, double crochet into the next double crochet. Repeat the pattern of chain 2, double crochet around the entire row.
- At the end of the row, slip stitch into the 3rd chain of the starting 5 chains.
- Repeat Row 2 to create the mesh pattern, turning your work at the start of each row.

Length
- Continue repeating the mesh pattern until the piece reaches your desired length.
- In the tutorial, 72 rows of mesh were made for a long skirt/dress design.
- Once complete, fasten off by cutting the yarn and pulling it through the final loop. Secure and weave in the ends.
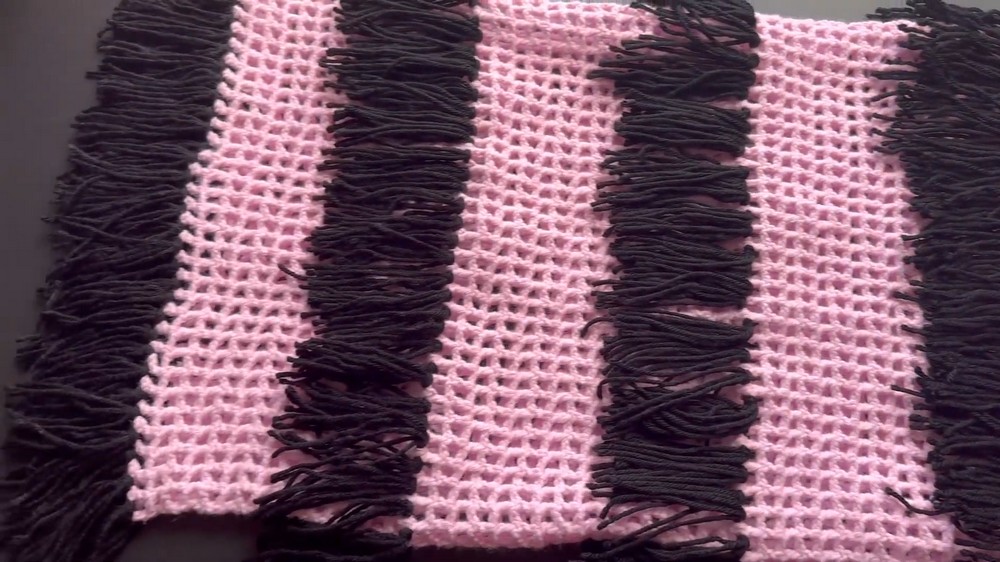
Adding Fringe
- For the fringe, cut yarn into strands of approximately 7 inches long (adjust based on your preference). Use 3-4 strands per fringe.
- To attach fringe:
- Insert your hook into a chain-2 space on the second row of the mesh.
- Fold the strands of yarn in half to create a loop.
- Pull the loop through, then pull the ends of the fringe through the loop to attach securely.
- Repeat this process around the entire row for the first fringe layer.

Fringe Layers
- To create additional fringe layers:
- Skip 16 mesh rows from the previous fringe row.
- Attach the next row of fringe at the 17th row.
- Repeat until you have achieved the desired number of fringe layers.
- The tutorial demonstrates 6 rows of fringe evenly spaced across the length of the project.
Waist Tie
- Create a long chain that will fit around your waist comfortably. Test fit before finalizing the length.
- Using a darning needle, thread the chain through the top mesh row (Row 1). Start at any point and weave the chain over and under the chain-2 spaces around the entire waistline.
Finishing Touches
- Once complete, secure all loose ends by weaving them in with a darning needle.
- Test-wear your piece to ensure the fit is comfortable. Adjust the tie as needed.

Customization and Tips
- Sizing: Adjust the initial chain to suit your hip size. Always ensure the number is even.
- Length: Make more or fewer mesh rows to create mini, midi, or maxi lengths.
- Fringe: Experiment with different fringe lengths, colors, or density for unique effects.
- Yarn Choice: Use cotton for a more breathable cover-up or acrylic for vibrant color options.
Special Techniques
- Mesh Pattern: The repeating pattern of double crochet and chain-2 creates a lightweight, airy texture.
- Fringe Attachment: Keeping the layers evenly spaced ensures a clean, professional look.
Conclusion
This simple yet elegant crochet design is perfect for summer outings or beach days. Whether worn as a skirt or a cover-up dress, the project combines practicality with style. By customizing the fringe layers, yarn colors, and length, each piece becomes uniquely yours.
Important Remarks
- To convert the look into a dress, tie the waist chain around your neck for a halter-like design.
- Keep your tension consistent to ensure the mesh rows are uniform.
- Pair the final piece with your favorite swimwear, or wear it over a casual outfit as a stylish accessory.