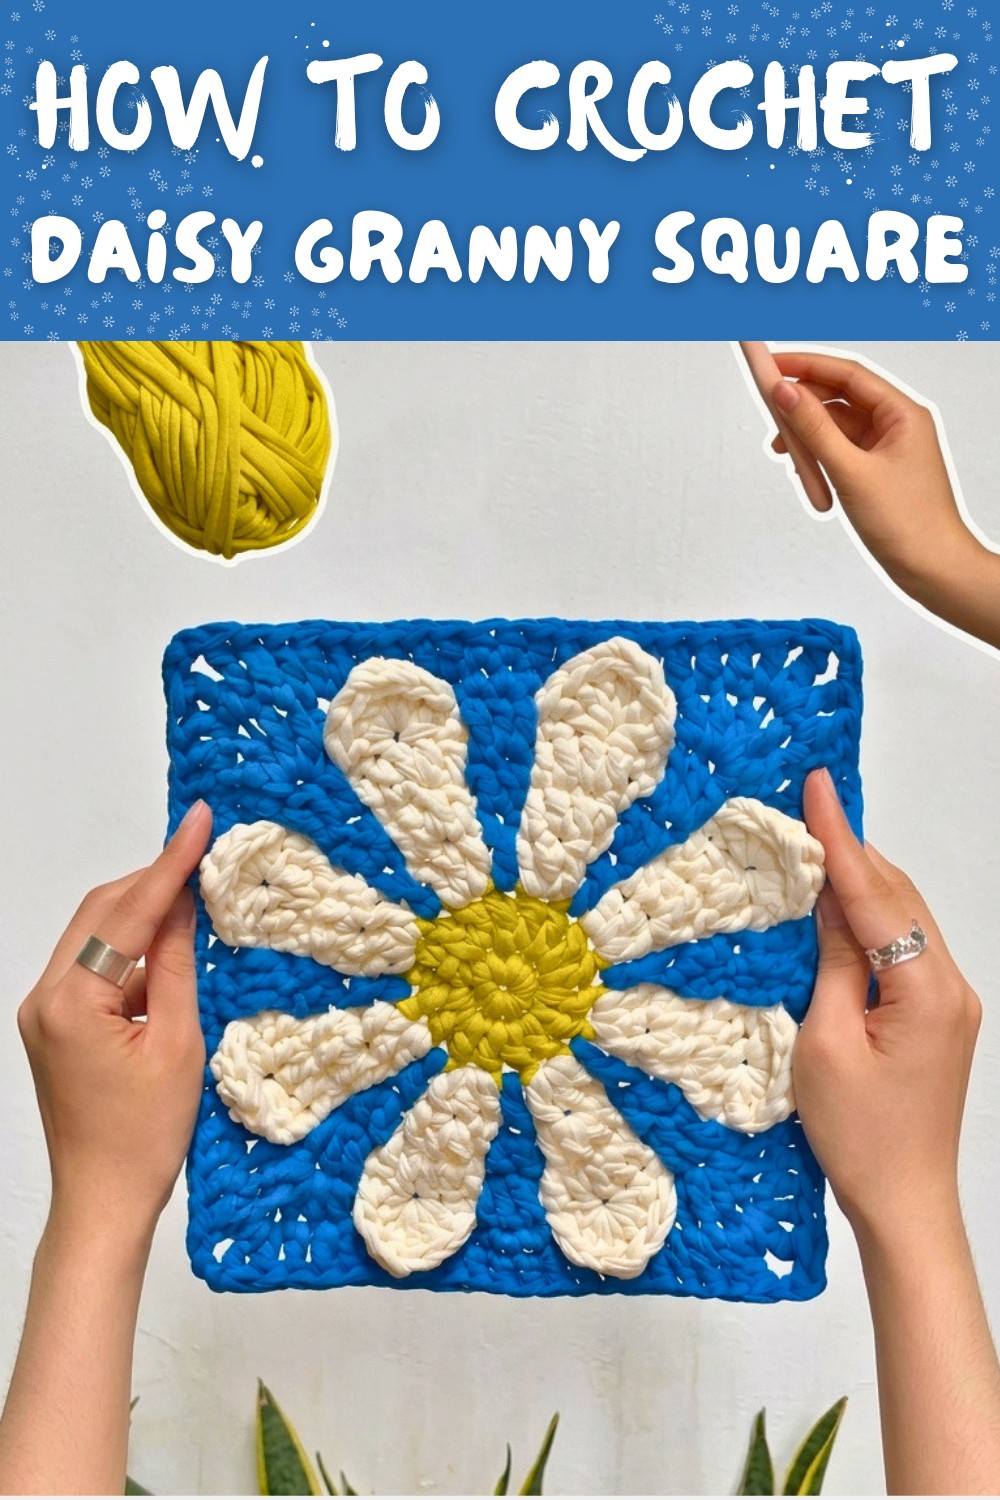
Simple Daisy Granny Square – Free Crochet Pattern
Did you know that the classic granny square has been around for over a century, but now you can give it a fresh twist by turning it into a gorgeous, puffy daisy flower? The Free Crochet Daisy Granny Square Pattern is more than just a fun trend, it's a perfect starter project for anyone wanting to blend creativity, sustainability, and handmade style. Using recycled t-shirt yarn, even beginners can quickly create a granny square that looks and feels both modern and special.
Crochet Daisy Granny Square - Cozy & Groovy Pattern

One of the things that makes this pattern so special is its cheerful design and versatility. Each square bursts with a vivid yellow or gold flower center, surrounded by crisp white petals, and a soft, colorful border that you can customize to match your own style. Key stitches include the magic ring, single crochet, double crochet, treble, extended double crochet, and slip stitch, making this project a fabulous way to practice your crochet basics and a few new skills. If you want to get creative, you can join several squares to make vibrant tote bags, funky cushion covers, warm blankets, or even clothing, just by switching up yarn colors or sizes.
Important Steps You Can't Forget
- Start with a snug magic ring for a neat, professional look.
- Carefully count each stitch-especially when forming petals and corners.
- Always secure and hide your yarn ends to keep your square looking tidy.
- Make sure your "stacked single crochets" are straight to keep petals even.
- Finish with neat slip stitches so your edges stay smooth and flat.

Common Issues and How to Fix Them
- Loose or gaping center: Tighten your magic ring before moving to the next round.
- Uneven petals: Double-check stitch counts in every petal, and adjust tension if needed.
- Messy color changes: Overlap yarn ends and crochet over them for seamless transitions.
- Curling or wavy square: Lay your square flat and gently stretch it or block it for a perfect finish.
Size Guide
With bulky (weight 5) t-shirt yarn and an 8mm crochet hook, each daisy square measures about 5 inches across. You can adjust the size by changing hook and yarn thickness as desired.
Chunky Groovy 3D Flower Square Crochet Pattern
Materials List
- Yarn: Bulky weight (Category 5) recycled T-shirt yarn or similar chunky yarn (multiple colors for center, petals, and background)
- Hook: 8.0 mm crochet hook (US L-11)
- Notions: Large darning needle for finishing, sharp scissors
- Optional: Stitch marker (helpful for rounds)
Skill Level
Intermediate
(Suitable for makers who are practiced in working in the round, clusters, and occasional specialty stitches.)
Key Abbreviations (US Terminology)
| Abbreviation | Meaning |
|---|---|
| ch | chain |
| sl st | slip stitch |
| sc | single crochet |
| dc | double crochet |
| ext-dc | extended double crochet |
| tr | treble crochet |
| hdc | half double crochet |
| st(s) | stitch(es) |
| rep | repeat |
| beg | beginning |
Special Notes:
- Stacked single crochets are used instead of chains for a neat edge (stack three sc, counts as dc).
- Extended dc: Yarn over, pull up loop, yarn over and pull through one loop, then (yarn over and pull through two loops) twice.
- Pattern written in US terms.
- Work rounds; change colors as indicated for bold effect.
Step-by-Step Pattern
Row 1: Flower Center
- Make a magic ring.
- Work 8 sc into the ring.
- Tighten ring.
- Sl st to the first sc to close.

Simple Explanation:
Work single crochets tightly into your magic ring to make a neat, sturdy flower center. Slip stitch to finish the round.
Row 2: Center Expansion
- Stacked sc (counts as dc): Into first stitch, do three stacked sc.
- 2 dc into each stitch around (16 dc total):
In same stitch as stacked sc, add 1 dc.
In every remaining stitch, work 2 dc. - Sl st to beg stacked sc and fasten off.
Simple Explanation:
For this row, you're making two double crochets in every stitch to quickly grow the circle. The stacked sc keeps the beginning edge clean.
Row 3: Flower Petals
- Join petal color with a standing dc in the 5th stitch of the round.
- Work 2 more dc into same st (3 dc cluster).
- Ch 1, skip 1 st.
- Repeat: In next st, work 3 dc, ch 1, skip 1 st; repeat around (8 clusters total).
- Sl st to beg standing dc and fasten off.

Simple Explanation:
Petals are created by clusters of three double crochets with a chain between them for spacing. Each cluster goes in every other stitch; you'll have 8 "petals" forming a flower.
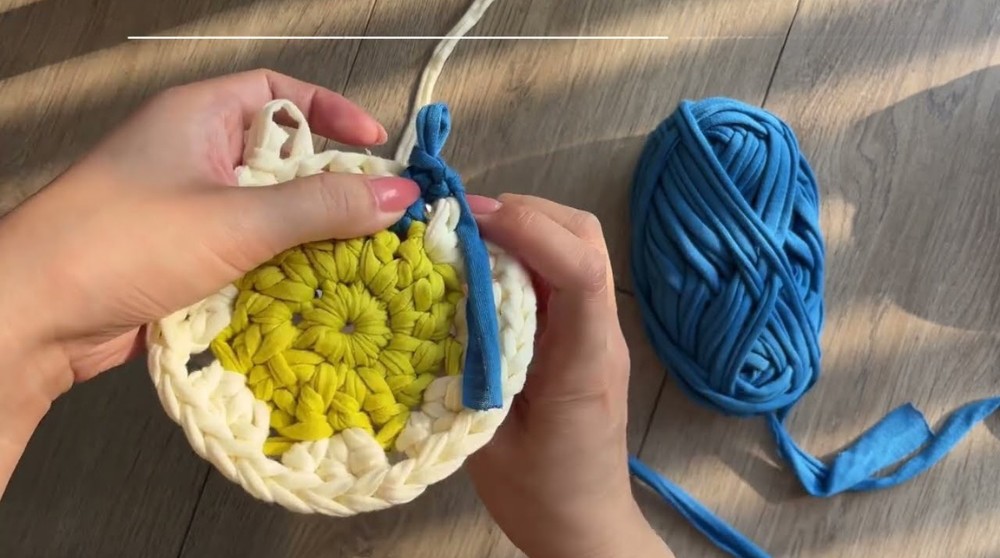
Row 4: Background Frame
- Join background color with a standing dc in any petal cluster.
- Ch 4.
- Dc in next cluster, ch 4; repeat around.
- Sl st to beg dc and fasten off.

Simple Explanation:
You are building a frame behind your petals by working a double crochet into each petal cluster, separated by chains. It's the foundation for squaring the flower.
Row 5: Petal Expansion
- Into each petal cluster: Stack 3 sc (counts as dc), 2 dc in next st, 1 dc in last st.
- Ch 2 between petals.
- Repeat across all petals.
- Sl st to beg stacked sc and fasten off.
Simple Explanation:
Petals get bigger and more 3D! Each petal uses four double crochets, and chain-2 spaces separate them for shape.
Row 6: Background Expansion
- Into first petal stitch: Stack 3 sc (counts as dc), dc in same st.
- Ch 5.
- Into next petal: 2 dc, ch 5. Repeat around.
- Sl st to beg dc and fasten off.

Simple Explanation:
You make bigger, airy chain spaces and more double crochets to expand the frame for your flower.
Row 7: Petal Expansion
- Into first petal: Stack 3 sc (counts as dc), 2 dc in second st, 1 dc in third and fourth st (total 5 dc).
- Ch 2 between petals.
- Repeat for all petals.
- Sl st to beg stacked sc and fasten off.
Simple Explanation:
Petals expand again with a total of five double crochets, and chain-2 spaces keep them separated.
Row 8: Sculpted Petal (Fancy Edge)
- Ch 1, sc into first st.
- Skip 1 st, into next:
- 2 dc,
- 1 ext-dc,
- 1 tr,
- 1 ext-dc,
- 2 dc,
(all in one st)
- Skip 1 st, sc into next, ch 2.
- Repeat for all petals.
- Sl st to beg sc and fasten off.
Simple Explanation:
Each petal is shaped with fancy stitches (treble and extended dc mixed with dc) to give a 3D punchy look. Single crochets and chain-2 spaces keep the petals spaced.
Row 9: Background Building
- Stacked sc into ch-2 space (counts as dc).
- In same space:
- 2 dc into first st and chain space.
- 5 dc into chain-5 space (back of petals).
- Repeat:
- [3 dc into next ch-2 space (first, chain, and second st), 5 dc into chain-5 space]
- Continue around.
- Sl st to beg stacked sc and fasten off.
Simple Explanation:
You are building more structure behind the petals for the square using double crochets in each space. This will later be squared off.
Row 10: Square the Flower (Corners & Sides)
- Ch 1, sc in same st.
- Sc in next 2 sts, then 4 sc across petal back.
- Into 5th petal st: hdc.
- Into next background group:
- 1 dc in first st,
- 2 dc in second st,
- ch 2,
- 2 dc in same (corner),
- 1 dc in third st.
- hdc in next st.
- 11 sc across next petal back.
- Repeat for four sides/corners.
- Finish with four sc to beginning. Sl st to beg sc and fasten off.
Simple Explanation:
This row adds corners and straight sides to your flower, shaping it into a square. Double crochets at corners and half-double crochets fill out the sides.
Row 11: Square Definition & Final Edge
- Stack 3 sc (counts as dc) in first st.
- Hdc in next two sts.
- Dc in next eight sts to corner.
- Corner:
- tr in chain space,
- ch 2,
- tr again in chain space.
- Dc in next eight sts, hdc in next three.
- Repeat for all sides and corners.
- Finish with slip stitch to beg stacked sc. Use needle to sew final V-stitch for seamless edge. Fasten off and weave in ends.
Simple Explanation:
Build up sides with half double and double crochet, shape corners with treble crochets separated by chain-2. Use needle at the last join for a tidy finish.
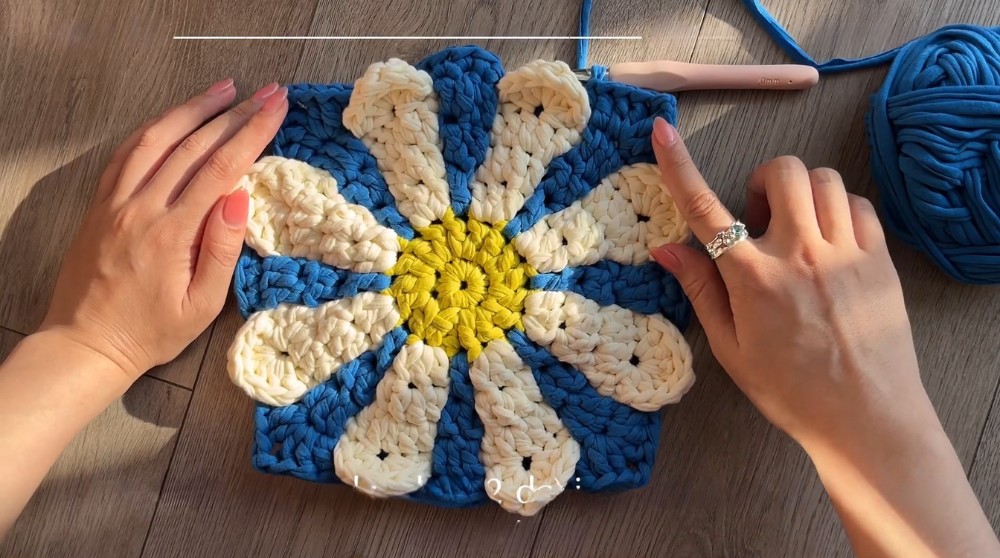
Conclusion
Your chunky, groovy 3D flower square is finished! Use it to make bags, blankets, or wearables - it has bold texture and sculpted petals, perfect for all kinds of creative projects.
Pattern Corrections & Tips
- Petals too tight? Check your tension and try pulling up a bit more yarn for the tall stitches.
- Square not flat? Gently block after finishing to make it flat, especially with chunky yarn.
- Seamless join: Use a tapestry needle to mimic the look of a V-stitch when joining the last round for a professional finish.
Expert tip:
Use color changes at any row for extra pop! If unsure about stacked single crochets, substitute with ch-3 as first dc.