
Square Pouch Free Crochet Pattern You'll Use a Lot
Organize your things with this free crochet square pouch pattern that gives you handy storage and adds a simple, lovely touch with its handmade design.
Using just a few small colorful squares, you can create a pouch that looks cheerful and feels soft to touch. What makes this pouch special? Its lovely flower like shapes stitched into each square, combined with bright and happy colors, make it stand out. It's not just pretty, it's functional too. You can use it to store makeup, coins, keys, or other small essentials. With a secure zipper added, it keeps everything safe and easy to carry. Whether you put it in your bag or use it as a tiny accessory, it fits perfectly in any space.
Crochet Square Pouch with Free Pattern for Easy Use

Another great thing about this pouch is how easily you can personalize it. Pick colors that match your style or make it bigger if you need more space. Want to add a fun twist? Decorate it with pom poms, beads, or small tassels. Plus, it's light on the budget because all you need is yarn and a few simple tools to start.
This crochet pouch is not just a practical item, it's a wonderful way to show off your creativity. It's beginner friendly, quick to finish, and looks so pleasing that you'll feel proud to use or gift it. Bring some charm into your everyday life with this delightful project.
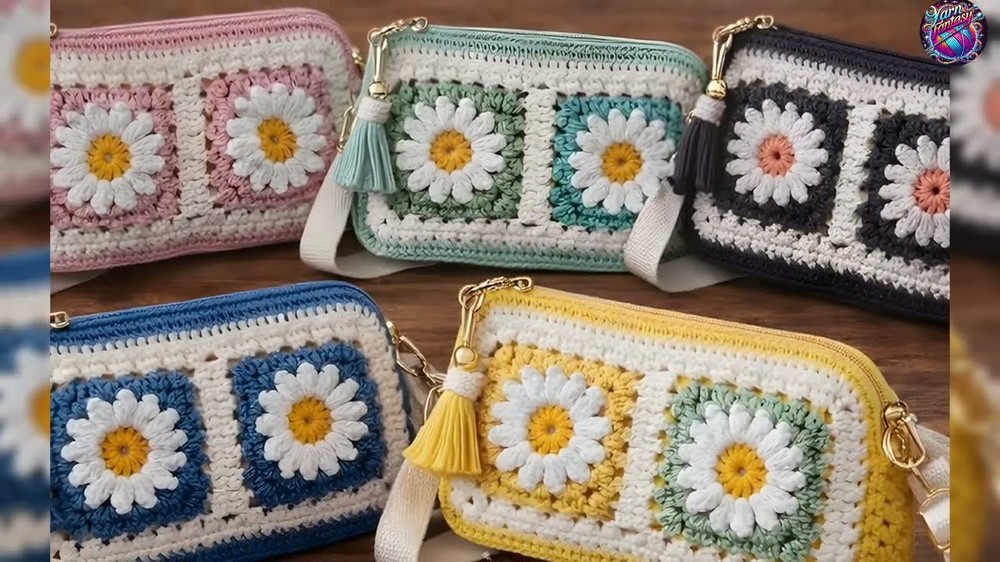
Crochet Square Pouch Pattern
Materials Needed
- Yarn:
- Main Color (White for the flower centers)
- Secondary Colors (Yellow and another accent color of your choice for the petals and outer detailing)
- Crochet Hook: 2.0 mm
- Zipper: Matching or coordinating color to fit the finished pouch
- Thread and sewing needle (for zipper attachment)
- Stitch markers (optional)
- Scissors
- Measuring Tape
Gauge
- Gauge: 10 single crochet (sc) stitches x 10 rows = 2"x2" (5 cm x 5 cm)
Note: Ensure your gauge matches to achieve the specified finished size.
Finished Size
When completed, the pouch measures approximately:
- Length: 7 inches (18 cm)
- Width: 4 inches (10 cm)
Special Techniques
- Slip Knot: To start your crochet project.
- Magic Circle: For neat and tidy motif centers.
- Double Crochet (dc): This stitch is used to create the daisy square motifs.
- Half Double Crochet (hdc): Used for the pouch edging.
- Single Crochet (sc): Used for joining and decorative edging.
- Attaching a Zipper: Sewing the zipper neatly using basic stitching techniques.
Instructions
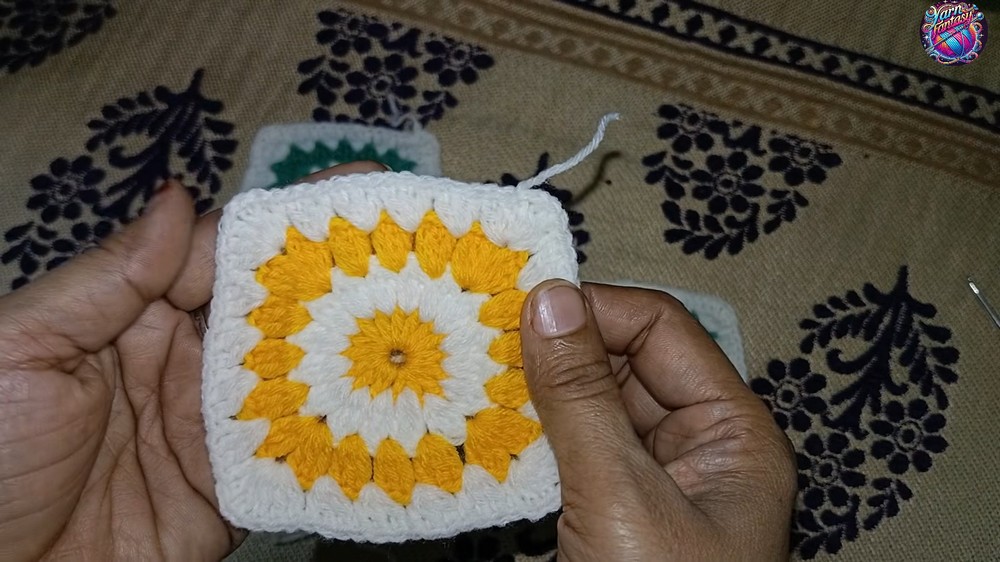
Step 1: Create the Daisy Flower Squares
- Start the Magic Circle:
- Create a slip knot, insert your hook, and form a magic circle.
- Round 1 (Base petals white yarn):
- Chain (ch) 5; join with a slip stitch (sl st) to form a ring.
- Ch 2 (counts as the first dc), and work 15 double crochets (dc) into the ring.
- Join with a sl st to the top of the first ch 2. (16 dc total)
- Round 2 (Petals yellow yarn):
- Attach yellow yarn neatly.
- Ch 1, [dc 3 times into the same space as the last join, pull through all 3 loops on the hook, ch 1] repeat this petal pattern in each dc from the previous round.
- At the end of the round, you will have 16 petals. Fasten off.
- Round 3 (Square border accent color):
- Attach the accent yarn.
- Begin in any ch 1 space between petals.
- Work the following corner section: ([dc 3, ch 1, dc 3] into the same ch 1 space).
- Work 3 dc into each gap between petals, skipping corners.
- Repeat for each side of the square. Fasten off.
Repeat Steps 1-4 to create four daisy flower squares.


2: Assemble the Squares
- Position the Squares:
- Arrange the four squares in 2x2 format with corners aligned neatly.
- Join Squares Using Single Crochet (sc) Seam:
- Align two squares with right sides facing.
- Insert your hook into the back loops of both pieces.
- Work single crochet (sc) across to join the squares.
- Repeat this process for the other two squares, and then join the two rows together.
- Sew Additional Edging for Strength (optional):
- Use hdc along the seams if additional reinforcement is needed.


3: Shape the Pouch
- Fold and Secure:
- Fold the joined squares in half with the floral design facing outward.
- Pin the sides together for easy crocheting.
- Work Single Crochet Seam Around Sides:
- Start from the bottom corner, join the side edges using sc.
4: Add Edging
- Add Decorative Border:
- Work hdc around the folded pouch opening to create a neat and polished edge.
- For the corners, work 2 hdc into the same stitch for a rounded look.
- Attach a Zipper:
- Hand sew the zipper using matching thread. Align neatly along the edges of the opening.

Customization Ideas
- Change Colors: Experiment with different colors for the petals, center, and square border to suit your personal taste.
- Add a Strap: Crochet a matching strap or handle for a shoulder or wrist pouch style.
- Decorations: Add tassels, pom poms, or beads for extra flair.
- Size Adjustments: To make a larger pouch, increase the number of squares or use thicker yarn with a larger hook.


Tips for Success
- Maintain Consistency: Ensure that all your motifs are of equal size for an even finish.
- Block Your Squares: Before assembling, block the squares to help them lay flat for easier joining.
- Handle the Zipper Gently: While sewing, ensure the stitches are secure but not too tight to prevent puckering.
- Weave in Ends As You Go: This saves time and keeps your project neat and manageable.

Maintenance Tips
- Cleaning: Wash the crochet pouch gently with lukewarm water and mild detergent.
- Avoid heavy wringing to prevent distortion.
- Storage: Keep the pouch filled slightly to retain its handmade shape. Avoid crushing under heavy items.
- Repairs: In case of thread disconnection or zipper issues, restitch the affected areas carefully.
Conclusion and Final Look
The finished Daisy Flower Pouch is a combination of vibrant colors, a sturdy structure, and beautiful design. The floral motifs add charm, while the practical zipper closure ensures its utility for storing essentials. Whether you use it as a makeup bag, coin pouch, or a small clutch, this pouch is versatile and stylish.
Crochet offers endless creativity, so feel free to tweak the details, try different color palettes, or add your own personal flair. This project is ideal for beginners advancing their skills and experienced crocheters looking for a quick, rewarding project.
By following this pattern and tips, you'll create a unique pouch that's both functional and decorative.
Extra Notes:
- Ensure all knots are secure to prevent unraveling.
- This pattern is a great way to use leftover yarn and reduce waste.
- Don't rush the final assembly-precision will give your pouch a professional look.