Trendy Free Crochet Top Pattern That Turn Heads Everywhere
Style your wardrobe with charming crochet top ideas that inspire creativity and uniqueness. Perfect for all skill levels, they're fun and full of personality!
There's something timeless about how a crochet shoulder bag fits seamlessly into everyday life. Combining practicality with intricate textures and vibrant colors, it serves as both a functional item and a stylish statement. Whether featuring bold patterns or subtle details, it reflects a sense of individuality that's hard to match.
Cool Free Crochet Top Pattern Perfect for Summer Days

Lightweight yet durable, it's perfect for daily errands, casual outings, or thoughtful gifting. With a mix of eco-friendliness and character, this handmade top brings a unique touch to any wardrobe without compromising utility.

Crochet Cluster Top Pattern
Materials Needed
- Yarn:
- Weight: Sport or lightweight (#3 yarn).
- Color: Your choice (single color or multi-color for visual interest).
- Hook Size:
- 3.75mm or size recommended for your yarn.
- Other Supplies:
- Stitch markers for tracking placements.
- Scissors.
- Darning needle for weaving ends.
Gauge
- Cluster Stitch Gauge (with 3.75mm hook):
- 10 clusters x 10 rows = 4"x4".
- Adjust hook size accordingly to match gauge.
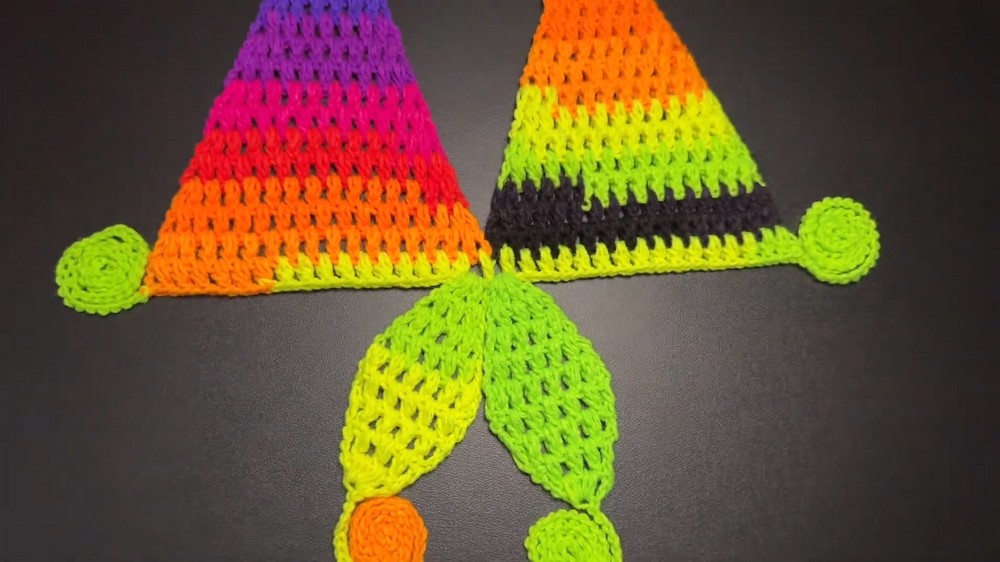
Finished Size
Cup Size
- Width per cup: 7.5 inches.
- Height per cup: 10 inches.
Top Size
- Across: ~30 inches (adjust based on preference).
- Straps: Chains of 60 for neck and waist ties.

Pattern Instructions
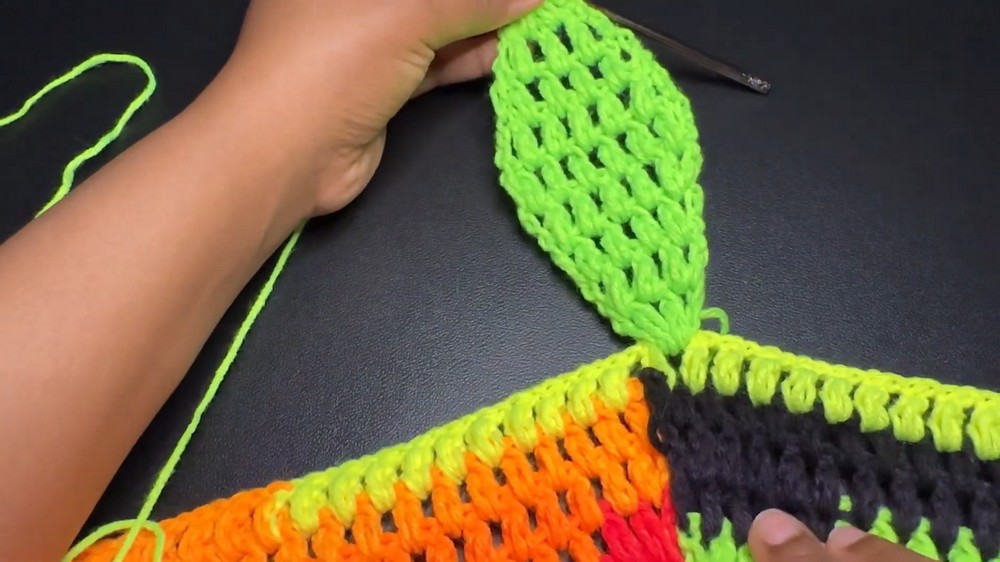
1. Create the Cups (Make 2)
Step 1: Magic Ring
- Create a magic ring by forming a loop with the working yarn placed over the short strand. Pull up a loop, chain 1 to secure the circle.
**Step 2: Row 1 (Foundation Row)
- Chain 3 (counts as your first double crochet).
- Yarn over, insert hook into the magic ring, pull up a loop, yarn over, and repeat until you have 5 loops on your hook.
- Pull through the first 4 loops, then pull through the remaining 2 loops, and chain 1-this creates your first cluster stitch.
- Repeat for another cluster stitch.
- Add a final double crochet into the magic circle.

Step 3: Pull the tail to close the magic ring.
2. Continue Increasing Rows for Cups
Row 2:
- Chain 3 and turn your work (counts as a double crochet).
- Make a cluster stitch into the next space created by the previous chain 1.
- Continue cluster stitching into chain 1 spaces of the prior row.
- At the end of the row, place a double crochet on top of the turning chain from the previous row.


Row 3 & Beyond:
- Repeat instructions for row 2 until the cup measures 10 inches tall (about 15 rows for small-to-medium sizes).
3. Join the Cups
Once both cups are complete:
- Leave a long tail on the first cup to sew it to the second cup.
- Use your hook or a darning needle to join the two cups in the center:
- Insert through the first clusters of both cups. Chain 1 and pull tight. Weave in the ends.

Now, the cups are joined into one piece.
4. Add Bottom Row
To create the base connecting the cups:
- Keeping the working yarn on one side, insert your hook into the first chain space of the bottom edge of the cups.
- Chain 3 and begin cluster stitching into each chain space across the bottom.
- To join the cups at the center, yarn over, insert through both the chain spaces of each cup, and complete the cluster stitch, chaining 1 before continuing.
Repeat across until the row is complete. End with a double crochet on the last chain.
5. Create Straps
Using the same yarn, create chains for straps and ties:
- Neck ties: Attach yarn at the top corner of the cups and chain 60 for each strap.
- Waist ties: Attach yarn where the bottom edge begins and chain 60 for adjustable ties.
Repeat on all corners.
6. Bottom Section Design
This optional bottom feature adds flare to your top.
Row 1:
- Insert hook at the chain space in the center of the bottom edge (created previously).
- Chain 3, make 2 cluster stitches into the same chain space. Add a double crochet into the same chain space to complete the row.
Row 2:
- Turn your work, chain 3, and cluster stitch into the first chain space. Continue cluster stitching across the bottom edge in each chain space. End with a double crochet at the final chain space.
Row 3-5:
Repeat this pattern for additional rows.
7. Final Decreases for Bottom Edge
To taper the bottom edge:
- Skip the first chain space and start the row at the second chain space (decreasing).
- Continue working cluster stitches as before. End each row with a double crochet.
- Repeat this for 4 rows to narrow the width.

Customization Ideas
- Length Adjustment: Add rows to make the top longer or decrease rows for a cropped look.
- Edging Options: Add scalloped edging at the top or bottom for a decorative finish.
- Color Variations: Crochet each cup or row in different colors for a striped or color-blocked effect.
- Tie Length: Lengthen or shorten the ties for better adjustability based on style preferences.
Tips for Enhancing the Experience
- Beginner-Friendly: Use stitch markers to track center points and decreases, especially during shaping.
- Check Measurements: Frequently match your crochet work with the measurements provided or your desired size.
- Use Quality Yarn: Choose soft, durable yarn for better comfort against the skin.
Conclusion
This crochet cluster top is a trendy and versatile project suitable for small-to-medium sizes. The cluster stitches add texture and charm to the design, while ties allow adjustability for a perfect fit. Whether casual or chic, this handmade piece stands out effortlessly!

Final Remarks:
The finished top features two softly textured cups, ties for neck and waist, and an optional tapered design at the bottom edge. With custom colors and lengths, this pattern ensures creativity for all crocheters!