
Trendy Granny Square Bag – Free Crochet Pattern & Guide
Style your look with a free crochet granny square bag pattern sure to become your new favorite accessory for every outing and daily adventure.
A handmade bag can bring special joy to your everyday life. It is simple to make and looks colorful and charming. This creative project uses small squares that are joined together to form a beautiful bag. The Crochet Granny Square Bag pattern is very easy to follow and you do not need much skill or experience. You can use different yarn colors to make your bag bright and unique.
Free Cute Granny Square Bag Crochet Pattern for Everyday Use

This bag is strong and can carry things like books groceries or even your favorite items. It is good for going to the market for shopping or just walking in the park. With this pattern you can make a bag for yourself or for someone you care about. It is a wonderful way to create something useful and show your love. This bag is also a great gift idea and can be used every day. Making your own bag is fun and you will enjoy the process from start to finish.

Granny Square Spiderweb Crochet Bag Pattern
Materials
- Yarn: 100% Cotton, 2 mm thickness; two colors suggested (e.g., black and dark gray)
- Crochet Hook: Size 3 mm
- Tapestry Needle (for seaming and weaving in ends)
- Stitch Markers (optional)
- Scissors
- Blocking board/Pins, towel, or mat (optional, for blocking/granny shape)
- Fabric for lining (optional but recommended for bags; light-weight cotton)
- Needle and matching thread (for sewing lining)
- Measuring Tape
Abbreviations (US Terms)
- ch - chain
- sc - single crochet
- dc - double crochet
- sl st - slip stitch
- sp - space
- rep - repeat
Special Notes
- Pattern is fully modular; you can make as many granny squares as desired for larger or smaller bags, or switch motif colors for different effects.
- Assembly uses a slip stitch join through the back loops only, for a seamless edge.
- Each finished granny square (after blocking) measures approximately 11 cm per side.
- Lining is optional but highly recommended for bags made with openwork squares.
Pattern Steps
1. Granny Square (Spider Web Motif) - Make 5
Round 1:
- Using dark gray or color 1, make a magic ring.
- Ch 2 (counts as first dc).
- Dc 11 into the ring.
(Total 12 dc.) - Pull ring closed and join to 2nd ch of beginning ch-2 with a sl st.
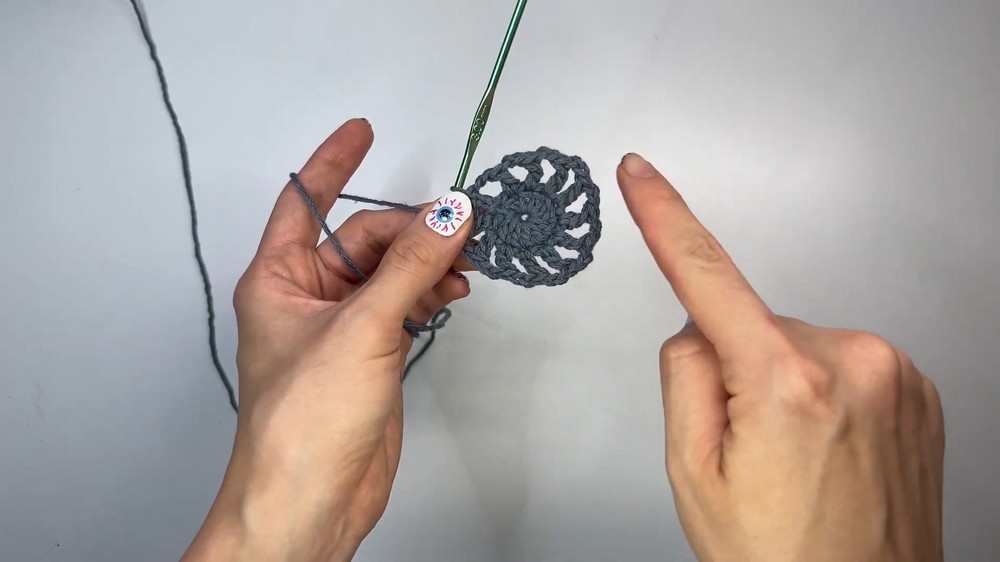
Round 2:
- Ch 2 (counts as dc), ch 2 (spacer).
- Dc in next st, ch 2.
Rep from * around for each dc (total: 12 dc, each separated by ch-2 sp). - Join to starting ch-2 with a sl st.
Round 3:
- Ch 2 (counts as dc), ch 3 (spacer).
- Dc in next dc, ch 3.
- Rep from * around (12 dc, each separated by ch-3 sp).
- Join to starting ch-2 with a sl st.
Round 4 (Form Corners):
- Ch 1, sc in same sp as join.
- [3 sc in next ch-3 sp, sc in next dc] twice
- In next dc: Work [2 dc, ch 2, 2 dc] (forms corner).
- [3 sc in next ch-3 sp, sc in next dc] twice
- In next dc: [2 dc, ch 2, 2 dc] (next corner).
- Rep this [3 sc in ch-3 sp, sc in dc twice, then [2 dc, ch 2, 2 dc] in next dc] around for all four corners.
- Join with sl st to first sc.
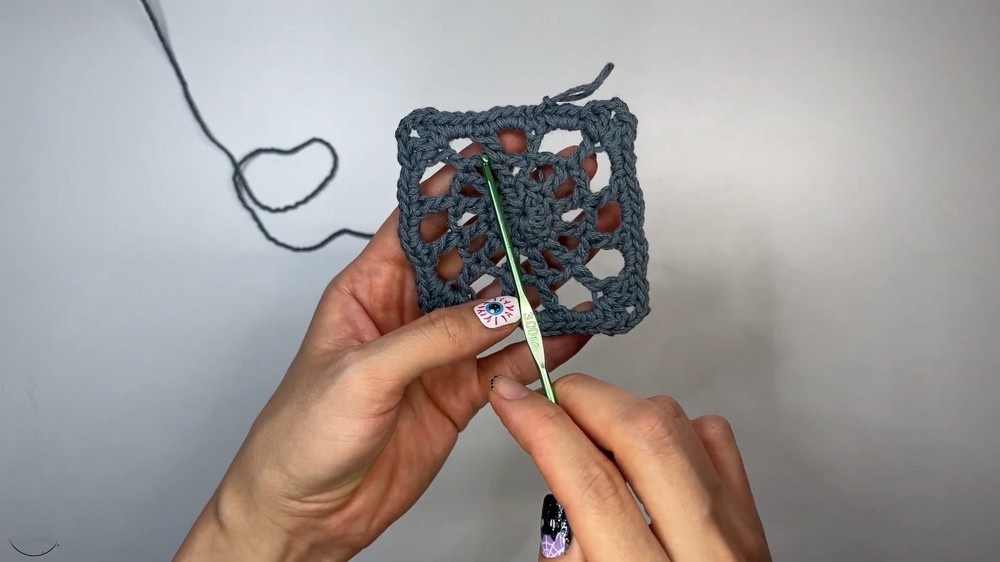
Summary of patterning in this round:
- Three "sides" are (sc in dc, 3 sc in ch-3 sp, sc in dc, 3 sc in ch-3 sp).
- At every third dc (spread evenly), work a corner: [2dc, ch 2, 2dc].
Round 5 (Final Square Round):
- Ch 2 (counts as dc), dc in each st to corner ch-2 sp.
- In corner: [2 dc, ch 2, 2 dc].
- Continue dc in every st to next corner, working corners as above.
- Join with sl st to 2nd ch of start.
- Fasten off; weave in ends.
2. Blocking the Granny Squares (Optional but Strongly Recommended)
- Block each square to 11 cm sides using a blocking board or a firm towel/mat and pins.
- Pin each corner, spritz with water, and let dry overnight for even, squared shape.

3. Bag Layout and Planning
- Arrange 5 squares as follows:
- One in the center, with four more attached to each side (think of a cross shape).
- Take a photo or note layout for correct joining.
4. Joining Granny Squares
Slip Stitch (Back Loop Only) Method:
- Place two squares with right sides together.
- Join yarn in the left chain of the corner sp of both squares.
- Work slip stitch joins by inserting hook through back loop only of both squares (nearest loop on first square, farthest on second).
- Continue joining along edge to next corner, being careful to align stitches (each side should have 19 stitches, not counting the corner ch-2 sps).
- Fasten off, leaving a neat finish.
- Repeat to join all squares according to your planned layout.
5. Constructing the Bag Shape
- Once all squares are joined in cross formation, fold the "arms" of the cross over the middle square, forming a pouch shape.
- The center square will be the base; the outside squares fold up to meet and form the sides of the bag.
- Seam the matching sides together (see assembly section in video for reference).
- Be sure to work with wrong sides together so the seams are inside the bag.
- Join with sl st in back loops as before.
6. Bag Top Edge (Optional, for Structure)
- Join yarn at any top seam.
- Sc around entire opening.
- At each corner, work: [2 sc, ch 2, 2 sc] for structure.
- Join with sl st to first sc; fasten off.
- Repeat for both top sides of the bag (if desired).
7. Strap / Cord
- At one top side corner, join yarn in ch-2 corner sp.
- Ch to desired strap length (sample: 80 ch for 41 cm).
- Sl st into opposite top corner (other side of the bag).
- Optionally, turn and sc in each ch for a thicker, sturdier strap.
(Return and join with sl st at starting point, fasten off.)
8. Optional: Fabric Lining
- Cut fabric panels to fit inside of finished crochet bag, adding ½" (1 cm) seam allowances.
- Place fabric right sides together; sew side and bottom seams.
- Turn lining right side out, fold top edge down by 1 cm and press.
- Insert lining into bag; hand-stitch folded edge to inside of crochet bag using matching thread and small stitches, catching as little yarn as possible for a seamless look.
- Tips:
- Double lining (e.g., white for bright interior, dark for wear) can be used for durability and appearance.
- Secure with pins along edge before stitching.

Conclusion
You have completed a decorative spider web granny square bag with sturdy, clean seams and a neat finish. The motif can be repurposed for home decor, wearables, or accessories as you desire. Lining enhances durability and functionality for carrying items.

Pattern Correction & Tips
- Correction: Be sure every square side has the same number of stitches for accurate joining. Corners use ch-2, which are not included in side stitch counts.
- When joining, always insert hook through corresponding stitches and corners.
- Keep your squares blocked for even alignment.
- Use a strong, color-matched sewing thread when affixing the lining.
- For a sturdier strap, double the row or weave a cord or ribbon through the top edge.
- For different sizes, adjust yarn, hook, or make more/larger squares.