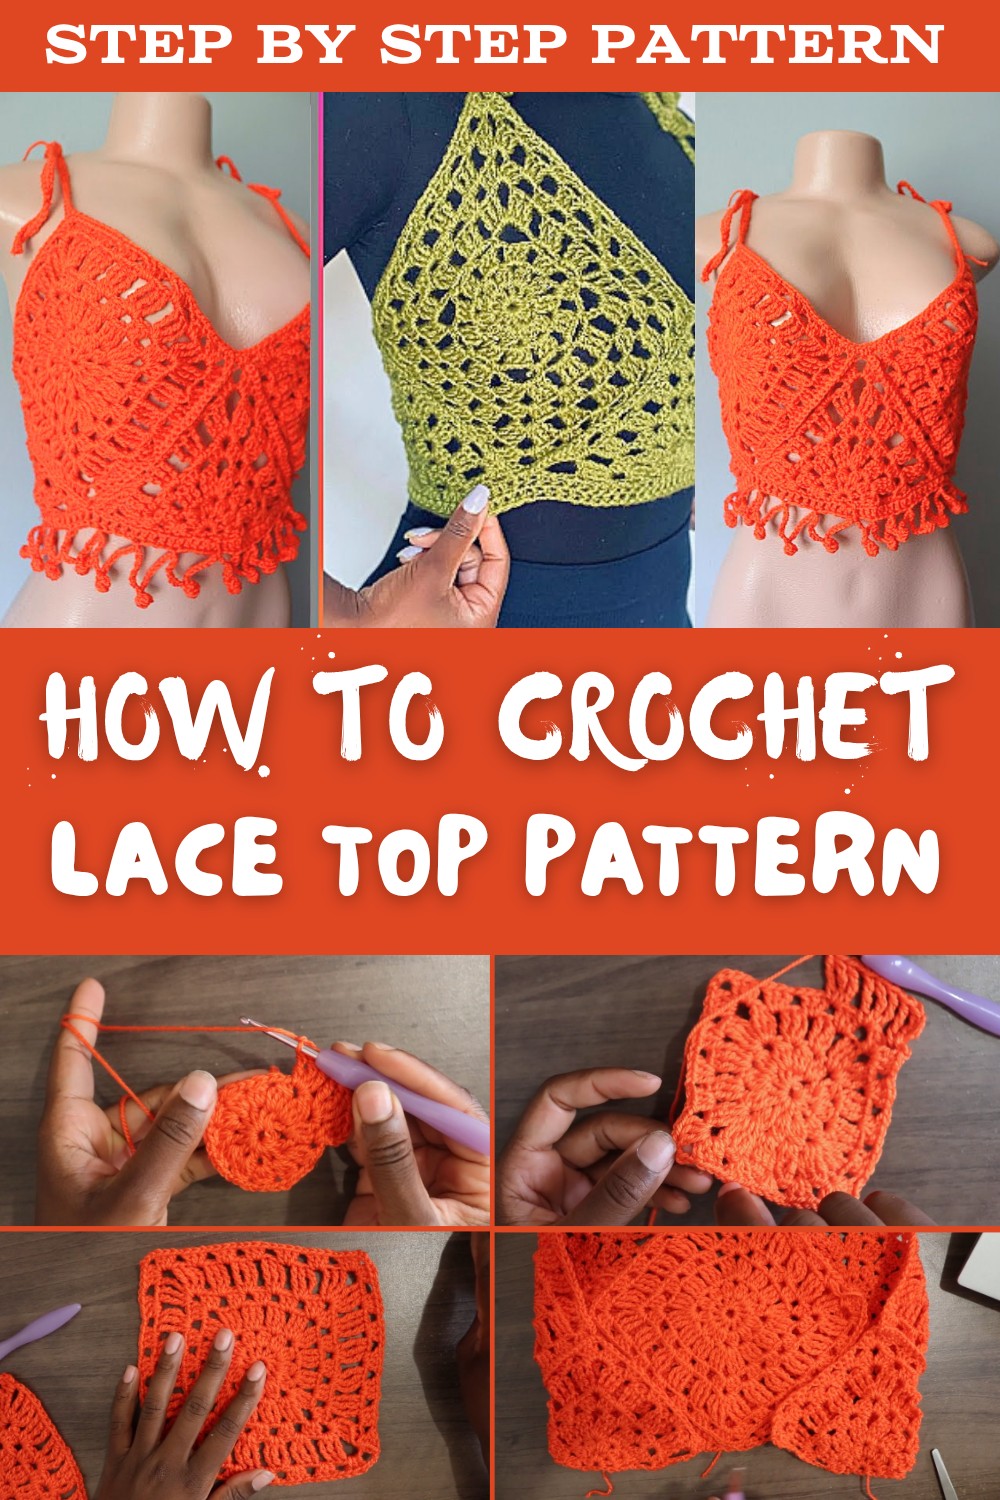
Crochet Lace Top for Beginners: Free Pattern with Instructions
Master the art of crocheting a gorgeous lace top with this free and easy guide, perfect for enhancing your style effortlessly and comfortably every day.
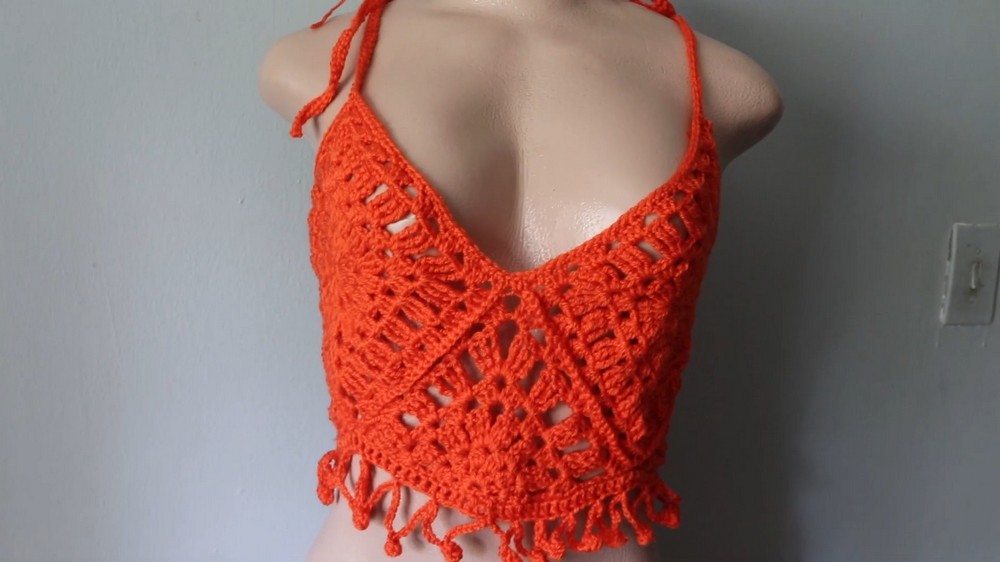
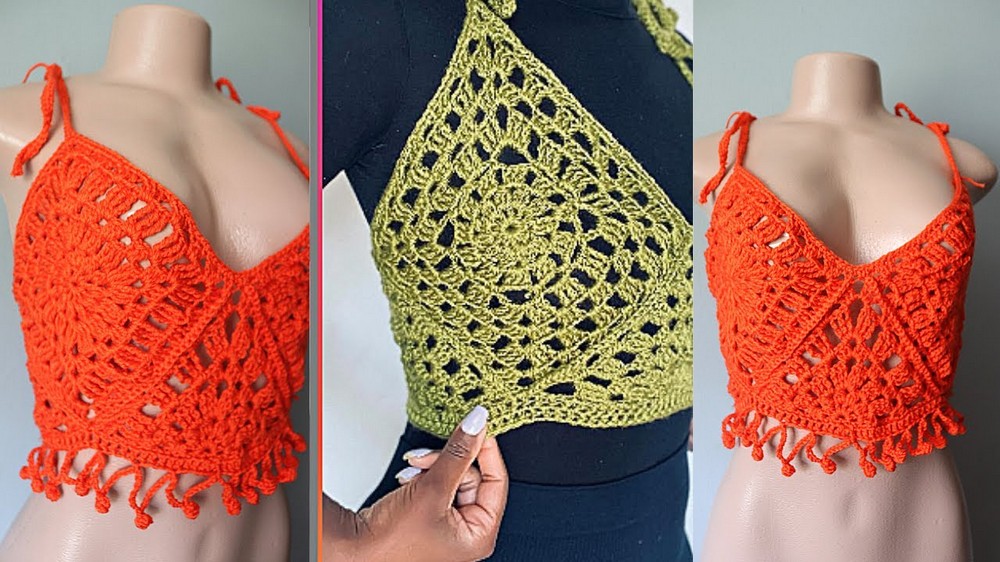
Gone are the days of wearing dull, boring tops that lack charm and personality. This crochet lace top is a breath of fresh air, offering a design that's full of elegance and lightweight beauty. The delicate lace pattern creates a soft, breezy finish, making it perfect for sunny days or layering to add flair to any outfit. Its airy structure keeps it comfortable, while the intricate details give it a stylish, eye-catching look.
Free Crochet Lace Top Pattern for Every Occasion
With a relaxed and flattering fit, it suits all body shapes and can easily pair with jeans, skirts, or shorts for any occasion. Easy enough for beginners but stunning enough to impress, this crochet top brings creativity and uniqueness into your wardrobe. Every stitch you make becomes part of a wearable work of art, whether for casual outings or special moments.
Cropped Top Crochet Pattern Step-by-Step
Skill Level
Intermediate - The pattern uses basic crochet stitches, assembly techniques, and simple shaping.
Finished Size
- Size: Small/Medium.
- Fits bust size 32C or comparable.
- Customization: Instructions on how to adjust for larger sizes are included in the "Customization Ideas" section.
Gauge
- Gauge: 2x2 inches square = approx. 8 double crochet stitches across x 5 rows of double crochet.
Materials
- Yarn:
- Kartopu Flora Yarn, 100% Acrylic
- Recommended hook size: 2.5-3 mm.
- To achieve a looser fit, use a 4 mm crochet hook, as in this pattern.
- Note: Any DK-/Light-Worsted weight yarn with similar fiber content can be substituted.
- Kartopu Flora Yarn, 100% Acrylic
- Tools Required:
- Crochet hook: 4 mm.
- Scissors.
- Measuring tape (optional).
- Yarn needle (for weaving in ends and assembly).
Special Techniques
- Magic Ring (Adjustable Ring):
- A technique used to crochet in rounds without creating a hole in the center.
- Clusters:
- This pattern uses 3 double crochet clusters, created by working three double crochet (Dc) stitches in the same space.
- Corner Creation:
- Corners are achieved by working an extra cluster separated by chains (e.g., Chain 3 between clusters).
- Assembly Techniques:
- The pieces are joined by crocheting together adjacent edges with single crochets (Sc).
- Edge Borders:
- The edges are finished with single crochets to create a neat, uniform look.
Pattern Instructions
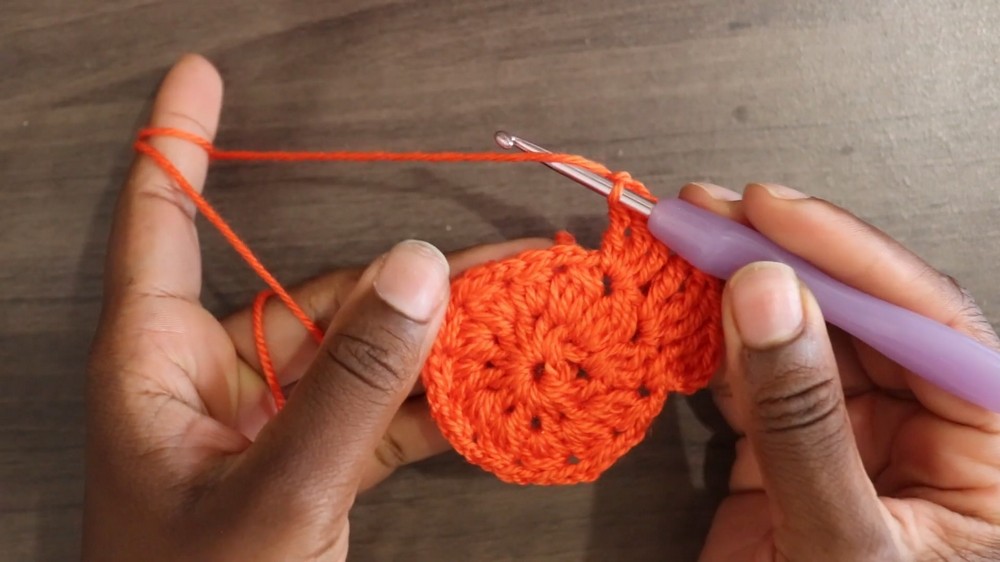
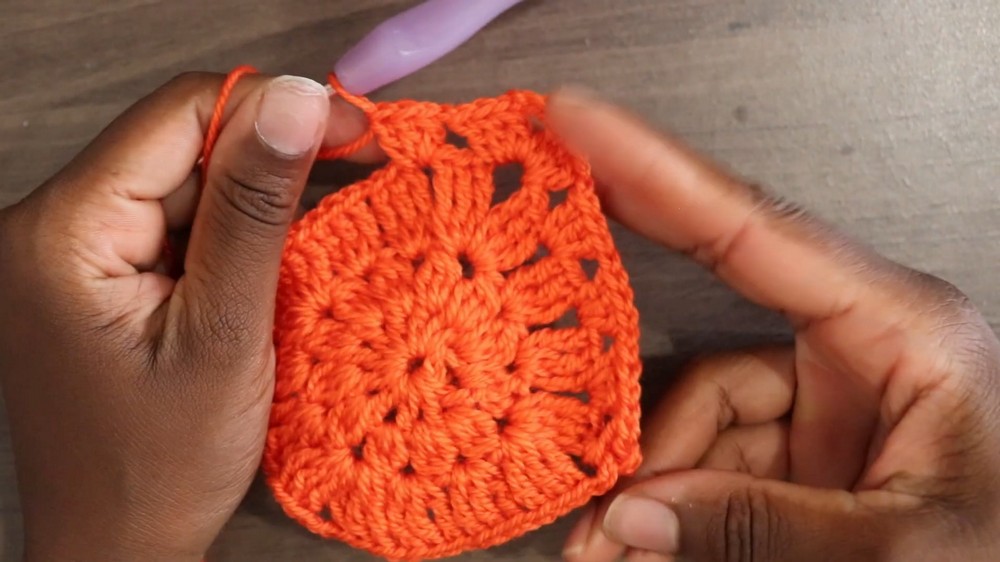
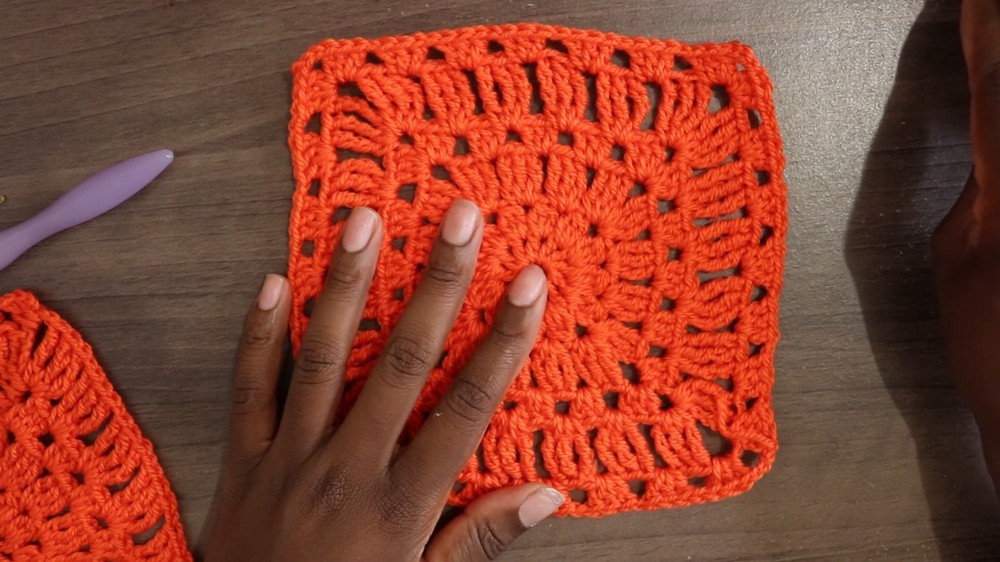
Step 1: Full Square Panel
Each square panel forms the "building blocks" of the top. You will need 3 square pieces for the complete top.
- Start with the Magic Ring:
- Round 1: Ch 4 (counts as the first double crochet and Chain 1), then work 12 double crochet (Dc) into the ring. Sl St into the third Ch to close the round. (12 Dc, including Ch 4 as 1st Dc)
- Round 2: Create Petals:
- Ch 3, work 3 Dc together (Cluster Stitch) in the same space without fully finishing Sts (leave loops on hook until the 3rd Dc), then YO and pull through all loops. Ch 2 and repeat around. You should finish with 12 "petals" or clusters.
- Close the round with a Sl St into the top of the starting chain.
- Round 3 (Forming Four Corners):
- Ch 4 to begin treble crochet (Tr).
- Work 3 Tr in each space between clusters from the previous row. Skip to the next corner space, and for corners, work (3 Tr, Ch 3, 3 Tr) into the same space.
- Rounds 4-5:
- Alternate with rows of Dc clusters (3 Dc per space) and repeat the corner setup:
- Corners = 2 clusters in one space with Ch 3 in between.
- All other spaces = 1 cluster per space.
- Chain 1 between non-corner clusters.
- Alternate with rows of Dc clusters (3 Dc per space) and repeat the corner setup:

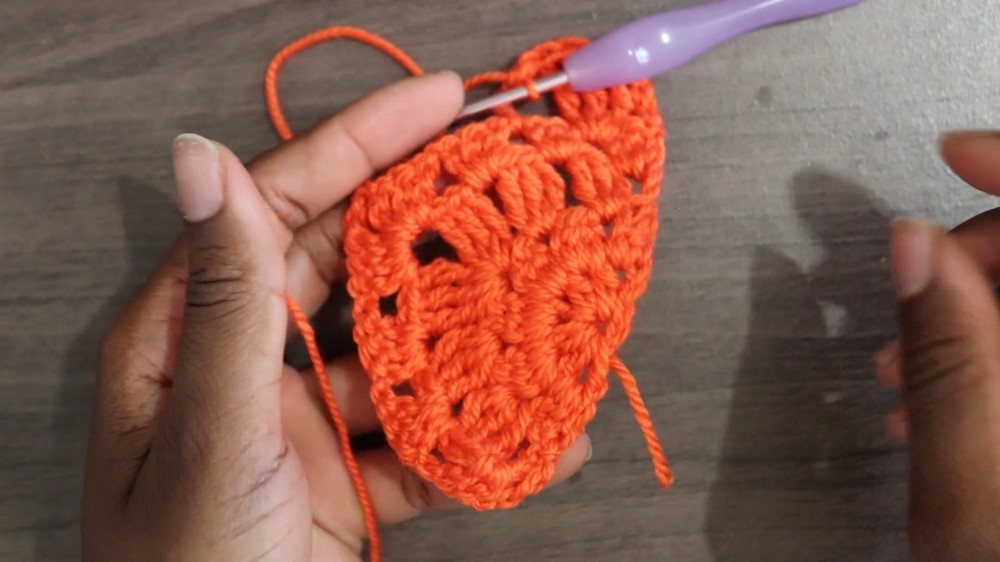
Step 2: Half Triangle Panels
You will need 3 half triangle panels for this project (used to balance the design along the neckline and back).
- Start with the Magic Ring:
- Round 1: Ch 3, make 7 Dc into the ring. Pull the ring tight and turn the work. (8 stitches, with Ch 3 counting as 1st Dc)
- Round 2:
- Form clusters in rows (working flat):
- Ch 3, make 1 cluster of 3 Dc in the row's first space.
- Chain 2 between clusters and make 2 clusters in the last space to form the triangle edge.
- Form clusters in rows (working flat):
- Rounds 3-4:
- Repeat, adding corners when needed by working 2 clusters with extra Ch 3 for corner formation.
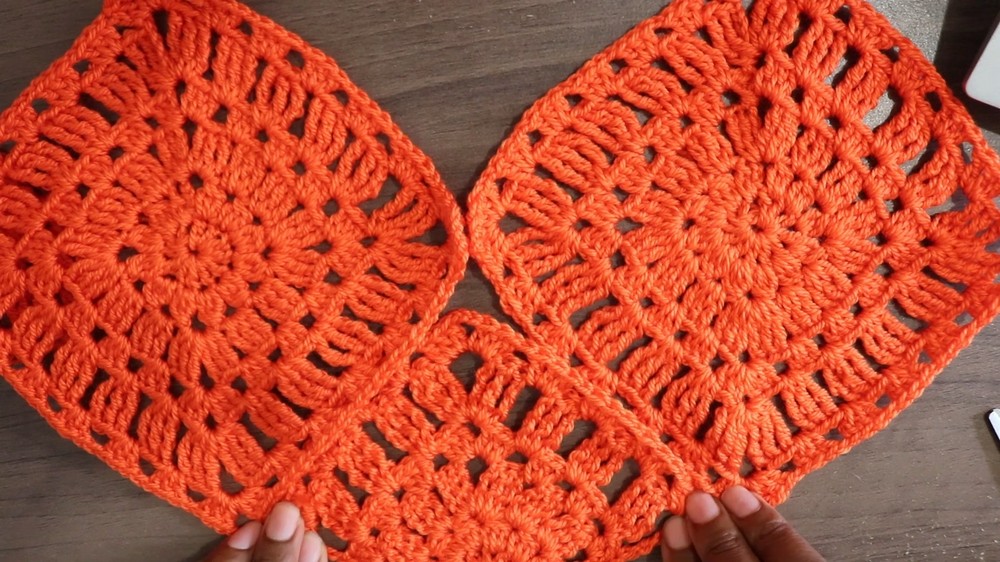
Step 3: Assembly
- Arranging the Squares and Triangles:
- Place 3 full square pieces for the body of the top.
- Add 3 half-triangle panels to define the neckline and back shape.
- The arrangement: 2 square panels at the front, one square panel for the back, and the triangular shapes placed symmetrically.
- Joining the Panels:
- With the right sides together, use single crochets (Sc) to join the squares and triangles along their edges.
- Make sure the corners and clusters align to maintain symmetry.
- Edges and Straps:
- After joining all panels, work single crochet (Sc) around the top's edges to create a clean border.
- For the straps:
- Chain 80 for each strap (or adjust the length if needed).
- Work single crochet (Sc) or half-double crochet (Hdc) along the chain for a thicker look.
- Attach the straps to the corners of the front squares for a perfect fit.


Customization Ideas
- Add Rows for Larger Sizes:
- Continue adding rounds to the square and triangle panels to increase their size. For example, add extra rows of Dc clusters to the panels if making a size larger than Small/Medium.
- Adjust Strap Length: Longer straps can be tied at the back or crossed for support.
- Embellishments: Add beads or buttons to the straps, or use contrasting yarn for borders.
- Add Fringe: For a boho look, attach fringe along the bottom edge of the top.
Tips for Success
- Test Your Gauge: Ensure your squares and triangles are uniform in size, as this will impact the final fit of your crochet top.
- Use Stitch Markers: Mark corners or specific points during assembly for even alignment.
- Block Before Assembly: Steam or pin-block your squares and triangles for even dimensions before joining.
- Neat Color Changes: Ensure to weave in ends carefully for a polished and professional finish.
Conclusion & Final Look
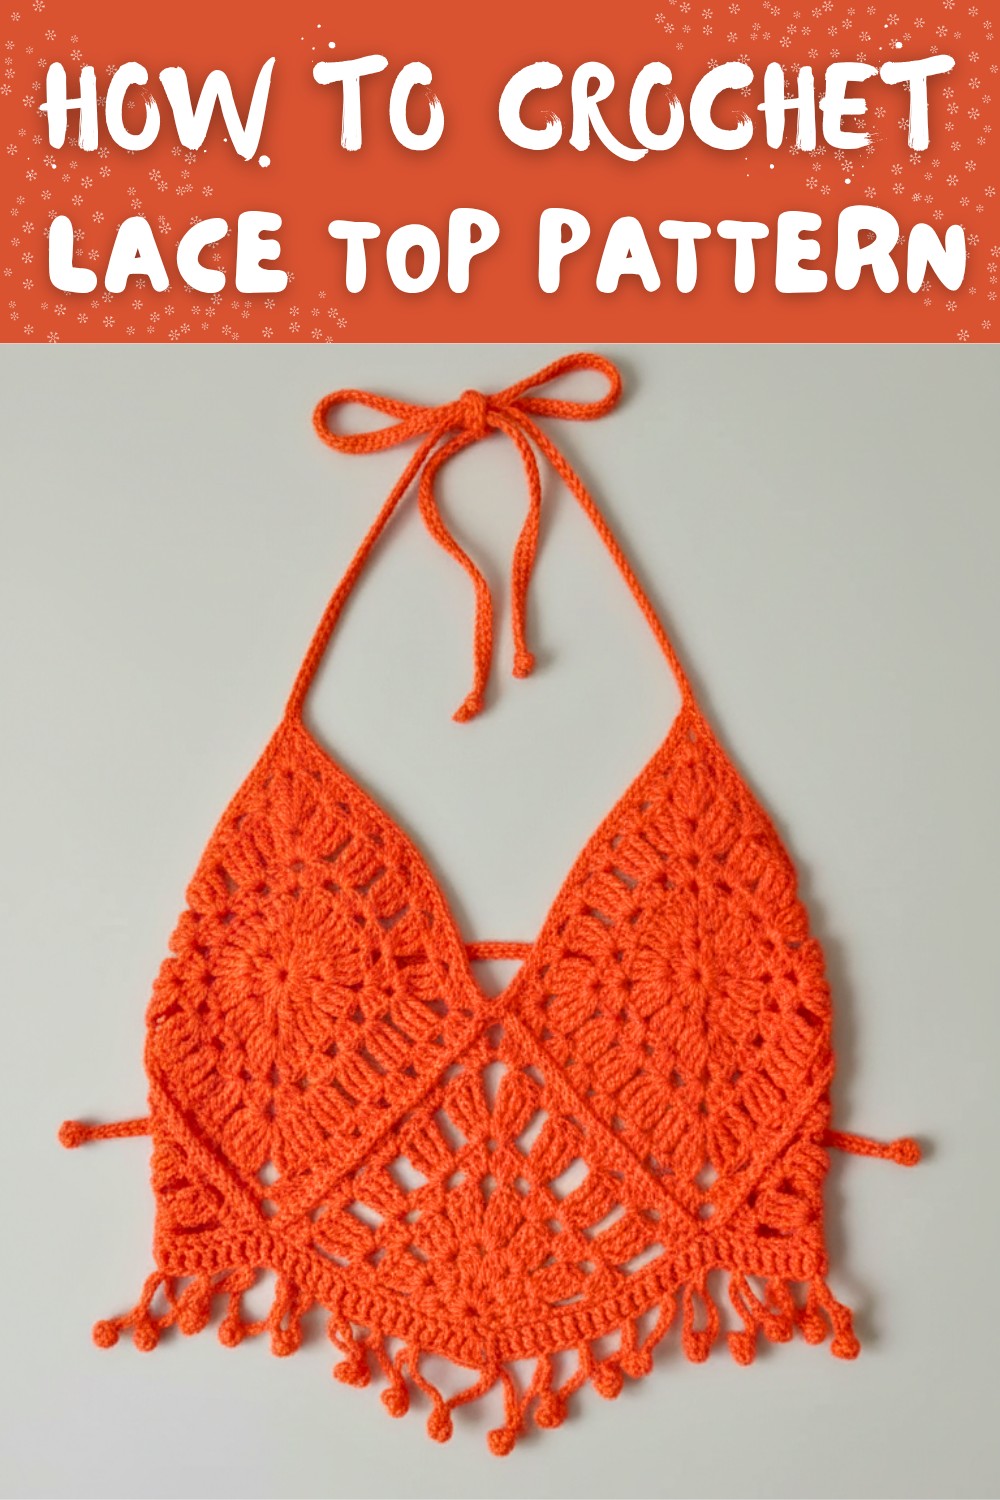
Your crochet cropped top is now complete! The finished top showcases an attractive bohemian vibe with alternating textured squares and intricate triangle panels, perfect for layering or wearing solo. You can pair this top with high-waisted shorts, skirts, or a tank top underneath for a chic statement.
Important Notes
- This project is straightforward and beginner-friendly in construction but requires patience for the assembly process. Take your time to align panels carefully.
- Feel free to experiment with colors and patterns to add a personal, creative spin on this design. Lacy edges or scalloped finishes could elevate the aesthetic further.
- This is a versatile pattern that can be adjusted to suit various sizes and preferences.