
Free Crochet Bow Pattern Using Scrap Yarn
Style every project with Free Crochet Bow Pattern offering sweet decorative charm for hair accessories, clothing and festive decorations.
I've always loved adding little handmade touches to my outfits and gifts, and crocheting bows has become one of my favorite quick projects. This cute accessory is perfect for decorating hair clips, hats, or even gift packages. With just a few small changes, you can also turn the Free Crochet Bow Pattern into bigger bows for headbands or smaller ones for embellishing bags and clothes. It's such a simple but versatile pattern that lets you personalize so many things.
The crochet bow stands out with its charming, classic shape-symmetrical loops with a neat center knot that gives it an elegant finish. Its texture is soft but firm enough to hold the bow's shape well, making it ideal for both wearables and décor. The style is timeless and sweet, effortlessly adding a delicate, handmade feel wherever you use it. Whether bright and colorful or subtle and neutral, these bows add a lovely accent that can brighten up any accessory or gift.
Crochet Bow Pattern for Hats, Bags, and More

This project is great for beginners who know basic stitches and want to practice creating shapes with crochet. The pattern mainly uses simple stitches that come together quickly without being too tricky. It's a satisfying and quick make, perfect for when you want to crochet something adorable without spending hours.
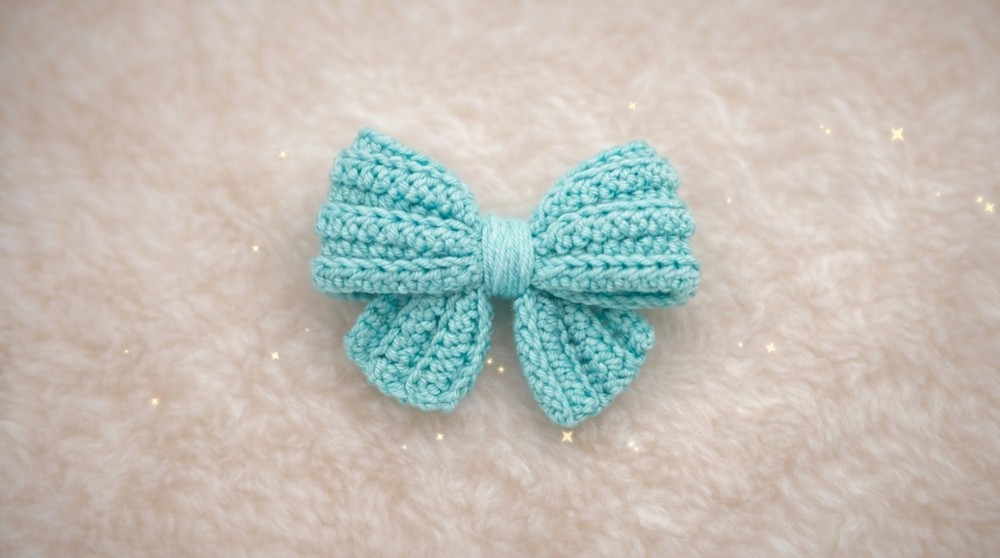
Crocheted bows make wonderful handmade gifts, especially when added to hair accessories or wrapped around presents. They also work well as fun collectibles if you like making sets in various colors and sizes. If you enjoy small, sweet projects that add charm and personality to your project, this bow pattern is definitely worth trying. It's easy, enjoyable, and sure to bring a smile to your face and those who receive your creations!
Cozy Crochet Bow Pattern
This charming crochet bow is surprisingly simple to craft, boasting no sewing or stuffing-and no magic ring! Designed to be soft, neat, and perfectly shaped, this bow makes an ideal decorative accessory for gifts, hairbands, or home décor. The textured finish is achieved by working stitches in the back loop only after an initial foundation row, adding an elegant dimension to your creation.
Skill Level & Terminology
- Skill Level: Beginner to Intermediate
- Terminology: This pattern uses US crochet terms to describe stitches throughout.
Crocheters familiar with chain (ch), half double crochet (hdc), single crochet (sc), and slip stitch (sl st) will find this pattern straightforward. Working in the back loops only is featured to enhance texture but is clearly explained.
Materials & Tools
- Yarn: Medium weight cotton or acrylic yarn (five-ply or similar thickness recommended for good shape)
- Crochet Hook: Size recommended for your yarn (approximately 3.5mm to 4mm)
- Accessories: Yarn needle for weaving in ends, scissors.
Gauge
Gauge is not critical for this project, but consistent tension will ensure a uniform look and shape. For best results, try to maintain a neat tension on your half double crochet stitches.

Abbreviations List
- ch - chain
- hdc - half double crochet
- sc - single crochet
- sl st - slip stitch
- bpl - back loop only
Special Stitch Instructions
Working in Back Loop Only (BLO)
To create the soft ribbed texture, insert your hook into the back loop (the loop furthest from you) of each stitch instead of both loops, then complete the stitch as usual.
Finished Size
- Approximate dimensions: 15 cm (6 inches) wide and 5 cm (2 inches) tall once shaped and secured.
- Size may vary lightly depending on yarn thickness and hook size.
The Pattern Itself
Foundation Row - Slip Knot & Chain
- Begin with a slip knot on your hook.
- Chain 68 stitches, then add 1 turning chain.

You now have the base chain of the bow, which forms the length of your strip.
Row 1 - Start the Bow
- Skip the first chain after the hook.
- Work 1 half double crochet (hdc) into each of the next 7 chains.
- Work 6 slip stitches (sl st) in the following 6 chains.
- Work 1 hdc into each of the next 18 chains.
- Work 6 sl st in the next 6 chains.
- Again, work 18 hdc in the next 18 chains.
- Work 6 sl st in the following 6 chains.
- Finish the row with 7 hdc in the last 7 chains.
- Chain 1 and turn your work for the next row.

This establishes a structured base with sections of half double crochet separated by slip stitches to create the bow's subtle contours.
Rows 2 to 5 - Back Loop Only Texture
- From now on, work into the back loop only for a softer textured bow.
- Row 2:
- Work 7 hdc in the first stitches (back loop only).
- Work 6 slip stitches.
- Work 18 hdc in the following stitches.
- Work 6 slip stitches.
- Work 18 hdc again.
- Work 6 slip stitches.
- Finish with 7 hdc.
- Chain 1 and turn your work.
- Repeat Row 2's pattern exactly for Rows 3, 4, and 5.
Working in the back loop only enhances the bow's softness and delicate ribbing effect.
Row 6 - Edge Variation and Finishing
- Begin with 7 single crochet (sc) stitches at the row start to provide a firm edge.
- Work 6 slip stitches.
- Continue with 18 hdc.
- Again, work 6 slip stitches and 18 hdc following the established rhythm.
- Complete the row with 6 slip stitches and finish with 7 single crochets.
- Fasten off and leave long tails for weaving.

The changes on the edges provide stability and a polished finish to the bow before shaping.
Assembly & Finishing
Shaping the Bow
- Take your long crochet strip.
- Pull the strip gently, bringing the ends toward the center, allowing the bow shape to form naturally around the gathered middle section.
- Wrap a length of yarn tightly around the center to secure the bow shape firmly.
- Tie off and neatly weave in the yarn ends, hiding them within the wraps.

Your bow will now hold its shape perfectly without any sewing or stuffing.
Usage Suggestions
- Attach this bow to hairbands, clip it onto gifts, or use it as a charming embellishment for clothing or home décor.
- Its softness and neat finish make it very versatile and suitable for many creative projects.
Summary of the Pattern
- Start with a slip knot and foundation chain of 68 + 1.
- Row 1 sets the base with hdc and sl st sections.
- Rows 2 to 5 create texture by working half double crochets in the back loops only, maintaining the slip stitch separations.
- Row 6 adds a firmer edge with single crochets and finishes the strip.
- Shape by gathering the strip and secure with yarn wrapping.
- Weave in ends to complete your neat, soft bow.
Final Notes
- This pattern is beginner-friendly but includes a slight texture technique to add interest.
- Keep tension consistent, especially when working back loops for an even texture.
- Adjust the chain length for wider or narrower bows as preferred.
- No sewing or stuffing needed - simplicity with style!
