Free Crochet Valentino Bag Pattern for Every Occasion
Stand out wherever you go with this free crochet Valentino bag pattern made for modern looks and everyday convenience.
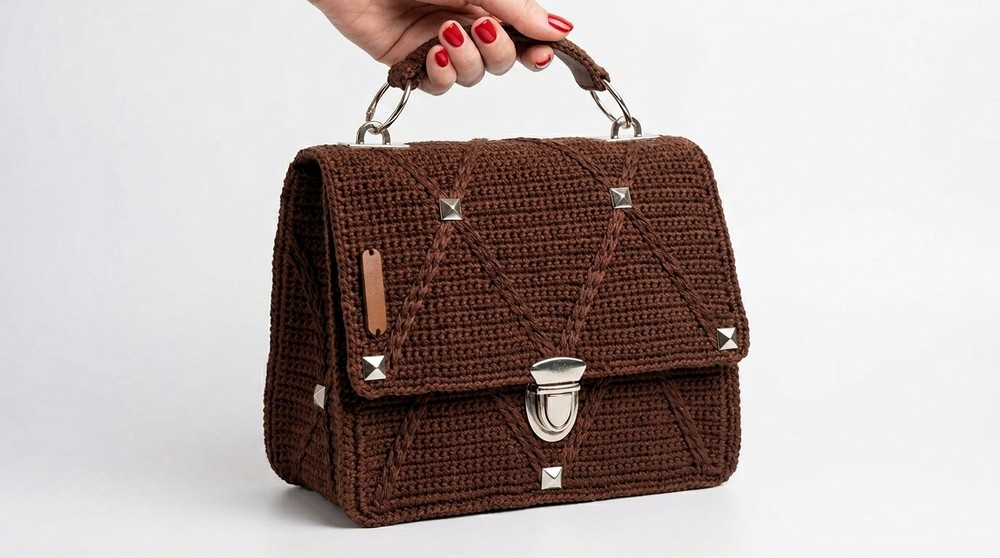
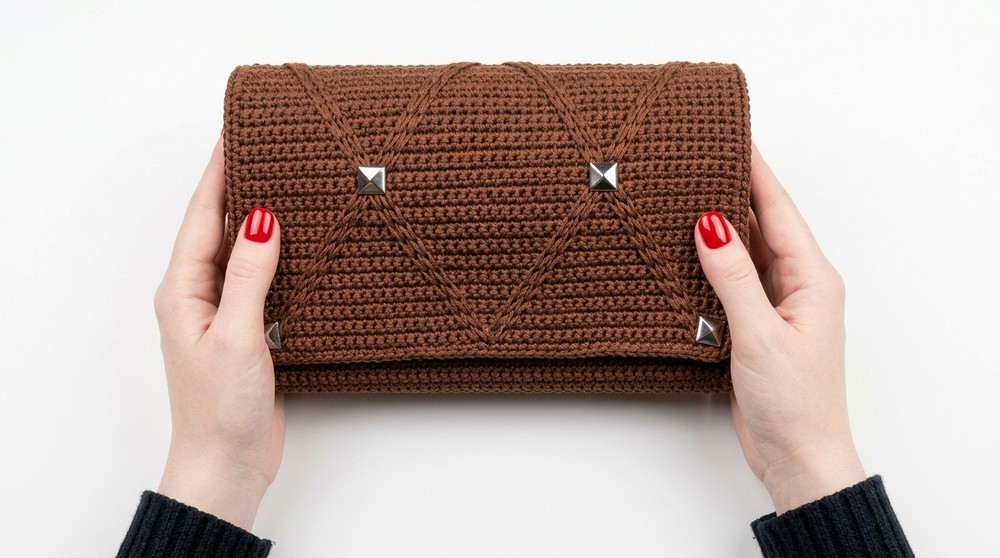
Do you love making fun and stylish things using yarn? This Free Crochet Valentino Bag is the perfect project for you. It is more than just a regular accessory. It stands out with its clean edges and lovely cross stitch patterns. It's simple to work on and looks luxurious once finished. The size is just right for everyday use-20 cm wide and 31 cm long. You can use it to carry small daily items like your phone, wallet, makeup, or even snacks.
Making this bag doesn't require hard to find materials. You just need polyester yarn, a 5mm crochet hook, and a few extras like rings or fabric for lining. The yarn adds strength and durability to the bag, making it reliable even for daily errands or outings.
Quick and Easy Crochet Valentino Bag Pattern Free

What makes this project fun is how you can pick any color yarn to personalize it according to your taste. You can match it with your favorite outfit or select cheerful colors for a fresh look.
Once finished, the bag can have cute finishing touches like fancy handles or a matching strap. The design makes it suitable for all occasions-whether you're grabbing something quick from the store or heading out to meet friends. Its sleek yet sweet look will have people wanting one for themselves.
This bag is a mix of both beauty and usefulness. It lets you turn your free time into something truly rewarding. The perfect combination of yarn and crochet talent will make this Valentino inspired bag a treasure you'll cherish forever.
Crochet Valentino Bag Pattern
Finished Size
- Dimensions: Width - 20 cm (7.87 inches), Length - 31 cm (12.20 inches).
- These measurements are based on 84 rows of single crochet. Modify according to your needs.
Materials Required
- Yarn: Polyester yarn (without brand, use durable yarn suitable for bags).
- Hook: 5 mm crochet hook (Tulip brand used in tutorial).
- Tools:
- Stitch markers (optional, for corners).
- Scissors.
- Yarn needle (for sewing ends).
- Decorative Elements: D rings, lining fabric, or optional accessories (charms, hooks).
Gauge
While gauge isn't specified, it's important to ensure uniform stitches. Create a swatch using 10 rows of single crochet to confirm the bag's dimensions align with the finished size.
Crochet Techniques
- Single Crochet (sc): Insert the hook into a stitch, pull the yarn through, yarn over, and pull through both loops.
- Slip Stitch (sl st): Insert the hook into a stitch, yarn over, and pull through all loops.
- Chain Stitch (ch): Create a foundation chain by pulling yarn through the loop on the hook.
Step by Step Instructions
Step 1: Foundation Chain
- Start with a slip knot on your hook.
- Wrap yarn around your finger and pull a loop through.
- Create 47 chains (ch) by repeatedly yarn over and pulling through.
Step 2: First Row
- Skip the first chain near the hook, insert the hook into the second chain.
- Work 1 single crochet (sc) into this chain.
- Continue working 1 sc into each of the next 45 chains-this completes the first row.
Step 3: Repetition Rows
- Turn your work at the end of the first row and chain 1 (this acts as the turning chain).
- Continue working 1 sc into each stitch across the row.
- Repeat this process until you have completed 84 rows.
- Tip: Check the dimensions at this stage. The fabric should measure 20 cm wide and 31 cm long.
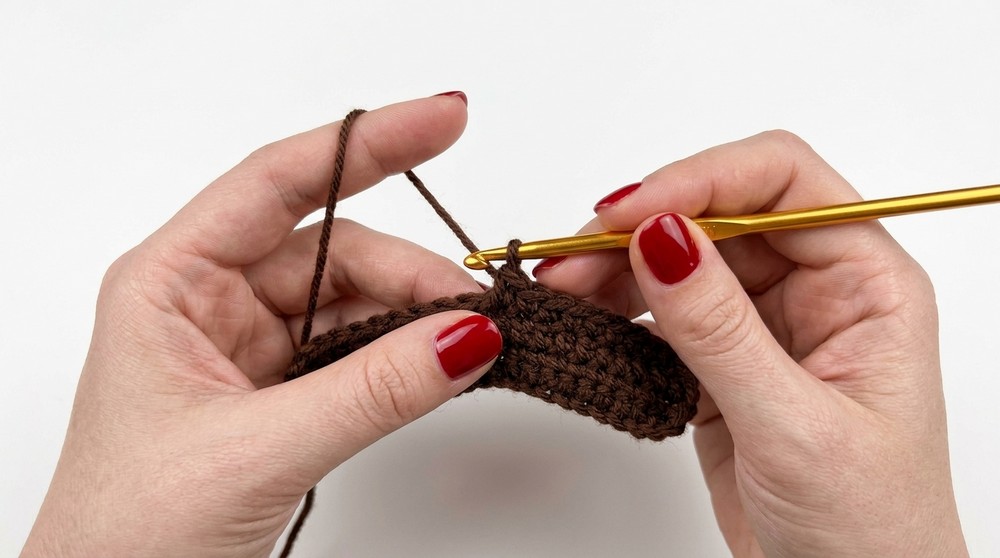
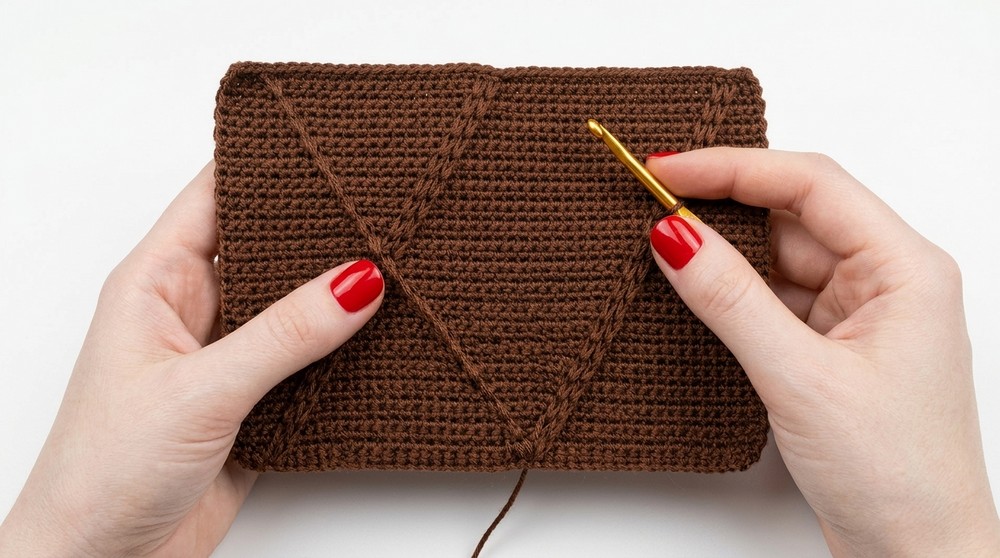
Step 4: Cross Motif Decoration
For a decorative front side, follow this process:
Creating the Cross Motif
- Flip to the front side of the crochet fabric.
- Locate the second loop from the corner:
- Insert your hook into this loop, yarn over, and pull through to create a slip stitch.
- Skip two rows, then make another slip stitch. Repeat this across the fabric to achieve the curved motif pattern.
Adding Rows for Cross Patterns
- Start the next motif 3 loops below the previous motif for proper alignment.
- Work through the same process:
- Slip stitches in every alternate row, creating symmetrical diagonal lines.
- Cut yarn after completing the motifs.
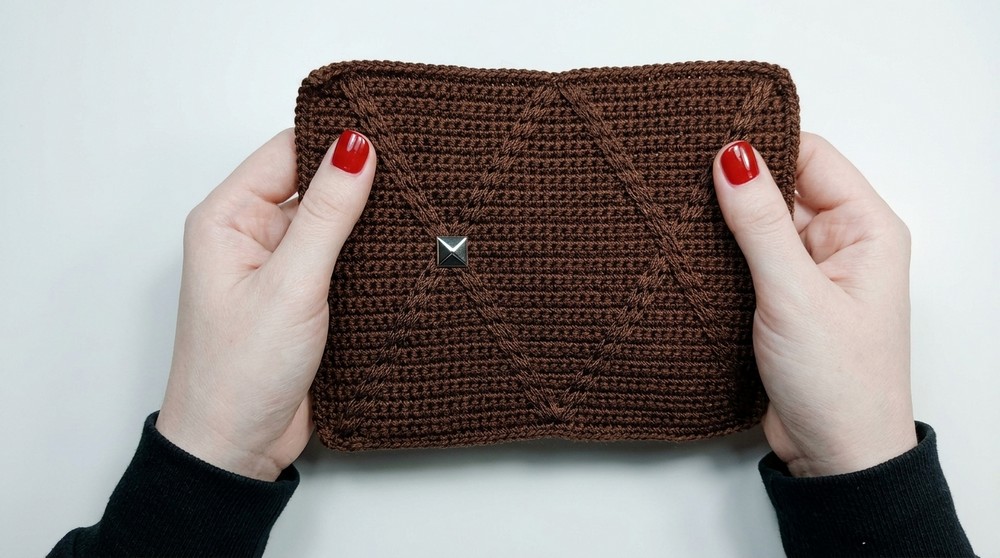
Step 5: Joining Edges
Once the motifs are complete, fold the fabric and join its sides to create the bag shape:
Slip Stitch Assembly
- Slip knot the new yarn on your hook.
- Insert the hook into the top corner of one side and the corresponding corner of the other side.
- Work slip stitches to join the edges.
- Chain 1 after every slip stitch for flexibility.
- Continue joining the fabric along the side edges.
Step 6: Bordering the Bag
Once the main structure is assembled, create a clean border:
Single Crochet Border
- Start by inserting the hook into the corner loop.
- Work 1 single crochet around the edges:
- Insert the hook, pull the yarn through, yarn over, and pull through both loops.
- At corner stitches, work 2 sc into the same loop to keep the structure neat.
Step 7: Adding Lining and Accessories
- Lining: Cut fabric to match the interior dimensions of the bag. Sew the lining using a needle and thread for a professional finish.
- Hardware: Attach D rings or decorative rings to the top corners or edges of the bag using sturdy slip stitches.
- Additions: You can sew on charms, hooks, or keyrings for personalization.
Step 8: Handles
The Valentino crochet bag can be handheld or converted into a crossbody bag:
Making Bag Handles
- Create a chain for your desired handle length (e.g., 30 cm). Ensure it's a multiple of two chains.
- Work across these chains using slip stitches to ensure strength and durability.
- Attach the handles to the bag's edges with secure slip stitches or sew them firmly.
Customization Ideas
- Size Adjustment: Increase the foundation chain count for a wider bag or add rows for a taller bag.
- Colors: Use gradient yarns for a unique look or switch between colors for stripes.
- Alternative Patterns: Replace cross motifs with chevron, dots, or other designs for added creativity.
- Handles: Create short handles for a tote bag or attach hooks for detachable straps.

Tips for Success
- Loose Stitches: Avoid tightening slip stitches when creating motifs; loose stitches ensure flexibility.
- Durability: Use sturdy yarn and double up hardware attachment points for longevity.
- Check Alignment: Ensure motifs align symmetrically before moving to the next row.
- Lining Choice: Use matching or contrasting fabric for an elegant interior finish.
Conclusion
The Valentino crochet bag is a stylish, functional project that introduces decorative techniques and practical assembly methods. Perfect for beginner and intermediate crocheters, it allows the crocheters to exercise creativity through design, accessories, and colors. With a blend of simple single crochet rows and beautiful motifs, this bag is both fashionable and highly customizable.
Final Remarks
Upon completion, your handmade Valentino inspired crochet bag will showcase elegance and style. Whether you use it for shopping, daily errands, or as a gift, its polished appearance is bound to impress. Add decorative elements like keyrings or hardware for an upgraded look.