
Easy Crochet Hanger Bag Pattern for Organizing Spaces
Refresh your closet with a creative crochet hanger bag that keeps your accessories organized while adding a touch of charm to your space.
Featuring a cozy, textured design, this hanger bag is both functional and stylish, with a neat pouch that hangs from a standard hanger to store lightweight items like scarves, socks, toys, or household essentials. Its structured yet soft shape makes it a tidy and aesthetically pleasing addition to any organization project, blending seamlessly into your home decor.
This Crochet Hanger Bag Pattern Will Blow Your Mind

This Crochet Hanger Bag Pattern is perfect for crocheters of all skill levels, offering a design that's easy to adapt and fully customizable. Whether you want a dainty, neutral toned bag to match farmhouse inspired spaces or a bold, colorful option for a playful vibe, the size, color, and style choices are endless. Consider using cotton yarn for a durable, breathable stuff that holds its shape well and highlights the stitch definition beautifully, or experiment with an acrylic yarn for a splash of vibrant color.

The pouch is built in rows or rounds with an open top, ready to be secured to your chosen hanger. To make the assembly seamless, you can crochet directly onto the hanger, or stitch it in place for convenience. Pro tip: Be sure to block your work if using cotton yarn for crisp results.
This design was born out of a love for creating simple, practical items that still feel special and unique. Don't hesitate to experiment with embellishments, trims, or even fun applique designs to make this project truly your own. Let your creativity run wild.
Project Details
- Skill Level: Beginner to Intermediate
- Finished Size:
- Circle Diameter: Approx. 4.5 inches (11.5 cm)
- Final Diameter (With Mane): Approx. 7 inches (18 cm)
- Strap Length: Adjustable (6 inches is used in the sample)
- Purpose: A charming wall hanger, perfect for nurseries, kids' rooms, or fun décor.
Materials
You will need the following:
- Yarn:
- Yellow (Main Color MC) - for the lion's face and ears.
- Brown or Orange (Contrasting Color CC) - for the mane.
- Black and White - for facial features.
- Hook Size:
- Tulip crochet hook, size 4/0 (2.5 mm).
- Accessories:
- Safety eyes (optional) or black embroidery thread for eyes.
- Stitch markers or a scrap thread to mark rows.
- Scissors, lighter (for yarn ends), and a yarn needle for assembly and sewing.

Gauge
- 12 single crochets = 2 inches (5 cm).
- Adjust hook size if your circle doesn't meet gauge.
Abbreviations
- Ch: Chain
- Sl St: Slip Stitch
- Sc: Single Crochet
- Hdc: Half Double Crochet
- Dc: Double Crochet
- Tr: Triple Crochet
- Sc Inc: Single Crochet Increase (2 Sc worked into 1 stitch)
- Rep: Repeat
Pattern Instructions
Step 1: Crochet the Body (Make Two Circles)
These circles will form the lion's front and back faces.
Circle Instructions
Round 1:
- Make a magic ring.
- Ch 1 and work 6 Sc into the magic ring. (6 stitches total)
- Pull the ring tightly closed and join with a slip stitch into the first Sc.
Round 2:
- Work 2 Sc into each stitch around (1 Sc Inc per stitch). (12 stitches total)
Round 3:
- Work Sc Inc, 1 Sc six times around. (18 stitches total)
Round 4:
- Work Sc Inc, 2 Sc six times around. (24 stitches total)
Round 5:
- Work Sc Inc, 5 Sc six times around. (30 stitches total)
Round 6:
- Work Sc Inc, 4 Sc five times, then finish with Sc Inc and 2 Sc in the final repeat. (36 stitches total)
- First Circle: Fasten off and weave in ends.
- Second Circle: Do not fasten off after Round 6 - continue to make the ears.

Step 2: Crochet the Ears
The ears are crocheted into the front loops of the second circle only.
- Locate the front loop of an available stitch on the second circle.
- Work the following pattern:
- Sl St into the front loop.
- Ch 2, make 3 Dc into the same loop.
- Ch 2, Sl St into the next front loop to complete first ear.
- Skip 6 stitches (front loops only) and repeat the ear pattern to make the second ear.


Fasten off and weave the ends neatly into the fabric.
Step 3: Assemble the Circles
Hold the two circles together, aligning the ears at the top. The next step involves joining the circles and creating the lion's mane all in one process.
Joining the Circles with Mane
- Attach your Contrasting Color (CC) yarn to the bottom of the ear on the second circle.
- To join the circles:
- Grab 2 loops from the top circle (second circle with ears).
- Grab the front loop only from the bottom circle (first circle).
Mane Ruffle Pattern
Work the following stitch sequence around the edge between the two circles:
- Ch 2, 3 Dc into the next stitch, Ch 2, Sl St into the next stitch.

Repeat until you've crocheted around the bottom edge of the lion. Stop when you reach the base of the second ear.

Step 4: Mane at the Top
To complete the mane, use the back loops of the bottom circle that were left unworked earlier.
- Attach the CC yarn to an available back loop.
- Work the same Ch 2, 3 Dc, Ch 2, Sl St pattern along the top edge.
- Continue until there are three ruffle sections across the top edge of the lion.
Step 5: Strap for Hanging
- After completing the top mane, Ch 45 (or a desired length) to create the hanging strap.
- Sl St into the same stitch to secure the loop.
- Resume the ruffle pattern along the remaining back loops until you meet the starting point.
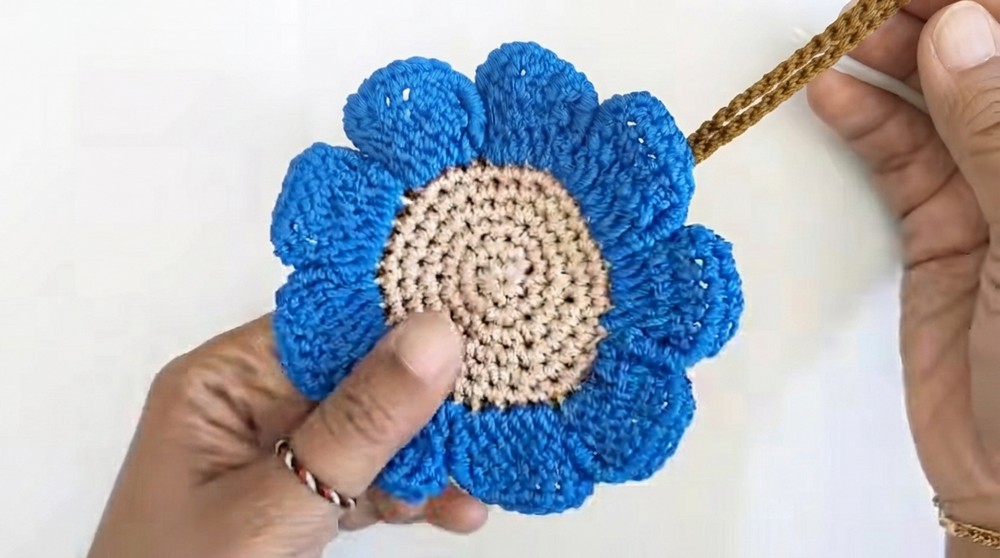
Step 6: Add a Flower Motif
The flower like pattern is made separately in the remaining back loops of the bottom circle.
- Attach the CC yarn to the first back loop.
- Work the petal pattern as follows:
- Ch 4, 2 Tr into the same back loop.
- In the next back loop, 2 Tr.
- Ch 4, Sl St into the next back loop to complete the petal.
- Repeat this petal pattern around the circle to create 9 petals.
Finishing the Flower:
- Work single crochet stitches around each petal for definition:
- Add 4 Sc into Ch 4 spaces.
- Add 6 Sc into Tr stitches.
Step 7: Create the Lion's Face
- Eyes: Attach safety eyes or embroider small circles using black yarn. Position the eyes evenly spaced above the nose placement.
- Nose and Mouth:
- Using black yarn, embroider a triangular nose at the lion's center.
- Add a vertical line below the nose and small curved lines for the mouth.

Tip: Use pink yarn to create subtle cheek details below the eyes.

Customization Ideas
- Color Play: Swap traditional yellow and brown for bold or pastel colors to fit your décor theme.
- Textured Yarn for Mane: Use boucle yarn to add a 3D, fluffy effect to the mane.
- Strap Alternatives: Replace the crocheted strap with ribbon, rope, or leather for a more polished look.
- Add Accessories: Attach a small bow, pom pom, or even beads to give the lion a playful twist.

Tips for Success
- Tension Control: Keep your stitches consistent to avoid misshapen circles.
- Marker Usage: Use stitch markers in the first stitch of each round to track your progress.
- Tidy Finishing: Always weave in or tidy thread ends thoroughly with a needle or lighter for a professional look.

Finishing Touches
Congratulations, Your crochet lion hanger is complete. The finished project showcases a vibrant face with ruffled mane and customizable facial details. Hang it in a nursery, living area, or even gift it to a loved one - it's sure to bring joy anywhere.
This project encourages creativity while providing practical crocheting experience. Feel free to experiment with colors, textures, and personalization to make this lion hanger truly your own.