
How to Free Crochet Wallet Pattern for Stylish Storage Solutions
Stay chic and organized with a free crochet wallet pattern designed for convenience, durability, and endless creative possibilities.
A truly functional accessory can also be an effortless expression of style and creativity. This crochet wallet pattern offers a sleek yet versatile way to organize your cards, IDs, and small essentials while showcasing your handmade touch. Built using strong, durable fibers and innovative stitching techniques, this wallet pattern combines the charm of minimalism with the practicality of modern design. The thoughtfully crocheted magnetic button closure not only secures your belongings but adds a polished finish to this everyday companion.
Must-Try Free Crochet Wallet Pattern Styles for Modern Accessories
With its compact size and dual compartments, this pattern is perfect for those who value efficiency without sacrificing aesthetics. Whether used for personal storage or gifted as a thoughtful token, its adaptable pattern allows endless opportunities for customization.

Its easy crochet process makes it an approachable project for beginners and an engaging challenge for seasoned crocheters looking to refine their organizational stitching skills. By turning simple supplies into something both functional and artful, this wallet transforms the everyday into something truly remarkable.

Materials Needed
- Polyester cord (4 mm): Recommended for its durability.
- Tip: Choose a neutral or vibrant color to match your style.
- Crochet hook size 4 mm
- Tapestry needle: For weaving in ends and sewing.
- Stitch markers: Optional, but helpful for marking important sections.
- Magnetic button (14mm): Costurable or snap-style, as per your preference.
- Sewing thread and needle (for the button)
- Scissors
- Lighter: To melt the ends of the polyester cord to avoid fraying.
Special Features
- Two Compartments: Ideal for neatly organizing cards, IDs, and documents.
- Magnetic Button Closure: Adds ease and security for everyday use.
- Customizable Size: Adjust by changing the number of foundation chains and rows.
- Durability Using Polyester Cord: Ensures the wallet holds its shape over time.
Step-by-Step Process
1. Create the Base
- Start with a slip knot: Leave a 10 cm tail of polyester cord. Loop the cord and pull it through the hook to form the knot.
- Foundation chain: Crochet 33 chains. Ensure the chains are uniform in size. Avoid making them too tight to allow ease in the next row.
- Tip: Pull the yarn gently to create a balanced chain stitch.
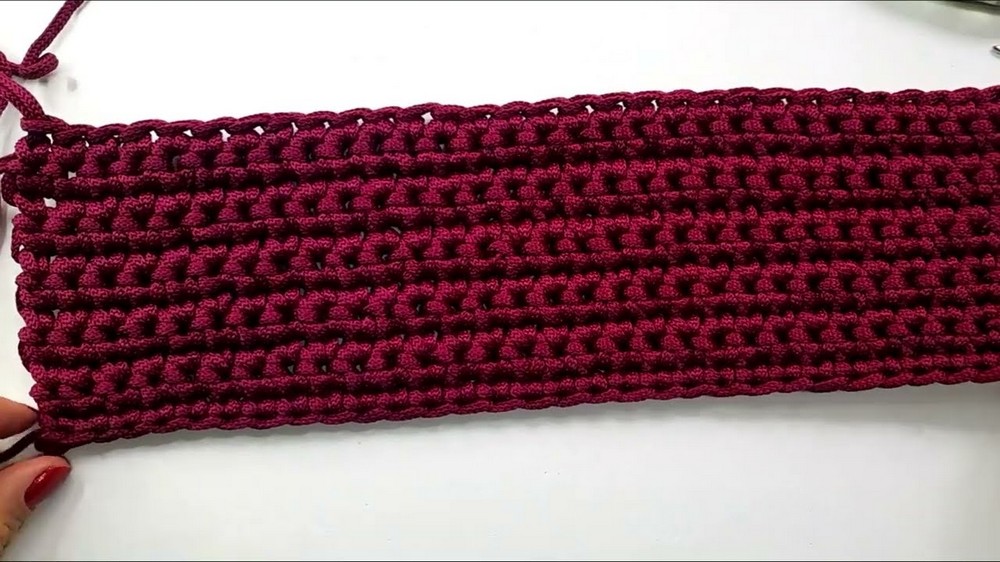
- Row 1: Work single crochets across the chain.
- Skip the first chain from the hook.
- Starting in the second chain, insert the hook into the back loop of each chain, yarn over, pull through, yarn over again, and pull through both loops. (This is the single crochet stitch.)
- Continue until the end of the row, creating 32 single crochet stitches.
- Row 2-Onwards: Turn your work at the end of each row. Chain 1, then repeat single crochet stitches in both loops across.
- Repeat until you have 11 rows.
- Measuring the Base: The finished base should measure approximately 35 cm by 10 cm. The exact measurement can vary based on yarn tension and hook size. Adjust for your preferred dimensions.

2. Define the Compartments
- Fold the base to create two sections, leaving a 4-stitch gap in the center for flexibility.
- Locate the center point of the piece. Count 16 stitches on either side and place stitch markers to mark each section. The markers will guide where to form a crease for the partitions.

3. Sew the Compartments
- Use the same polyester cord for sewing. Cut a piece of cord three times the length of the side you'll sew.
- Thread the tapestry needle and start sewing each side of the wallet. Work in a zigzag or whip stitch, catching two loops from each side for consistency.
- Tip: Burn the end of the cord lightly with a lighter to prevent fraying before threading.
- Sew from the bottom of the wallet up to the top edge. Repeat on the second side.
- To ensure symmetry, sew in one direction and return in the opposite direction to fill in any gaps.


4. Attach the Magnetic Button Closure
- Positioning: Place the bottom half of the button on the front flap of the wallet. Ensure that when the flap closes, it aligns properly with the bottom piece.
- Sewing the Button: Use a strong sewing thread or invisible thread to secure the button. Ensure it's tightly attached.
- Attach the corresponding button part on the base of the wallet, following the same steps. Double-check that the button closes smoothly before tying off the thread.
Finishing Touches
- Trim any loose threads or end pieces.
- Smooth out the wallet edges and adjust the shape if necessary.
- Test the closure to ensure the button secures properly.

Tutor's Suggestions
- Yarn Tension: Keep your tension consistent for neat stitches.
- Custom Colors: Experiment with different cord colors to suit your style.
- Sizing Alteration: If creating smaller or larger wallets, adjust the chain count (width) and row count (height).
- Care: To maintain a polished look, avoid overstuffing the wallet and keep it away from sharp objects.
Special Uses
This wallet is ideal for organizing IDs, bank cards, and small documents. It also works great as a handmade gift or craft fair item. Its compact size makes it a practical, easy-to-carry accessory.
Final Tip
To ensure a professional finish and durability, periodically check your stitches during the project. Keep burning the edges of the polyester cord after cutting to avoid fraying issues.
Conclusion
This crochet wallet pattern delivers both functionality and style with its neatly organized compartments and chic magnetic closure. It's a project perfect for beginners looking to expand their skills or seasoned crocheters seeking a practical daily-use item. Whether for personal use or gifting, this pattern is sure to impress with its thoughtful design and handmade touch. Keep practicing, and you'll master this pattern in no time!

Complete Remarks:
This project teaches the essentials of working with durable cords and designing structured pieces with ease.